


14
15
M12
ICAV3
...........................12 V
.........................720 g
.......................2744 mm
........................12,4 mm
............... 320 x 240 pixel
...........................30 M Pixel
........................... 4x
..........................4,5 h
.................SD-Card
...........................32 GB
..........2402-2480 MHz
....................5,07 dBm
WARNING! Read all safety warnings and all
instructions.
Failure to follow the warnings and instructions
may result in electric shock,
fi
re and/or serious injury.
Save all warnings and instructions for future reference.
SAFETY INSTRUCTIONS INSPECTION CAMERA
Switch o
ff
the mains fuse for the relevant area when working
behind walls.
When working in pipes, make sure that these are not live or
electrically charged. The pipes must not contain any liquid.
The camera and the device must not come into contact with
liquid.
The camera and the cable must not come into contact with
oil, gas or other materials capable of causing corrosion.
To reduce the risk of explosion, electric shock and property
damage, always check the work area before beginning a
job. Do not allow cable to contact electrical, chemical, or
moving hazards.
Auto use: Turn o
ff
the engine and allow to cool before
beginning inspection. Do not allow the visual inspection
camera or cable to contact oil, gas, or other corrosive
materials.
To reduce the risk of damage to the tool, do not use
excessive force or “kink” the cable. Do not use in areas
where vi-sual inspection camera and cable will contact
corrosive or oily substances.
Do not use the cable to clear clogs or move obstructions.
This is not a drain cleaner!
SAFETY INSTRUCTIONS BATTERY
Do not try to replace the battery pack if the surface of the
instrument is wet.
Disconnect all the cords and cables from the object under test
and power o
ff
the instrument before removing or inserting the
battery pack.
Do not dispose of used battery packs in the household refuse
or by burning them. Milwaukee Distributors o
ff
er to retrieve old
batteries to protect our environment.
Do not store the battery pack together with metal objects (short
circuit risk).
Use only System M 12 chargers for charging System M 12
battery packs. Do not use battery packs from other systems.
Battery acid may leak from damaged batteries under extreme
load or extreme temperatures. In case of contact with battery
acid wash it o
ff
immediately with soap and water. In case of eye
contact rinse thoroughly for at least 10 minutes and
immediately seek medical attention.
Warning!
To reduce the risk of
fi
re, personal injury, and
product damage due to a short circuit, never immerse your
tool, battery pack or charger in
fl
uid or al-low a
fl
uid to
fl
ow
inside them. Corrosive or conductive
fl
uids, such as
seawater, certain industrial chemicals, and bleach or bleach
containing products, etc., Can cause a short circuit.
This appliance is not intended to
be used or cleaned by persons
with reduced physical, sensory or
mental capabilities, or lack of
experience or knowledge, unless
they have been given instructions
concerning the safe use of the
appliance by a person legally
responsible for their safety. They
should be supervised whilst using
the appliance. Children shall not
use, clean or play with this
appliance, which when not in use
should be secured out of their
reach.
SPECIFIED CONDITIONS OF USE
The digital inspection camera can be used to view and
inspect areas that are hard to access. It is ideal for the rapid
and simple localisation of problems and objects without
having to open or damage items. The recordings can be
saved as images or movies on the memory card.
Appliance with strong radiated disturbances may be
in
fl
uence display function, it would be self-recovered when
interference was removed.
Do not use this product in any other way as stated for
normal use.
RADIO FREQUENCY INTERFACE REQUIREMENTS –
RELATED TO EUROPEAN INSTALLATION
Note: This equipment has been tested and found to comply
with the limits for a EN 300 440 v2.1.1 receiver Category 3.
These limits are designed to provide reasonable protection
against harmful interference in a residential installation.
This equipment is sensitive to other equipment that
intentionally generates, radio frequency energy in the
2402-2480MHz that may conduce to the instability to use
the Remote Control on it. However there is no guarantee
that interference will not occur in a particular installation. If
ENGLISH
ENGLISH
TECHNICAL DATA
INSPECTION CAMERA
Battery voltage.........................................................................
Weight with battery ..................................................................
Camera cable length ...............................................................
Camera head ...........................................................................
Screen resolution.....................................................................
Picture resolution .....................................................................
Max. zoom ...............................................................................
Max. battery life (1,5 Ah)..........................................................
Type of memory card ...............................................................
Max. memory size SD-card .....................................................
Frequency band(s) of Bluetooth ..............................................
Maximum radio-frequency power transmitted in the
frequency band(s)....................................................................
this equipment su
ff
er from the harmful interference from
another radio device to radio this can be determined by
turning the respective equipment o
ff
and on, the user is
encouraged to try to correct the interference by one or more
of the following measures:
Turn o
ff
the disturbance equipment
Increase the separation between the disturbance equipment
Consult the dealer or an experienced radio technician for
help
EC-DECLARATION OF CONFORMITY
Hereby, Techtronic Industries GmbH declares that the radio
equipment type M12 ICAV3 is in compliance with Directive
2014/53/EU. The full text of the EU declaration of conformity
is available at the following internet address: http://services.
milwaukeetool.eu.
GB-DECLARATION OF CONFORMITY
Hereby, Techtronic Industries GmbH declares that the radio
equipment type M12 ICAV3 is in compliance with Directive
S.I. 2017/1206 (as amended). The full text of the GB
declaration of conformity is available at the following internet
address: http://services.milwaukeetool.eu.
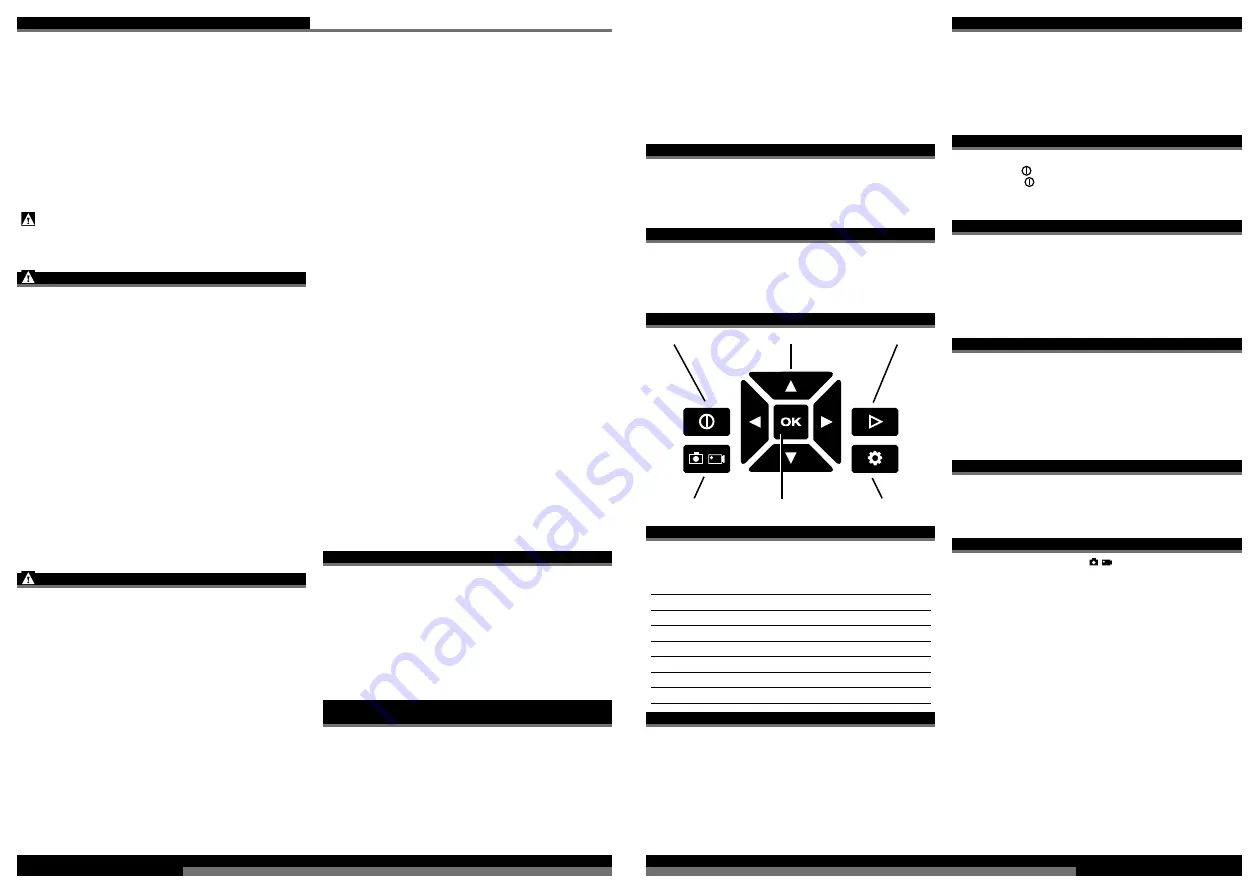
BUTTONS
Power Button
Arrow Buttons
Playback Button
Picture / Movie toggle
OK Button
Setting Button
SETTINGS
To enter the settings menu, turn on the tool and press the
Settings button. Use the
◄►▲▼
buttons to move through
the setting menu.
MENU SELECTIONS
MICROPHONE ON/OFF
LCD BRIGHTNESS
LOW/MEDIUM/HIGH
DATE MM/DD/YY
TIME HR/MIN
AM/PM
LANGUAGE MULTIPLE
SELECTIONS
DELETE ALL
CANCEL/DELETE ALL
VERSION
Display the software version.
CHARGING THE DISPLAY
When the display and handle are connected, the battery
pack will power both the handle and the display. When
separated, the display runs o
ff
of an internal rechargeable
battery. To recharge the display, connect it to the handle/
battery pack, or to a power source via USB cable. Always
store the display docked on the handle. If the display shuts
down due to low power, recharge for at least 30 minutes
before use.
DOWNLOADING TO A COMPUTER
Insert the USB cable into the port on the side of the display.
Connect the USB end into the USB port on your computer.
NOTE: If you are unable to view the videos on your
computer it may be because your computer is missing the
DIVX or XVID codec. The AVI
fi
le is recorded in MPEG4
format and your computer needs a DIVX or XVID codec to
decode and play it. Download the appropriate codec to view
the images/videos.
TURNING ON/OFF
When the display is docked on the handle, press either
Power button to turn the tool on. Press and hold either
Power button to turn the tool o
ff
. When the display and
handle are separated, use the individual power buttons to
turn each piece on and o
ff
.
FUEL GAUGE
When the display is docked on the handle, the M12™
battery pack fuel gauge is displayed in the upper right
corner. When the display is undocked from the handle, two
fuel gauges are displayed. The left gauge shows the
remaining charge of the display's internal battery. The right
gauge shows the remaining charge of the M12™ battery
pack. Each block in the fuel gauges represents
approximately 1/4 of the battery's life.
USING THE HANDLE AND DISPLAY
To separate the display from the handle grasp each part
fi
rmlyand slide the display away from the battery pack. To
reconnect, slide handle and display together.
NOTE: The error message "NO IMAGE SIGNAL" is
displayed if the handle is not powered on, the handle is out
of range of the display (approximately 15') or the cable is
not fully connected to the handle. Also, interference may
occur when multiple tools are in use in close proximity.
USING THE PIVOTVIEW™ CABLE (ACCESSORY)
See picture section.
If the desired view is not achieved, press the release
buttons and rotate the pivot cable 90°. Reattach to the
socket. Bend or manipulate the cable as needed.
TAKING IMAGES/VIDEOS
Use the Image/Video button
to toggle between taking
images or videos. The icon of the selected mode is
displayed in the upper left corner of the display.
Adjust the cable to best
fi
t the opening. After checking the
workspace for hazards, insert the cable.
Use the
▲▼
buttons to zoom in or out on the image.
Use the
◄►
buttons to rotate the image in 90° increments.
Use the LED brightness dial to increase/decrease the light.
To take an image or begin a video, press the OK button or
pull the trigger.
To end the video, press OK or pull the trigger again.
To save the image/video, press OK or pull the trigger. The
image/video is saved onto the memory card. Or, use the
◄►
buttons to select Cancel.
NOTE: During a video recording, sound is also recorded at
the display if the MICROPHONE is ON in Settings.
Содержание M12 ICAV3
Страница 1: ...M12 ICAV3 Original instructions...
Страница 3: ...4 5 Remove the battery pack before starting any work on the machine 1 2 2 1 1 2 3 click...
Страница 4: ...6 7 USB 1 1 2 2 3 3...
Страница 6: ...10 11 Accessory 1 1 2 1 1 2...
Страница 7: ...12 13 Trigger to take a photo or start a video Handle power button LED Brightnes dial...
Страница 10: ...18 19...


