background image

00110230w  Rev 10/20 

15 of 24

TIP

Having Trouble?   

See 

Troubleshooting

Exporting Data

Export to USB thumb drive

1.  Select 

Histogram

 from the main  

menu and scroll to 

Export to USB

press the OK button.

2.  Insert USB thumb drive into 

Scepter™ 3.0 USB port when 

prompted. Drive must be formated  

to FAT32. Press the OK button.

01-Feb-18 14:16

Histogram

Back

Go to Home

Edit Analysis

Switch to Volume

Scale Y Axis Count

Export to USB

Print

Delete

<

<

4/2


01-Feb-18 14:16

Histogram: Export

Press OK to continue

Insert 

USB Thumb Drive 

Into USB Port


3.  Select histogram(s):

TO EXPORT ONE,

 Scroll to the desired 

histogram and press the OK button. 

TO EXPORT ALL,

 Scroll to 

Export All


and press the OK button. 

4.  Exporting (All) Histograms

 will be 

displayed on the screen. Data will export 

as an image (PNG) and data (CSV). 

01-Feb-18 14:16

Histogram: Export

Back

Export Test 03 

Export All

<

Press OK to continue


01-Feb-18 14:16

Histogram: Export

Exporting . . .

Exporting All 

Histograms


01-Feb-18 14:16

Histogram: Export

Press OK for Explorer

Successful File 

Transfer

Remove 

USB Thumb Drive


Export is complete when 

Successful File Transfer Remove USB thumb drive

 shows on screen. Removing  

the USB thumb drive early may result in corrupted data. It is safe to remove the USB thumb drive now. 

5.  Press the OK button to return to the main Histogram Explorer screen.

Export to computer over Wi-Fi

® 

Network

The Scepter™ 3.0 hosts its own web page allowing users to download test data wirelessly. 

Materials Required

• Wireless Network broadcasting at 2.4 Ghz.
• PC, Mac

®

 or UNIX

®

 Computer 

connected to the same Wi-Fi

®

 Network as Scepter™ 3.0

.

• Scepter™ 3.0 Instrument. Follow 

Wi-Fi

®

 Network, p .8

 directions first.

1.  Obtain Scepter™ 3.0 IP address.  

(See 

Help Screens, p .17

.)

2.  Confirm Scepter™ 3.0 is connected 

to the same Wi-Fi

®

 network as the 

computer. (Follow 

Wi-Fi

®

 Network, 

p .8

 again if needed.)

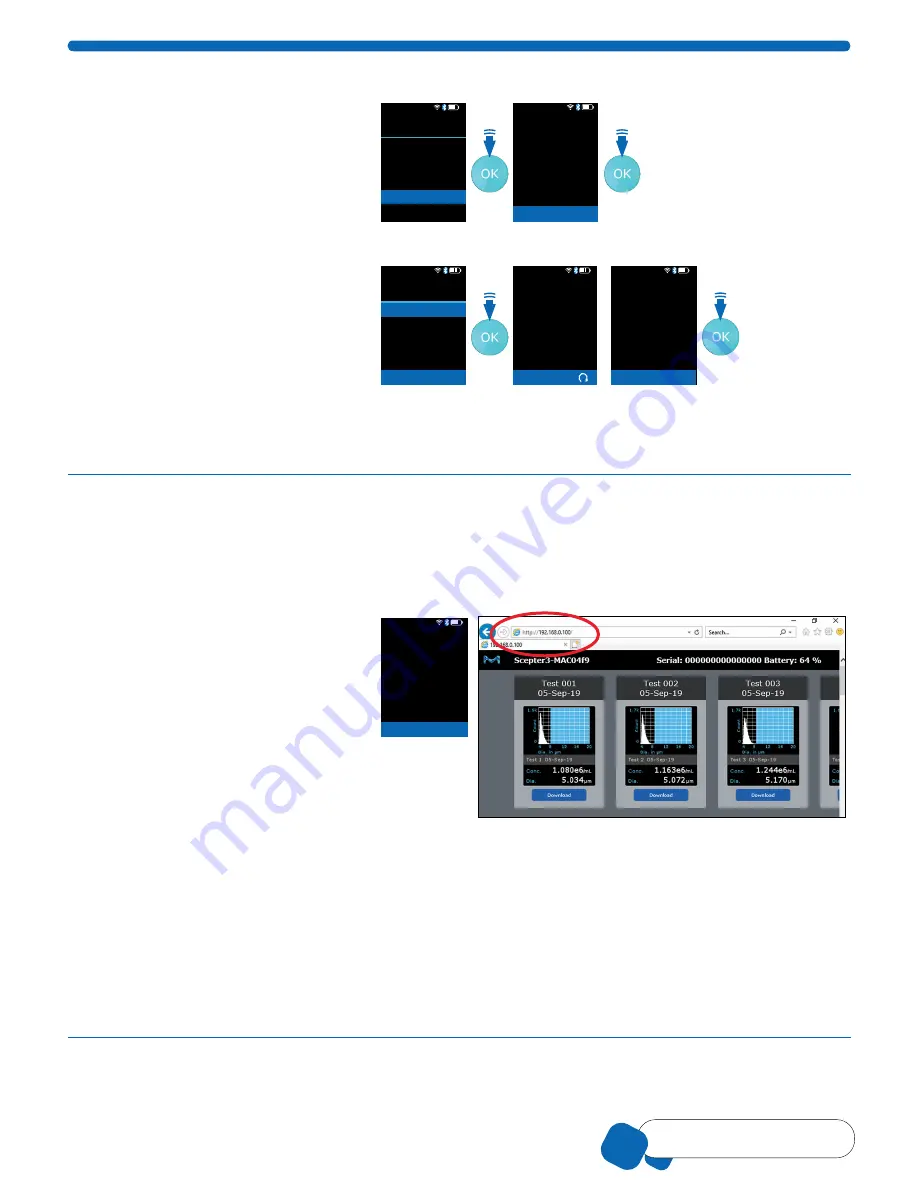
3.  From the computer, open the internet 

browser. Type the Scepter™ 3.0 IP 

address in the address bar (see red 

circle on image right). Press ENTER. 

The current data on Scepter™ 3.0 will 

be displayed.

01-Feb-18 14:16

Help: About

DNS Address                 

123456789
IP Address

WiFi MAC Address 

AA:BB:CC:DD:EE:FF
BT MAC Address  

AA:BB:CC:DD:EE:FF

<

Press OK to return to Help


4.  Scroll to the desired histogram, click Download. Data will download as an image (PNG) and data (CSV). 

The 

CSV file contains sample histogram data and summary results that is best opened through a spreadsheet 
program, such as Microsoft

®

 Excel, OpenOffice

®

 Calc, or Google Docs™ web-based word-processing program.


Log files or other device-maintenance formats may also be downloaded. These files are used by Tech Service 

if troubleshooting is needed. 

5.  To disconnect the communication, close the browser on the computer or power off the Scepter™ 3.0.

Note:

 Scepter™ 3.0 must remain powered on during this process, and can be actively in-use. Data can be 

downloaded from Scepter™ 3.0 multiple times, as long as the histogram remains in Scepter™ 3.0 memory. 

Scepter™ 3.0 can store a maximum of 999 histograms at one time. Files can only be deleted from Scepter™  

menus, not from the web, see 

Deleting Saved Data

.

192.168.0.100

Содержание PHCC30000

Страница 1: ...perates as MilliporeSigma in the U S and Canada The life science business of Merck KGaA Darmstadt Germany operates as MilliporeSigma in the US and Canada SigmaAldrich com User Guide Scepter 3 0 Handhe...

Страница 2: ...r computer easily No more cables The new Charging Station stores Scepter 3 0 out of the way when not in use freeing up valuable hood or lab bench space This system is intended for research use only Co...

Страница 3: ...nstrument to vibrations Vibrations may cause instrument malfunction or damage Do not autoclave or expose to high temperature To avoid damage to internal electronic components do not spray instrument w...

Страница 4: ...s the sensor Tech Service Port For Service use only USB Port Connects instrument to USB thumb drive Ergonomic Hook Allows comfortable handling of the instrument Secures the instrument to charger Contr...

Страница 5: ...the Recharging screen when placed in the Charging Station the following steps must be followed to start charging the Scepter 3 0 battery 1 Place Scepter 3 0 into the Charging Station 2 While on the s...

Страница 6: ...kable surface 1 Use double sided mounting tape 2 Remove tape liner from one side of tape and affix to back of mounting plate as shown below 3 Remove remaining tape liner and press firmly onto glass me...

Страница 7: ...14 16 Edit Time Hours Minutes Seconds 14 16 34 Press OK to accept 01 Feb 18 14 16 Edit Time Hours Minutes Seconds 14 16 34 Press OK to accept 1 Scroll to Edit Time and press the OK button 2 Scroll to...

Страница 8: ...nd select Properties If the File system is identified as FAT32 no formatting is needed Continue to Creating a Wi Fi Configuration File NOTE This view will also show how much space is available on your...

Страница 9: ...file from the computer onto the USB thumb drive Once the file has loaded remove the USB thumb drive from the computer port Connect to Wi Fi Network 1 From the Main Menu select Settings and press the...

Страница 10: ...were last set by the user either during a count or during post count data management 01 Feb 18 14 16 Menu Home Histograms Settings Help 01 Feb 18 14 16 Settings Back Date Time Bluetooth Wifi Gating M...

Страница 11: ...epter 3 0 instrument Do not use sensor if visibly damaged Attach the Sensor 1 When the Scepter 3 0 is powered on it will show Attach the Sensor to begin 2 Holding the sensor with the sensor size numbe...

Страница 12: ...net is recommend use low vacuum 5 Hg Cell Bead and Particle Suspensions Materials Required Cell sample Scepter 3 0 Test Beads Cat No PHCC3BEADS or particle suspensions Note Some particle suspensions...

Страница 13: ...ion and diameter or volume will be displayed on the screen Press the OK button to save up to 999 histograms in the Scepter 3 0 memory and open the Histogram Explorer Press the OK button to return to H...

Страница 14: ...03 Dec 17 Count 0 900 36 24 30 18 12 6 Dia in m 3 342e5 15 685 mL m Conc Dia 01 Feb 18 14 16 Histogram Edit Gates High gate Done 26 575 Low gate 12 585 Count 0 900 36 24 30 18 12 6 Dia in m Switch to...

Страница 15: ...wirelessly Materials Required Wireless Network broadcasting at 2 4 Ghz PC Mac or UNIX Computer connected to the same Wi Fi Network as Scepter 3 0 Scepter 3 0 Instrument Follow Wi Fi Network p 8 direct...

Страница 16: ...MS Press the OK button from any histogram on screen to open the Histogram Explorer menu 01 Feb 18 14 16 Menu Home Histograms Settings Help 01 Feb 18 14 16 Histogram Test 3 03 Dec 17 Count 0 900 36 24...

Страница 17: ...o printer Help Screens Tutorials 1 From the Menu screen scroll to Help press the OK button 2 Scroll to the topic of interest press the OK button 01 Feb 18 14 16 Scepter Software 4 6 01 Feb 18 14 16 Me...

Страница 18: ...ration of cell sample is within recommended operating range See Cell Bead and Particle Suspensions Test sample using Scepter 3 0 Test Beads Cat No PHCC3BEADS to ensure unit operating properly for conc...

Страница 19: ...y needs to be re charged Place Scepter 3 0 on charging stand to recharge the instrument See Battery p 5 Battery is not charging Ensure that the unit is correctly positioned in charging stand An animat...

Страница 20: ...ressing of OK button Fully submerge sensor in sample before pressing OK button Air bubble in sample Mix sample gently to avoid air bubbles Sensor lifted from sample before screen displays Sample Loade...

Страница 21: ...ed on FAT32 formatted USB thumb drive and try again See USB Thumb Drive Formatting p 8 Software update blocked on battery low Insufficient battery to perform update Recharge Scepter 3 0 and try again...

Страница 22: ...ntal Conditions Temperature 15 C to 25 C Maximum Relative Humidity 20 80 non condensing Storage Conditions Temperature 15 C to 30 C Maximum Relative Humidity 20 80 non condensing Scepter 3 0 Sensor Ma...

Страница 23: ...p E GP Sterile Vacuum Filtration System Millipore Express PLUS PES 0 22 500 38 12 SEGPU0538 0 22 500 45 12 SEGPU0545 0 22 1000 38 12 SEGPU1138 0 22 1000 45 12 SEGPU1145 Steritop E GP Sterile Funnel le...

Страница 24: ...Merck KGaA Darmstadt Germany and or its affiliates All Rights Reserved Global Registration Marks of Conformity USA TFB 1003 EUROPE C TAIWAN JAPAN R209 J00212 SOUTH KOREA R C Emd PHCC30000 RUSSIA BELAR...

Отзывы: