background image

11

10

2.  Fingered Chord Method (F.C.):

Finger Principle (F.C.):

1. Finger is the same relative position 

as the chord.

2. Locomotion chord is different from 

the finger chord, but the changing 
result is the same.

See fig. 25

fig. 18

fig. 19

fig. 20

fig. 21

fig. 22

fig. 23

CHORD FINGERING:

1.  Single Finger Method (S.F)

Finger Principle:

1. 

Major chord:

 press keynote key 

only.

2.

Minor chord:

 press keynote key 

and any black key on the left 
simultaneously.

3.

C7-seventh:

 tpress keynote key 

and any white key on the left 
simultaneously.

4.

Minor seventh:

 press keynote 

key and one black key and one 
white key on the left 
simultaneously.

See fig. 24

fig. 24

fig. 25

BASIC OPERATION

BASIC OPERATION

M

J K

O

N

M

T

H

I

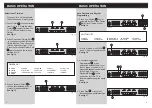
Record / Playback

-

To enter recording mode press 
Record  J . Notes played will be 
recorded in the memory (up to a 
maximum of 40). Press 
Playback/Effect  K , to play stored 
notes. To listen  again, just press 
Playback/Effect  K  again.
For a new recording, please repeat 
the above steps. Press Stop  M , 
to quit the function.

See fig. 18

Guide Function

1.  Press the Guide  O  and then press 

the white key to select the melody 
in performance. The main melody 
will then be masked but is restored 
if you don't play for three seconds.

See fig. 19

2. Press One Key  N  and then press 

the white key to select a melody 
in one key one note mode. Press 
any key to perform the main 
melody with the accompaniment 
repeated.

See fig. 20

3. Press Percussion  T  to practise 

percussion while music is playing. 
Press Stop  M  to quit this function.

See fig. 21

Chord

1. When the rhythm starts, press 

Single Finger Chord  H  and you 
can accompany the single finger 
chord according to the different 
fingering in the chord-key part ( 
Keys 1-18 ). The fingering is 
shown as Fig. 24.

See fig. 22 and 24

2. When the rhythm starts, press 

Fingered Chord  I   button and you 
can carry accompanying  the 
fingered chord according to the 
different fingering in the chord-key 
part. The fingering is shown as 
Fig. 25.

See fig. 23 and 25

Содержание MK-4100

Страница 1: ...Instruction Manual Please keep for future reference Acoustic Solutions Mini Silver Keyboard MK 4100 07 05 ...

Страница 2: ...r safety Take care not to drop the unit or subject it to strong shocks Children Children do not understand the dangers associated with operating electrical appliances Never allow children to use this appliance Mains Lead If this unit has a mains lead or is connected with a mains adaptor do not allow the lead to become strained or damaged as it creates a hazard Ventilation Warning Do not allow wate...

Страница 3: ...I M N O P Q R Q T U S V Rear Panel X Y Z G I J K L M P Q R S T U V X Z Y H Loudspeakers Power Switch Fill In Volume Single Finger Chord Fingered Chord Record Playback Effect Rhythm Programming Stop One Key Guide Demo Timbre Percussion Timbre Shift Rhythm Percussion Keys Timbre Keys Tempo Chord Keys Mic In Audio Out D C In N O B 1 x Music Stand A 1 x Keyboard L K J F E D F C 1 x Microphone ...

Страница 4: ...rom the mains and replace with a new set of batteries Note on batteries Do not mix different types of batteries or an old battery with a new one To prevent the risk of leakage or explosions never recharge the batteries apply heat or take them apart When not using batteries remove them to prevent battery drain If liquid leaks from the batteries throw them away Thoroughly clean the battery compartme...

Страница 5: ...estart Press Volume G for 16 level volume control See fig 8 Demonstration Songs and Percussion 1 Press Demo P to play the first demonstration song Press the button again to continue You can change the tempo by pressing Tempo U Press Stop M or any other function button to quit this function There are 6 demonstration songs for you to choose See fig 9 2 Press Percussion Keys T to select percussion so...

Страница 6: ...ontrol See fig 14 TIMBRE LIST 01 PIANO 02 HARP 03 ORGAN 04 BELL 05 J GUITAR 06 VIOLIN 07 STRING 08 GUITAR 09 TRUMPET 10 TUBA 11 E BASS 12 SAXOPHONE 13 FLUTE 14 BANJO 15 OBOE 16 HORN Auto Rhythms and Rhythm Programming RHYTHM LIST 01 DISCO 02 8 BEAT 03 ROCK ROLL 04 RHUMBA 05 TANGO 06 MARCH 07 COUNTRY 08 BOSSA NOVA 09 WALTZ 10 CHA CHA 2 In rhythm mode press Fill In F to add 1 2 bars of special sound...

Страница 7: ...just press Playback Effect K again For a new recording please repeat the above steps Press Stop M to quit the function See fig 18 Guide Function 1 Press the Guide O and then press the white key to select the melody in performance The main melody will then be masked but is restored if you don t play for three seconds See fig 19 2 Press One Key N and then press the white key to select a melody in on...

Страница 8: ...s period by the dealer from whom you purchased the unit The guarantee is subject to the following provisions The guarantee does not cover accidental damage misuse cabinet parts knobs or consumable items The product must be correctly installed and operated in accordance with the instructions contained in this manual It must be used solely for domestic purpose The guarantee will be rendered invalide...

Отзывы: