Manual
LOGO 14 Carbon
Page 36
©Mikado Modellhubschrauber
2x
M3x10
#1910
2x
M3
#2074
2x
4x11x5mm
#2503
#743
#729
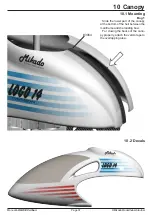
10 Canopy
10.1 Mounting
Bag 1
The canopy does not yet have any
holes for attaching it to the helicop-
ter. In order to fit the canopy properly
to your model, please proceed as fol-
lows: First, use rod no. 743 for mar-
king where the holes will be cut out.
Push the rod through the mainframe,
as shown in the picture. Then positi-
on the canopy exactly like you want
it to be attached to your helicopter.
The lower end of the canopy will al-
most touch the tail boom. Close the
canopy with tape, letting the two hal-
ves overlap slightly.
Now apply light pressure to the
canopy in the area of the two ends of
the rod. In this way you will obtain
round marks just where you need to
drill the holes for attaching the cano-
py. Drill two holes with 8mm diame-
ter each. After drilling, place a cano-
py fixing ring no. 2503 into each hole.
Содержание LOGO 14 Carbon
Страница 29: ...Manual LOGO 14 Carbon Page 29 Mikado Modellhubschrauber 7 Finished Main Frame Tail Boom...
Страница 39: ...Manual LOGO 14 Carbon Page 39 Mikado Modellhubschrauber 856 855 2383 11 Swashplate 11 2 Swashplate Guide Bag 1...
Страница 60: ...Manual LOGO 14 Carbon Page 60 Mikado Modellhubschrauber 17 Control Movements 17 3 Elevator 17 4 Aileron...
Страница 61: ...Manual LOGO 14 Carbon Page 61 Mikado Modellhubschrauber 18 Overview 18 1 Chassis...
Страница 62: ...Manual LOGO 14 Carbon Page 62 Mikado Modellhubschrauber 18 Overview 18 2 Rotor Head...
Страница 63: ...Manual LOGO 14 Carbon Page 63 Mikado Modellhubschrauber 18 3 Tail Boom Tail Rotor 18 Overview...
Страница 66: ...Design Rendering Mehran Mahinpour Tirooni Layout Realisation CDT Berlin www mikado heli de...


