background image

ENG14

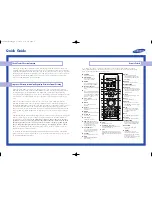
14. 

FAV

 button: Displays the selected favorite 

programmers.

15. 

VOL+/-

 button: Press to increase or decrease the 

volume.

16. 

AUTO

 button: Press to do auto configuration 

directly(PC-RGB MODE).

17. 

ASPECT

 button:  Select from the modes settings.

   
18. 

EXIT

 button: Press to exit all the OSD on the 

screen.

19. 

CH+/-

 button: Press to skip the next/previous 

channel.

20. 

SOURCE

 button: Press to select enter the source 

selecting menu.

21. 

PMODE

 button: Press to select the picture mode.

22. 

SMODE

 button: Press this button to change the 

audio mode.

23. 

SLEEP

 button: This feature allows you to set up 

sleep time.

24. 

TEXT

 button: Switch on or off the teletext mode.

:   Press to start playback or pause (ln MEDIA 

mode).

25. 

INDEX

 button: Request the index page (Teletext 

mode). 
■ button: Press to stop playing (ln MEDIA mode).

26. 

MIX

 button: Mix function in teletext mode.

1

2

3

4
5
6

7

8

9

10

11

18

19

14
15

17

13

12

16

20

21

24

25

28

29

32

33

22
23

26

27

30

31

34

35

36

REC


LIST

Содержание MIIAVISION MTV-K50LEUHD

Страница 1: ...Ultra HD MIIA MTV K50LEUHD LEDTV MIIAVISION 50 ENG User Manual...

Страница 2: ......

Страница 3: ...ed with the television 6 Sockets at the back of the television 8 Basic Installation 9 Instructions for the remote control 13 Basic menu operation 16 Menu 17 Use of the teletext 34 Dealing with problem...

Страница 4: ...nt that produces 8 The television has a polarised plug or an earth plug The polarised plug has earth plug has two pins and a third earth connection pin The wider pin or third pin is provided for the u...

Страница 5: ...ng the electrical cable to the socket Do not overload the wall socket This could damage the television and cause an electrical shock or a fire Check the television power cable from time to time and di...

Страница 6: ...alified In the event of a breakdown contact a qualified technician This symbol invites you to read the maintenance manual before taking further action If the television is used for video games or is c...

Страница 7: ...the internal parts and to prevent them from overheating Make sure that these vents are not obstructed carpet 6 Do not place the television in an enclosed space such as a bookcase or television cabinet...

Страница 8: ...use 2 You can contact your municipality to obtain information on the collection service Disposal of the television in a waste facility could cause the leakage of hazardous the food chain was bought is...

Страница 9: ...batteries correspond to the diagram 2 Replace the batteries making sure that they are positioned in the right direction If the remote control is left unused for a long period of time remove the batter...

Страница 10: ...onnecting to extern antenna to receive the TV 6 Coaxial Output Jack 7 CI slot insert CI card 8 Mini YPbpr Input Jack connecting for component signal input in Ypbpr mode 9 Mini AV Input jack connecting...

Страница 11: ...erial To guaranty a good picture and audio install the aerial The aerial system such as the one sistance for correct installation and connection After installation insert the plug of the aerial 75 OHM...

Страница 12: ...the connection of a normal VCR to the video input Connect the Audio output of the DVD or VCR to the Audio jack sockets on the set using the RCA cable 3 5 mm socket 2 X RCA socket Match the colours of...

Страница 13: ...AUDIO jack socket of the PC on the Select the PC input source using the SOURCE button on the remote control The HDMI connection enables the user to transmit the audio and video control signals only by...

Страница 14: ...ENG12 Headphones can be connected to the television in order to watch programs without distur NOTE F K QK K K W K Z K Headp hones...

Страница 15: ...and teletext is only available if the service is provided by broadcast 7 DISPLAY button press this button to display information about the current mode on the screen 8 button ln the DTV mode press to...

Страница 16: ...ess to select enter the source selecting menu 21 PMODE button Press to select the picture mode 22 SMODE button Press this button to change the audio mode 23 SLEEP button This feature allows you to set...

Страница 17: ...e 31 CANCEL button Cancel function in teletext mode Skip forward button ln MEDIA mode 32 TIMESHIFT button Press it to enter timeshift function 33 REC button Press to select enter the recorded 34 FAV b...

Страница 18: ...ss the SOURCE button on the remote control to display the list of input sources Press the buttons to select the input source required Press the OK button to enter the input source Press the EXIT butto...

Страница 19: ...turn to the previous menu buttons to select OK button to start the automatic search buttons to select OK button to enter the submenu OK button to start the program search Move Back MENU Quit EXIT Sele...

Страница 20: ...Z to move the current channel XH button again to set it as a normal channel buttons to select OK button to start the automatic search Signal information buttons to select Information OK button to _ bu...

Страница 21: ...t Contrast OK button to enter the submenu Brightness buttons to select Brightness OK button to enter the Colour button to select Colour OK Tint button to select Tint OK H Sharpness buttons to select S...

Страница 22: ...to select Sound j _ O O _ _ _ jQ_ A the Sound Mode directly buttons to select OK button to enter the submenu Bass buttons to select Bass OK button to enter the submenu D buttons to select D OK button...

Страница 23: ...ent time of the system Not available E buttons to select E OK button to enter the buttons to make the selection buttons to select OK button to enter the j V V V buttons to select OK button to enter th...

Страница 24: ...o confirm the Set password Set Password OK button to enter the submenu and set a new password D D Program OK button to enter the submenu OK button to save the settings and the button to return to the...

Страница 25: ...ich you wish to block the signal buttons to select Source OK button to enter the buttons to select the default source H buttons to select Prog OK button per select the default channel buttons to selec...

Страница 26: ...lect the TT language buttons to select OK button to enter the X buttons to select OK button to enter the _ Hearing Impaired buttons to select Hearing Impaired OK button to select On or Off H buttons t...

Страница 27: ...buttons to select D Screen OK to select On or Off buttons to select First OK to set the relevant j_ Reset buttons to select Reset j button to select Yes to reset the factory settings choosing the OSD...

Страница 28: ...tton to save and return to the previous menu buttons to select OK button to start the automatic search buttons to select OK to enter the submenu buttons to select OK button to enter the submenu H butt...

Страница 29: ...to select OK button to start automatic H buttons to select H Position OK button to enter the H buttons to select H OK button to enter the H buttons to select H OK button to enter the submenu Position...

Страница 30: ...ENG28 T T UH H TH A 1 H 2 The SOUND menu and its description are the same as for H X 3 j H 4 XH O XQQ 5 The TIME menu does not have the clock and time zone options 6 XH H _ O H _...

Страница 31: ...ect the option you wish to change in the H then press the OK button buttons to select H A A OK button OK button buttons to select the return option to return to the previous menu information on the fi...

Страница 32: ...OK button to play background music H buttons to select H OK button to enter Info buttons to select Info OK button to enter It is possible to display the information related to the picture Rotate butto...

Страница 33: ...ct OK The music will be played as a preview at the centre OK button buttons to select the return option to return to the previous menu and the preview of the music is shown in the centre press the OK...

Страница 34: ...ENG32 Basic functions j it O O Cinema OK button buttons to select the return option to return to the previous menu the right j the entire menu...

Страница 35: ...ENG33 Basic Functions buttons to select the Teletext from the main menu and press the OK key to enter O Choosing this function it is possible to replay from A to B O O menu...

Страница 36: ...ry to complete the whole three figures and then type the correct page number again j the page Index Q The dimensions of the text can be doubled in the teletext pages to make it easier to read V _ _ _...

Страница 37: ...d not the television properly sensor H H Check that the television is not positioned in direct sunlight Check that the sleep timer has not been set Check that the timer on the control of the socket to...

Страница 38: ...hed on This could be a problem related to the channel you are watching Change channel to check if the same problem occurs with other channels The television signal is weak or interrupted Check for any...

Страница 39: ...ed off and the electrical cable has been disconnected before starting cleaning 1 The best way to prevent the accumulation of dust on the screen is to wet a soft cloth with a mixture of tepid water and...

Страница 40: ...o change the design and technical characteristics of this television without obligation to inform the user The symbol and the instructions present on the product indicate that the electrical and elect...

Страница 41: ...l cables or wires connected to the television A H _X H _X V V H following the instructions included in the installation kit The length of the screws must not exceed 20 mm A Remove the support before i...

Страница 42: ......

Страница 43: ...Modello MTV K50LEUHD Alimentazione TV AC 100 240 50 60HZ Consumo in funzione 100W Consumo in standby 0 5W Produced imported and distributed by via Domenico Fontana 12 00185 Roma Italy MADE IN PRC...

Отзывы: