background image

Cleaning and care

Cleaning the drain pump and
lint trap.

Occasionally small objects, (buttons,
coins, etc.), may find their way into the
lint trap. It is a good idea to occasion-
ally check the lint trap to ensure that it
is free of foreign objects.

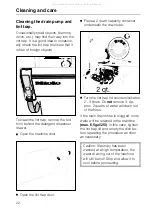
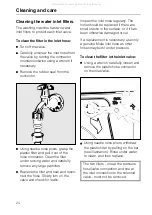
To clean the lint trap, remove the tool
from behind the detergent dispenser
drawer.

Open the machine door.

Open the lint trap door.

Place a 2 quart capacity container
underneath the drain tube.

Turn the lint trap lid counterclockwise
2 - 3 times. Do 

not

 remove it. Ap-

prox. 2 quarts of water will drain out
of the hose.

If the main drain hose is clogged, more
water will be retained in the machine

(max. 6.5 gal/25l)

. In this case, tighten

the lint trap lid and empty the dish be-
fore repeating the procedure as often
as necessary.

Caution: If laundry has been
washed at a high temperature, the
water draining out of the machine
will still be hot! Stop and allow it to
cool before proceeding.

Cleaning and care

22

All manuals and user guides at all-guides.com

Содержание Novotronic W 1930i

Страница 1: ...30i Washing Machine To prevent accidents and reduce the risk of damaging the machine ö read the Operating Manual before installing or using the machine M Nr 04 612 680 All manuals and user guides at all guides com a l l g u i d e s c o m ...

Страница 2: ...ent 12 Adding fabric softener or starch 13 Program selection 14 Program sequence 16 Textile care symbols 18 Additional options 19 Delay start Time remaining indicator 20 User Maintenance Instructions Cleaning and Care 21 Problem solving guide 25 After sales service 31 Installation Instructions Installation 32 Plumbing 40 Electrical connection 41 Programmable functions 42 Technical data 47 Contents...

Страница 3: ...hable swivel elbow 4 Detergent dispenser drawer 5 Control panel 6 Adapter strips 7 Inner door panel 8 Four height adjustable legs 9 Access panel for lint filter and drain pump 10 Access panel for emergency drain and door release Guide to the machine 3 All manuals and user guides at all guides com ...

Страница 4: ... lamp illuminates Detergent dispenser drawer Compartment i for the pre wash Compartment j for the main wash Compartment p with lid for fabric softener or starch f Pushbuttons for additional functions g SPIN SPEED SELECTOR switch h PROGRAM SEQUENCE indicators LED indicator lamps i PROGRAM SELECTOR switch Guide to the machine 4 All manuals and user guides at all guides com ...

Страница 5: ...ot repair or replace any part of the appliance or attempt any ser vicing unless specifically recom mended in the user maintenance instructions or in published user repair instructions that you under stand and have the skills to carry out 9 Do not add gasoline dry clean ing solvents or other flammable or explosive substances to the wash water These substances give off vapors that could ignite or ex...

Страница 6: ...ard polystyrene CFC free polystyrene foil transparent Untreated wood Polypropylene PP strapping Rather than throwing these materials away please take them to your com munity recycling center Disposal of your old machine Old machines contain materials which can be recycled Please contact your recycling center or scrap merchant be fore disposing of the appliance and render the machine inoperative as...

Страница 7: ...controls offer a com bination of simple operation with many optional features For instance since a main wash generally gives good results for a normal load the pre wash cycle has been made a user selectable op tion saving time water and energy over older full cycle machines Economy For optimum economical usage re member the following tips The automatic load control feature will adjust the water le...

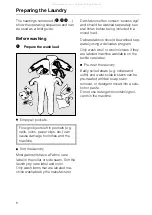
Страница 8: ...ma chine washable by the manufacturer Dark fabrics often contain excess dye and should be washed separately sev eral times before being included in a mixed load Delicate fabrics should be washed sep arately using a delicates program Only wash wool or wool mixtures if they are labeled machine washable on the textile care label Pre treat the laundry Badly soiled areas e g collars and cuffs and water...

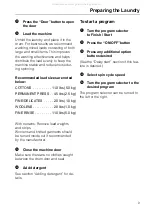
Страница 9: ...RINSE 11 0 lbs 5 0 kg With curtains Remove lead weights and strips Woolens and knitted garments should be turned inside out if recommended by the manufacturer 3 Close the machine door Make sure there are no clothes caught between the drum door and seal 4 Add detergent See section Adding detergent for de tails To start a program 1 Turn the program selector to Finish Start 2 Press the ON OFF button ...

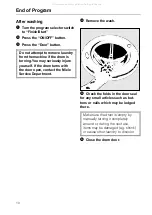
Страница 10: ...he drum turns with the door open contact the Miele Service Department 4 Remove the wash 5 Check the folds in the door seal for any small articles such as but tons or nails which may be lodged there Make sure the drum is empty by manually turning it completely around or during the next use items may be damaged e g shrink or cause other laundry to discolor 6 Close the drum door End of Program 10 All...

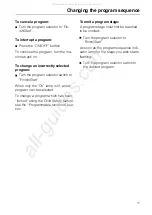
Страница 11: ...it a new program can be selected To change a program which has been locked using the Child Safety feature see the Programmable functions sec tion To omit a program stage A program stage must first be reached to be omitted Turn the program selector to Finish Start As soon as the program sequence indi cator lamp for the stage you wish starts flashing Turn the program selector switch to the desired p...

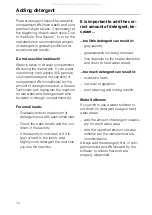
Страница 12: ...Check the wash results and the con dition of the laundry If the laundry is not clean or if it is gray or hard to the touch add slightly more detergent the next time you use the machine It is important to add the cor rect amount of detergent be cause too little detergent can result in gray laundry grease stains not being removed lime deposits on the heater elements and drum in hard water areas too ...

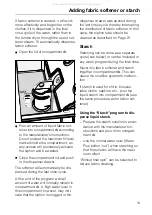
Страница 13: ...i cate that the siphon is clogged or the dispenser drawer was opened during the last rinse cycle thereby interrupting the distribution of fabric softener In this case the siphon tube should be cleaned as described on Page 21 Starch Starching can be done as a separate cycle see below or can be included in any wash program during the final rinse Never mix fabric softener and starch together in compa...

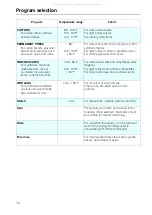
Страница 14: ...d 85 F 105 120 F 140 F For dark colored silks and all synthetic items lingerie For light colored silks and lace tablecloths For white cotton lace and crocheted items WOOLENS For all machine washable woolens and wool blends Also suitable for silks cold 105 F For all colors of wool and silk There is no Pre wash option in this proram Starch cold For tablecloths napkins aprons and shirts Spin For spin...

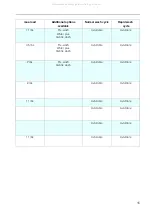
Страница 15: ...tle wash Available Available 4 5 lbs Pre wash Water plus Gentle wash Available Available 2 lbs Pre wash Gentle wash Available Available 2 lbs Available Available 11 lbs Available Available Available Available Available Available 11 lbs Available Available 15 All manuals and user guides at all guides com ...

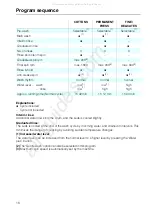
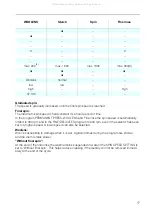
Страница 16: ...2 min 1h 00 min Explanations ß Cycle included Cycle not included Interim rinse Additional water flows into the drum and the suds is cooled slightly Graduated rinse The suds is cooled at the end of the wash cycle by incoming water and drained in intervals This minimizes the danger of creasing by avoiding sudden temperature changes 1 Increased water level The water level can be increased from the no...

Страница 17: ...ally limited to 900 rpm and in the FINE DELICATES program to 600 rpm even if the selector has been set to a higher speed A lower speed can also be selected Woolens Wool is susceptible to damage when it is wet Agitation times during the program are shorter and the drum rotates slower Without final spin At the end of the final rinse the wash remains suspended in water if the SPIN SPEED SETTING is se...

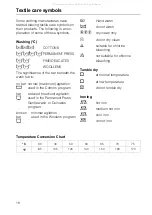
Страница 18: ... medium agitation f used in the Permanent Press Gentle wash or Delicates program broken minimal agitation bar used in the Woolens program g Temperature Conversion Chart C 30 40 50 60 65 70 75 F 85 105 120 140 150 160 170 Hand wash h do not wash ABC dry clean only D do not dry clean y suitable for chlorine bleaching z not suitable for chlorine bleaching Tumble dry q at normal temperature r at low t...

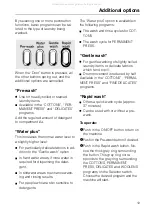
Страница 19: ...o are skin sensitive to detergents The Water plus option is available in the following programs The wash and rinse cycles for COT TONS The wash cycle for PERMANENT PRESS Gentle wash For gentle washing of slightly soiled laundry items or delicate fabrics which tend to pill Drum movement is reduced by half Available in the COTTONS PERMA NENT PRESS and FINE DELICATES programs Rapid wash Offers a quic...

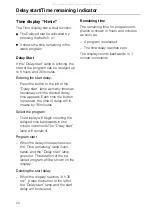
Страница 20: ...rogram The display will begin counting the delayed time backwards in one minute increments The Delay start lamp will remain lit Program start When the delay time reaches zero the Time remaining lamp illumi nates and the Delay start lamp goes out The duration of the se lected program will be shown on the display Deleting the start delay When the display reaches 9 h 30 min press the button to the le...

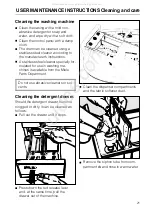
Страница 21: ...ing ma chines is available from the Miele Parts Department Do not use abrasive cleaners or sol vents Cleaning the detergent drawer Should the detergent drawer become clogged or dirty it can be cleaned as follows Pull out the drawer until it stops Press down the red release lever and at the same time pull the drawer out of the machine Clean the dispenser compartments and the fabric softener duct Re...

Страница 22: ...city container underneath the drain tube Turn the lint trap lid counterclockwise 2 3 times Do not remove it Ap prox 2 quarts of water will drain out of the hose If the main drain hose is clogged more water will be retained in the machine max 6 5 gal 25l In this case tighten the lint trap lid and empty the dish be fore repeating the procedure as often as necessary Caution If laundry has been washed...

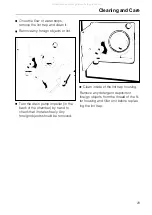
Страница 23: ... in the back of the chamber by hand to check that it rotates freely Any foreign objects should be removed Clean inside of the lint trap housing Remove any detergent deposits or foreign objects from the thread of the fil ter housing and filter unit before replac ing the lint trap Cleaning and Care 23 All manuals and user guides at all guides com ...

Страница 24: ...se Slowly turn on the valve and check for leaks Inspect the inlet hose regularly The hose should be replaced if there are small cracks in the surface or if it has been otherwise damaged or cut If a replacement is necessary use only a genuine Miele inlet hose as other hoses may burst under pressure To clean the filter in the inlet valve Using a wrench carefully loosen and remove the plastic hose co...

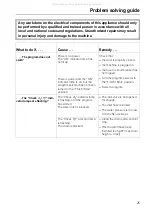
Страница 25: ...ot tripped There is power and the ON indicator lamp is on but the program selector has not been turned to the Finish Start position Turn the program selector to the Finish Start position Select a program The Check p q indi cator lamps are flashing The Check p indicator lamp is flashing and the program has started The water inlet is blocked The inlet valve is not opened far enough The inlet hose is...

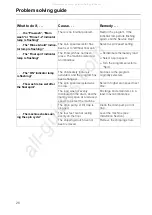
Страница 26: ...flashing The child safety feature is activated and the program has been changed Go back to the program originally selected The wash is too wet after the final spin The spin speed selected was too low Select a higher spin speed next time The load was not evenly distributed in the drum and the laundry was spun at a reduced speed to protect the machine Mix large and small items in a load to avoid imb...

Страница 27: ... The dispenser drawer was not pushed in when the fabric softener was being dispensed Make sure the drawer is all the way in The siphon tube is either incorrectly positioned or clogged Clean the siphon tube There is an excessive build up of foam Use only a low sudsing detergent at the appropriate temperature Follow recommendations on the package Take the water hardness into account Use less deterge...

Страница 28: ...equired result Liquid detergents do not contain bleaching agents They do not remove stains as well as powdered detergents containing non chlorinated bleaches Use a general purpose powder detergent containing a bleaching agent Pre treat stains with a stain remover After washing pilling ap pears on the fabric This is a normal occurance of everyday wear with some fabrics These fabrics must be handled...

Страница 29: ...ose into the con tainer Remove the stopper Caution if laundry has been washed at a high temperature water draining out of the machine will still be hot The amount of water discharged de pends on the drainage height A de livery head e g 1 m will mean there is more water to drain The container will need to be emptied several times When no more water drains out place the stopper back in the hose Prob...

Страница 30: ...ure the drum is sta tionary before reaching in to the ma chine to remove washing Reaching into a moving drum is extremely dangerous To check water pressure Place a bucket under the stopcock Turn on the stopcock If 5 litres of water flow into the bucket in 15 seconds the water pressure is cor rect Electric socket If there is any doubt about the elec tricity supply socket consult a qualified electri...

Страница 31: ...Miele Service Department see back cover When contacting the Service Depart ment please have the model and serial numbers of your appliance available both of which can be found on the data plate visible when the door front is opend above the porthole glass After sales service 31 All manuals and user guides at all guides com a l l g u i d e s c o m ...

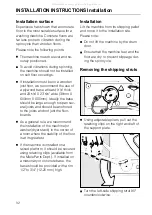
Страница 32: ...ds As a general rule we recommend the installation of the machine or washer dryer stack in the corner of a room where the stability of the floor is at its greatest If the machine is installed on a raised platform it should be secured using retaining clips available from the Miele Parts Dept If installed on a masonary or concrete base the base should be provided with a rim 1 2 to 3 4 12 20 mm high ...

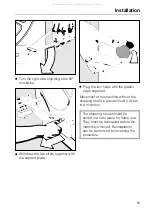
Страница 33: ...stic caps supplied Movement of the machine without the shipping struts in place should be kept to a minimum The shipping struts should be stored in a safe place for future use They must be reinstalled before the machine is moved Reinstallation can be performed by reversing the procedure Installation 33 All manuals and user guides at all guides com ...

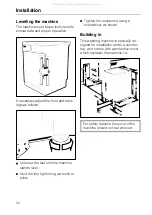
Страница 34: ...e stands level Hold the foot tight using a wrench or pliers Tighten the counternut using a screwdriver as shown Building in This washing machine is specially de signed for installation under a counter top and comes with a protective cover which replaces the machine lid For safety reasons the cover of the machine should not be removed Installation 34 All manuals and user guides at all guides com ...

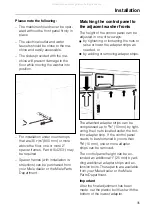
Страница 35: ...t washer fronts The height of the control panel can be adjusted in one of two ways by tightening or loosening the nuts to raise or lower the adapter strips as needed or by adding or removing adaper strips The attached adapter strips can be compressed up to 3 8 10 mm by tight ening the 4 nuts located under the bot tom adapter strip If the control panel needs to be shortened by more than 3 8 10 mm o...

Страница 36: ...the bottom edge to ward you Align the bottom of the template with the lower edge of the door Center the template on the panel by using the four parallel lines located at each corner The panel is cen tered when the identical line on each side aligns with the panel edge For example if your panel is 23 3 8 wide the second line from the center of the template will align with both the right and left ed...

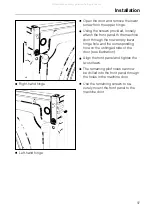
Страница 37: ...now empty lower hinge hole and the corresponding hole on the unhinged side of the door see illustration Align the front panel and tighten the two screws The remaining pilot holes can now be drilled into the front panel through the holes in the machine door Use the remaining screws to se curely mount the front panel to the machine door Installation 37 All manuals and user guides at all guides com ...

Страница 38: ... that access to the emer gency drain and door release panel is not impeded Installing the toekick Align and attach the two Velcro strips to each other Cut the strip into three equal pieces Remove the protective backing from one side of the three Velcro strips Press them into place on the washer toekick Peel the protective backing off of the second exposed side of the Velcro strip Align the matchin...

Страница 39: ... water will be flushed out during water the program Water hardness reminder The amount of detergent needed to wash clothes depends on various fac tors including the water hardness in your area You can set the water hard ness dial in the detergent dispenser as a reminder Turn the dial to the desired setting Use the tool supplied with the ma chine It is located behind the deter gent drawer on the le...

Страница 40: ...e cor rect functioning of the machine could be impaired The machine should not be connected to hot water only Connection to the drain sys tem The 5 ft 1 5 m drain hose may be con nected as follows 1 Directly into a sink hook the hose over the edge of the sink and secure it firmly e g by tying the hose to the water faucet 2 Connection to a stand pipe place the drain hose into a 1 1 2 38 mm stand pi...

Страница 41: ... by a quali fied electrician ELECTRICAL INSTRUCTIONS This installation should be done by an experienced and qualified person in most cases a licensed electrician in ac cordance with local codes and regula tions The washing machine is supplied with a 5 ft long 4 wire cord ending in a NEMA 14 20 P plug ready for connec tion to a 120 V 240V 208 V 60 Hz AC power supply The proper outlet can be purchas...

Страница 42: ... an ad ditional function is selected the On lamp will flash notifying you that the Child safety feature has been acti vated but the program will continue un interrupted This prevents children from inadvertently changing or stopping a wash program by playing with the dials If the program selector switch is turned to its original position the On lamp will stop flashing To change a program once the P...

Страница 43: ...tor switch to Finish Start Step 2 Carry out steps 2 and 3 within 4 seconds Press the ON OFF button Step 3 Press the Water plus button 4 times i e press in and out twice The ON lamp will illuminate and the Pre wash and Main wash lamps will flash Programmable functions 43 All manuals and user guides at all guides com ...

Страница 44: ...th rinse cycle Set the Program selector to Drain Continue with Step 5 to activate CNo water intake through compartment i Set the Program selector to Starch Continue with Step 5 to activate DProgram Lock Child safety feature Set the Program selector to WOOLENS cold Continue with Step 5 to activate Programmable functions 44 All manuals and user guides at all guides com ...

Страница 45: ...5 to activate Step 5 activate the function Press the Water plus button twice i e in and out once to toggle the function ON OFF The Rinse 1 2 lamp will illuminate when the function is activated Step 6 to store in memory Press the ON OFF button Programmable functions 45 All manuals and user guides at all guides com ...

Страница 46: ... Rinse 1 2 indicator does not light up no function was acti vated If the Rinse 1 2 indicator lights up proceed as in Deleting the additional functions Exception the Rinse 1 2 indicator will light up if the switch is set to COTTONS 170 F Deleting the additional func tions Follow the same instructions given under To activate the additional func tions steps 1 to 4 When the Rinse 1 2 lamp goes out Pre...

Страница 47: ...ain hose diameter Maximum drain length Power supply Max floor load 331 2 1 2 1 4 850 mm 10 0 5 mm 231 2 600 mm 24 610 mm 220 lbs 99 kg 11 lbs 5 kg dry laundry 2 8 kW 15 Amp 14 5 145 p s i 1 10 bar 4 0 ft 1 2 m 1 I D 25 mm 15 ft 4 5 m 120 V 240 V multi phase 208 V 60 Hz AC 1600 Newton 360 lbs INSTALLATION INSTRUCTIONS Technical data 47 All manuals and user guides at all guides com ...

Страница 48: ... plug for connection to a 120 240 V 208 V 60 Hz 3 pole 4 wire grounding power supply Program duration approximate Cottons without prewash Rapid wash Cottons 3 5 lbs Spin speed W 1930i Detergent dispenser Automatic for Temperature control 170 F 1 h 49 min 140 F 39 min from 400 to 1600 rpm Pre wash Main wash Fabric softener or starch Variable from cold to 170 F Technical data 48 All manuals and user...

Страница 49: ...49 All manuals and user guides at all guides com ...

Страница 50: ...50 All manuals and user guides at all guides com ...

Страница 51: ...51 All manuals and user guides at all guides com a l l g u i d e s c o m ...

Страница 52: ...Alteration rights reserved 000 3296 These instructions are printed on 100 recycled paper and are completely Biodegradable All manuals and user guides at all guides com ...

Отзывы: