background image

Help protect our environment

Warning - To reduce the risk of fire,
electric shock, or injury to persons,
read the IMPORTANT SAFETY IN-
STRUCTIONS before operating this
appliance.

Disposal of the packing
material

The transport and protective packing is
mostly manufactured from the following
recycled or recyclable materials:

– corrugated paper/cardboard

– polystyrene - CFC-free

– polystyrene foil (transparent)

– Untreated wood

– Polypropylene (PP) strapping

Rather than throwing these materials
away, please take them to your com-
munity recycling center.

Disposal of your old machine

Old machines contain materials which
can be recycled. Please contact your
recycling center or scrap merchant be-
fore disposing of the appliance.

Help protect our environment

6

Содержание NOVOTRONIC W 1918

Страница 1: ...ructions for the W 1918 Washing Machine In order to protect yourself and avoid damage to your machine it is absolutely necessary to read the operating instructions prior to installation and operation M Nr 05 226 210 ...

Страница 2: ...nging the programme sequence 11 Adding detergent 12 Adding fabric softener or starch 13 Programmes 14 Textile care symbols 19 Additional options 20 Delay start Time remaining indicator 21 Programmable functions 22 USER MAINTENANCE Instruction Cleaning and care 27 Problem solving guide 31 After sales service 36 INSTALLATION INSTRUCTIONS 37 Plumbing 42 Electrical connection 43 Technical data 45 Cont...

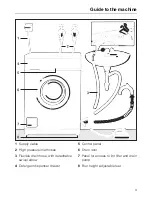
Страница 3: ...2 High pressure inlet hoses 3 Flexible drain hose with detachable swivel elbow 4 Detergent dispenser drawer 5 Control panel 6 Drum door 7 Panel for access to lint filter and drain pump 8 Four height adjustable feet Guide to the machine 3 ...

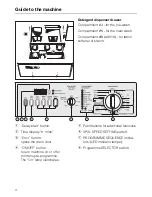
Страница 4: ...ramme The On lamp illuminates Detergent dispenser drawer Compartment i for the pre wash Compartment j for the main wash Compartment p with lid for fabric softener or starch f Pushbuttons for additional functions g SPIN SPEED SETTING switch h PROGRAMME SEQUENCE indica tors LED indicator lamps i Programme SELECTOR switch Guide to the machine 4 ...

Страница 5: ...th the controls 8 Do not repair or replace any part of the appliance or attempt any ser vicing unless specifically recom mended in the user maintenance instructions or in published user repair instructions that you under stand and have the skills to carry out 9 Do not add gasoline dry cleaning solvents or other flammable or ex plosive substances to the wash water These substances give off vapors t...

Страница 6: ...rom the following recycled or recyclable materials corrugated paper cardboard polystyrene CFC free polystyrene foil transparent Untreated wood Polypropylene PP strapping Rather than throwing these materials away please take them to your com munity recycling center Disposal of your old machine Old machines contain materials which can be recycled Please contact your recycling center or scrap merchan...

Страница 7: ...ontrols offer a com bination of simple operation with many optional features For instance since a main wash gener ally gives good results for a normal load the pre wash cycle has been made a user selectable option saving time water and energy over older full cycle machines Economy For optimum economical usage re member the following tips The automatic load control feature will adjust the water lev...

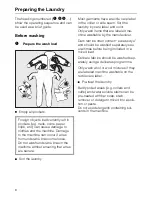
Страница 8: ...abel in the collar or side seam Sort the laundry by care label and color Only wash items that are labeled ma chine washable by the manufacturer Dark fabrics often contain excess dye and should be washed separately sev eral times before being included in a mixed load Delicate fabrics should be washed sep arately using a delicates programme Only wash wool or wool mixtures if they are labeled machine...

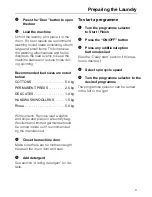
Страница 9: ...urtains Remove lead weights and strips and place in a laundry bag Woollens and knitted garments should be turned inside out if recommended by the manufacturer 4 Close the machine door Make sure there are no clothes caught between the drum door and seal 5 Add detergent See section Adding detergent for de tails To start a programme 1 Turn the programme selector to Start Finish 2 Press the ON OFF but...

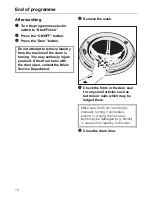
Страница 10: ...usly injure yourself If the drum turns with the door open contact the Miele Service Department 4 Remove the wash 5 Check the folds in the door seal for any small articles such as buttons or nails which may be lodged there Make sure the drum is empty by manually turning it completely around or during the next use items may be damaged e g shrink or cause other laundry to discolor 6 Close the drum do...

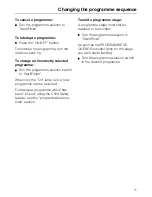
Страница 11: ...inish When only the On lamp is lit a new programme can be selected To change a programme which has been locked using the Child Safety feature see the programmable func tions section To omit a programme stage A programme stage must first be reached to be omitted Turn the programme selector to Start Finish As soon as the PROGRAMME SE QUENCE indicator lamp for the stage you wish starts flashing Turn ...

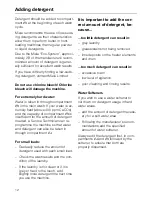
Страница 12: ...hine so that water and detergent can also be taken in through compartment i For small loads Gradually reduce the amount of detergent used with each small load Check the wash results and the con dition of the laundry If the laundry is not clean or if it is grey or hard to the touch add slightly more detergent the next time you use the machine It is important to add the cor rect amount of detergent ...

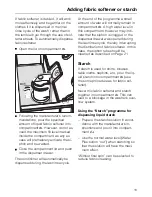
Страница 13: ...ormally remain in compartment p A high water level in this compartment however may indi cate that the siphon is clogged or the dispenser drawer was opened during the last rinse cycle thereby interrupting the distribution of fabric softener In this case the siphon tube should be cleaned as described on Page 21 Starch If starch is used for shirts blouses table cloths napkins etc pour the liq uid sta...

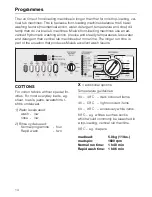
Страница 14: ...er run time is part of the equation that produces Miele s excellent wash results COTTONS For cotton fabrics without special fin ishes For most everyday loads e g sheet towels jeans sweatshirts t shirts underwear 1 Water levels used wash low rinse low 2 Rinse cycles used Normal programme four Rapid wash two X additional options Temperature guidelines 30 40 C dark coloured items 40 50 C light colour...

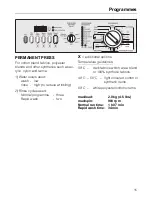
Страница 15: ...wrinkling 2 Rinse cycles used Normal programme three Rapid wash two X additional options Temperature guidelines 30 C dark fabrics which are a blend or 100 synthetic fabrics 40 C 50 C light coloured cotton or synthetic items 60 C white polyester cottons items max load 2 0 kg 4 5 lbs max spin 900 rpm Normal run time 1 h 07 min Rapid wash time 34 min Programmes 15 ...

Страница 16: ...cycles used Normal programme three Rapid wash two X additional options Temperature guidelines cold 30 C dark coloured silks and all synthetic items lingerie 40 50 C light coloured silks and lace tableclothes 60 C white cotton lace and crocheted items For machine washable curtains use cold 30 C with a pre wash Load the drum loosely up to 1 3 full max load 1 0 kg 2 2 lbs max spin 600 rpm Normal run ...

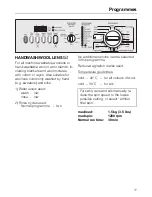
Страница 17: ...r levels used wash low rinse low 2 Rinse cycles used Normal programme two No additional options can be selected in this programme Reduced agitation is also used Temperature guidelines cold 40 C for all colours of wool cold 30 C for silk For satin lace and silk manually re duce the spin speed to the lowes possible setting or select without final spin max load 1 5 kg 3 5 lbs max spin 1200 rpm Normal...

Страница 18: ... Rinse For hand washed items that can be gently rinsed and if desired spun 1 Water levels used rinse high 2 Rinse cycles used Normal programme two max load 2 0 kg 4 5 lbs max spin 900 rpm Normal run time 14 min NOTE If cold is selected in HAND WASH WOOLLENS or DELICATES the machine will heat the water to 24 C to help the detergent dissolve and to compensate for temperature fluctuation s in the plu...

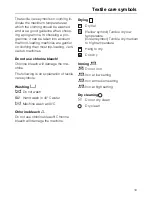
Страница 19: ...ine bleach Chlorine bleach will damage the ma chine The following is an explanation of textile care symbols Washing c h Do not wash Hand wash in 40 C water 7 Machine wash at 40 C Chlorine bleach x Do not use chlorine bleach Chlorine bleach will damage the machine Drying Dry flat Yellow symbol Tumble dry low temperature Green symbol Tumble dry medium to high temperature Hang to dry Drip dry Ironing...

Страница 20: ...sensitive to detergents The Water plus option is available in the following programmes The wash and rinse cycles for COT TONS The wash cycle for PERMANENT PRESS Gentle action For actioning of lightly soiled items or delicate fabrics which tend to pill Drum movement is reduced by half Available in the COTTONS and PER MANENT PRESS programmes Rapid wash Offers a quick wash cycle approx 38 minutes Can...

Страница 21: ... minutes Select the programme The display will begin counting the delayed time backwards in one minute increments The Delay start lamp will remain lit Programme start When the delay time reaches zero the Time remaining lamp illumi nates and the Delay start lamp goes out The duration of the se lected programme will be shown on the display Deleting the start delay When the display reaches 9 h 30 min...

Страница 22: ...nt setting or an additional function is selected the On lamp will flash notifying you that the Child safety feature has been acti vated but the programme will continue uninterrupted This prevents children from inadvertently changing or stop ping a wash programme by playing with the dials If the programme selector switch is turned to its original position the On lamp will stop flashing To change a ...

Страница 23: ...rogam selector switch to Start Finish Step 2 Carry out steps 2 and 3 within 4 seconds Press the ON OFF button Step 3 Press the Water plus button 4 times i e press in and out twice The ON lamp will illuminate and the Pre wash and Main wash lamps will flash Programmable functions 23 ...

Страница 24: ...5th rinse cycle Set the programme selector to Drain Continue with Step 5 to activate CNo water intake through compartment i Set the programme selector to Starch Continue with Step 5 to activate DProgramme lock Child safety feature Set the programme selector to HANDWASH WOOLLENS cold Continue with Step 5 to activate Programmable functions 24 ...

Страница 25: ...ontinue with Step 5 to activate Step 5 activate the function Press the Water plus button twice i e in and out once to toggle the function ON OFF The Rinse 1 2 lamp will illuminate when the function is activated Step 6 to store in memory Press the ON OFF button Programmable functions 25 ...

Страница 26: ...f the three shown If the Rinse 1 2 indicator does not light up no function was acti vated If the Rinse 1 2 indicator lights up proceed as in Deleting the additional functions Exception the Rinse 1 2 indicator will light up if the switch is set to COTTONS 95 C Deleting the additional func tions Follow the same instructions given under To activate the additional func tions steps 1 to 4 When the Rins...

Страница 27: ...ccording to the manufacturer s instructions Do not use abrasive cleaners or sol vents Cleaning the detergent drawer Should the detergent drawer become clogged or dirty it can be cleaned as follows Pull out the drawer until it stops Press down the red release lever and at the same time pull the drawer out of the machine Clean the dispenser compartments and the fabric softener duct Remove the siphon...

Страница 28: ...n If laundry has been washed at a high temperature water draining out of the machine will still be hot Take the yellow filter flap opener from behind the detergent drawer facia panel see illustration above Open the flap Place a dish under the drain fixture Turn the fluff filter lid round 2 3 times Do not take it right out With large volumes of water when the dish is full screw the fluff filter bac...

Страница 29: ...lter hous ing Remove any deposits of lime scale and detergent or foreign objects from the thread of the filter housing and filter unit as these objects can cause a leakage of water Deposits of limescale are often a sign of underdosage of powder Put the fluff filter back in place and secure After performing this action gently pour approx 2 litres of water into the detergent dispenser compartment j ...

Страница 30: ...he hose Slowly turn on the valve and check for leaks Inspect the inlet hose regularly The hose should be replaced if there are small cracks in the surface or if it has been otherwise damaged or cut If a replacement is necessary use only a genuine Miele inlet hose as other hoses may burst under pressure To clean the filter in the inlet valve Using a wrench carefully loosen and remove the plastic ho...

Страница 31: ...ircuit breaker has not tripped There is power and the ON indicator lamp is on but the programme selector has not been turned to the Start Finish position Turn the programme selector to the Start Finish position Select a programme The Check p q indicator lamps are flashing The Check p indicator lamp is flashing and the programme has started The water inlet is blocked The inlet valve is not opened f...

Страница 32: ...he ON indicator lamp is flashing The child safety feature is activated and the programme has been changed Go back to the programme originally selected The wash is too wet after the final spin The spin speed selected was too low Select a higher spin speed next time The load was not evenly distributed in the drum and the laundry was spun at a reduced speed to protect the machine Mix large and small ...

Страница 33: ...ompartment The dispenser drawer was not pushed in when the fabric softener was being dispensed Make sure the drawer is all the way in The siphon tube is either incorrectly positioned or clogged Clean the siphon tube There is an excessive build up of foam Use only a low sudsing detergent at the appropriate temperature Follow recommendations on the package Take the water hardness into account Use le...

Страница 34: ...t give the required result Liquid detergents do not contain bleaching agents They do not remove stains as well as powdered detergents containing non chlorinated bleaches Use a general purpose powder detergent containing a bleaching agent Pre treat stains with a stain remover After washing pilling appears on the fabric This is a normal occurance of everyday wear with some fabrics These fabrics must...

Страница 35: ...the sec tion on cleaning and care Pull down the ring in the upper right corner of the access area and the door will open Always make sure the drum is sta tionary before reaching in to remove laundry Reaching into a moving drum is extremely dangerous To check water pressure Place a bucket under the water sup ply valve Turn on the valve If 5 liters 1 gal of water flows into the bucket in 15 seconds ...

Страница 36: ...ease contact Your Miele Dealer or The Miele Service Department see back cover When contacting the Service Depart ment please have the model and serial numbers of your appliance available both of which can be found on the data plate visible above the front glass on the inside of the door After sales service 36 ...

Страница 37: ...hick and 60 x 60 cm wide Ideally the base should be large enough to span several joists and should be an chored to the joists and not just the floorboards As a general rule we recommend the installation of the machine or washer dryer stack in the corner of a room where the stability of the floor is at its greatest Installation Lift the machine from its shipping pallet and move it to the installati...

Страница 38: ...c caps supplied The machine should not be moved with out the transit struts in place The transit fitting should be stored in a safe place for future use It must be reinstalled before the ma chine moved Reinstallation can be carried out by reversing the proce dure INSTALLATION INSTRUCTIONS 38 ...

Страница 39: ...t it does not slip or slide along the floor Take care not to injure yourself or damage any surrounding furniture Shorten the front left leg so the ma chine is standing on the other three legs only Push the top front left cor ner diagonally to ensure that the right rear leg is resting on the floor Check with a level in both planes as shown in the illustration To tilt the machine toward the back ext...

Страница 40: ...t tight may cause damage to both the machine and its surrounding area If a countertop is placed over the washer at least a 6 mm 1 4 gap must be left between the top of the machine and bottom of the counter top and nothing should be within 12 mm 1 2 of any other side of the washing machine Washer Dryer Stack This Miele washing machine can be in stalled as part of a washer dryer stack in combination...

Страница 41: ... Any residual water will be flushed out during the programme Water hardness reminder The amount of detergent needed to wash clothes depends on various fac tors including the water hardness in your area You can set the water hard ness dial in the detergent dispenser as a reminder Turn the dial to the desired setting Use the tool supplied with the ma chine It is located behind the deter gent drawer ...

Страница 42: ...r supply it is essential that the hot water inlet hose is also connected to the cold water supply using a Y connector Otherwise cor rect functioning of the machine could be impeded It is not allowed to connect the ma chine to a hot water supply only for functional and safety reasons Connection to the drainage system The 1 5 m hooked drain hose may be connected as follows 1 Directly into a sink hoo...

Страница 43: ...t in the risk of electric shock Check with a qualified electrician or serviceman if you are in doubt as to whether the appliance is properly grounded Do not modify the plug provided with the appliance if it will not fit the outlet have a proper outlet installed by a quali fied electrician ELECTRICAL CONNECTION The washing machine comes supplied with a 1 5 m 5 ft long 12 4 AWG cord with a 4 wire 3 ...

Страница 44: ...you to use a standard dryer 4 wire 30A outlet that most laundry rooms already have Two 15A Miele appliances can be powered from this kit For more infomation on the Double Receptacle please contact your Miele dealer or the Miele Service Department Electrical connection 44 ...

Страница 45: ...ty Rated load Fuse rating Water pressure Maximum drain height Drain hose diameter Maximum drain length Power supply Max floor load 850 mm 595 mm 610 mm 99 kg 5 kg dry laundry 2 8 kW 15 Amp 14 140 psi 0 1 1 MPa 1 25 m 25 mm 5 0 m 120 V 240 V 2 phase 60 Hz 208V 164 kg 360 lbs Technical data 45 ...

Страница 46: ...le 4 wire grounding Power consumption extended cycles Cottons without prewash 95 C Rapid wash Cottons 3 2 kg 60 C Water consumption Cottons without prewash Rapid wash Cottons 3 2 kg Programme duration Cottons without prewash 95 C Rapid wash Cottons 3 2 kg 60 C Spin speed W 1918 Detergent dispenser Automatic for Temperature control variable 1 30 kWh 0 25 kWh 65 l 55 l 108 minutes 38 minutes from 40...

Страница 47: ...47 ...
Страница 48: ...Alteration rights reserved 000 0699 This paper is made from 100 chlorine free bleached cellulose and therefore protects the environment ...

Отзывы: