background image

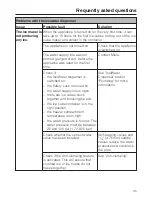
Problems with the ice/water dispenser

Issue

Possible fault

Solution

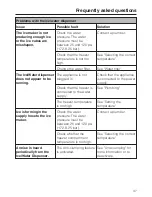
The ice maker is
not producing
any ice.

When the appliance is turned on for the very first time, it can
take up to 10 hours for the first ice cubes to drop out of the ice
cube maker and collect in the container.

The appliance is not turned on.

Check that the appliance
is switched on.

The water supply line was not
primed (purged of air) before the
appliance was used for the first
time.

Contact Miele.

Check if:

– the Ice/Water dispenser is

switched on.

– the Safety Lock is turned on.

– the water supply line is open.

– there are ice cubes stuck

together and blocking the exit.

– the ice cube container is in the

right position.

– the freezer compartment

temperature is too high.

– the water pressure is too low. The

water pressure must be between
25 and 120 psi (1.72-8.25 bar).

See "Ice/Water
Dispenser" and/or
"Plumbing" for more
information.

Check whether the correct water
valve has been installed.

Self-tapping valves and

3

/

16

" (4.76 mm) saddle

valves reduce the water
pressure and can block
the pipe.

Check if the Anti-clumping feature
is activated. This will ensure that
crushed ice or ice cubes do not
freeze together.

See "Anti-clumping".

Frequently asked questions

45

Содержание F 1471 Vi

Страница 1: ...Operating and Installation Instructions Freezer with Ice Water Dispenser F 1471 Vi To prevent accidents and appliance damage read these instructions before installation or use M Nr 09 157 430 en US CA ...

Страница 2: ...d door alarm 14 Temperature alarm 14 Door alarm 14 Setting the temperature 15 Using the freezer efficiently 17 Freezing food 17 Defrosting 18 Cooling drinks quickly 18 SuperCool 20 Ice Water Dispenser 21 Safety lock 24 Lighting 24 Settings 25 Anti condensation heater 25 Anti clumping 26 Button sound 26 Automatic defrost 27 Adjusting the interior fittings 28 Cleaning and care 30 Cleaning the interi...

Страница 3: ...ation options 55 Door dimensions open 115 57 Niche dimensions 58 Installing the appliance 60 Before you begin 60 RemoteVision module installation 62 Preparing the installation niche 63 Sliding the appliance into the installation niche 67 Aligning the appliance 68 Attaching the appliance to the installation niche 69 Preparing the custom door 71 Attaching and aligning the custom door front 73 Aligni...

Страница 4: ...with the household electrical supply This data must correspond to prevent injury and machine damage Consult a qualified electrician if in doubt Before installation or service disconnect the power supply to the work area by unplugging the unit tripping the circuit breaker or removing the fuse Do not use an extension cord to connect this appliance to electricity Extension cords do not guarantee the ...

Страница 5: ...re making plumbing connections ensure the appliance is disconnected from the mains electricity supply Do not operate any appliance with a damaged cord or plug or if the appliance has been damaged in any manner Contact Miele s Technical Ser vice Department This appliance must not be used in a non stationary location e g on a ship Do not install the freezer in a room with too low an ambient temperat...

Страница 6: ...icularly when hands are damp or wet Skin may adhere to these extremely cold surfaces Avoid contact with the moving parts of the ejector mechanism or with the heating element located on the bottom of the ice maker Do not place fingers or hands on the automatic ice making mechanism while the appliance is plugged in Do not refreeze frozen foods which have thawed completely Do not store or use gasolin...

Страница 7: ...f the door Leave the shelves in place so that children may not easily climb inside Consult with your municipal policy on recycling Be careful not to damage any part of the pipework while awaiting disposal by puncturing the refrigerant channels in the evaporator bending any pipework scratching the surface coating Splashes of refrigerant can damage the eyes Your old freezer may have a cooling system...

Страница 8: ...nterior shelf fControl panel for the Freezer gMain switch to turn the appliance On Off hFreezer baskets iWater filter jIce Water dispenser in the door kControl panel for Ice Water Dispenser lIce Water dispenser outlet mDrip tray with grid and cover Guide to the freezer 8 ...

Страница 9: ... the SuperCool function Control panel for Ice Water Dispenser aLighting sensor button bWater sensor button cIce cube sensor button dOn Off sensor button for the Ice Water dispenser eSensor button for the temperature and or door alarm fWater filter change indicator Only visible when the relevant function is activated dCrushed ice sensor button eSafety lock sensor button Guide to the freezer 9 ...

Страница 10: ...g the appliance On Off Open the appliance door Turn the appliance On Off with the main switch The main switch is located on the right side underneath the control panel Once on the appliance begins cooling When the door is open the interior lights come on The access button will light in the control panel The preset temperatures factory default settings are reached after a few hours Do not put any f...

Страница 11: ... settings menu touch the access button p so it turns white The last settings entered are stored If the access button is not pressed the display will go out after approx 30 secs The other sensor buttons now disappear from the control panel Additional settings In the settings mode you can select and change functions In settings mode certain settings can be changed The function possibilities are desc...

Страница 12: ...ep holding the X button down until the following appears in the display approx 5 seconds Tap the X button until appears in the display Touch the access button p to confirm By touching the X button you can choose between 0 Button sound is off 1 Button sound is on Return to menu Touch the access button p to confirm the setting Tap the X button until you see in the display Touch the access button p Y...

Страница 13: ...ecautions need to be taken Shut off the water supply line several hours before switching off the appliance Take all food out of the appliance Turn the appliance off Unplug the appliance Empty the ice cube container Clean the interior Remove and discard the water filter secure the filter cap Leave the door open to prevent odors Settings 13 ...

Страница 14: ...ected the alarm with turn off and the sensor button for alarm will go out Turning the temperature alarm Off As soon as the alarm condition is corrected the alarm signal turns off and the affected zone stops flashing in the display The alarm indicator goes out To turn the alarm off early press the alarm sensor button The alarm signal turns off The alarm indicator remains on until the alarm conditio...

Страница 15: ...control panel always shows the desired temperature Temperature range The temperature can be set within the following range 7 F to 11 F 14 C to 24 C To freeze fresh food and store frozen food for an extended period of time a temperature of 0 F 18 C is suggested The room temperature and the installation location can affect the time it takes for the appliance to drop to the coldest temperature If the...

Страница 16: ...on p once Keep holding the X button down until the following appears in the display approx 5 seconds Tap the X button until appears in the display Touch the access button p to confirm By touching the X button you can select either Fahrenheit or Celsius for the temperature display 0 Fahrenheit 1 Celsius return to menu Touch the access button p to confirm the setting Tap the X button until a appears...

Страница 17: ...ion ahead of time see SuperCool This will provide the food already in the freezer with a protective boost of cold air Placing food in the freezer Food to be frozen can be placed anywhere in the freezer The freezer baskets can hold a maximum of 35 lbs 16 kg of frozen food Spread the food to be frozen across the bottom of the freezer basket or across the shelves so that it will freeze through to the...

Страница 18: ... poultry Drain it away and promptly wash the container the sink and your hands Danger of salmonella poisoning Fruit should be defrosted at room temperature in its packaging or in a covered bowl Most vegetables can be cooked while still frozen Simply place directly into boiling water or hot oil Cooling drinks quickly To cool drinks quickly switch on the SuperCool function See SuperCool for more inf...

Страница 19: ...eats from freezing together in solid blocks when packed separate with a sheet of plastic freezer wrap Do not season fresh foods or blanched vegetables before freezing Cooked food can be lightly seasoned before freezing but care should be taken as the taste of some spices alters when frozen Do not place hot foods or drinks in the freezer This causes already frozen food to thaw and increases the ene...

Страница 20: ...itching on SuperCool Touch the SuperCool sensor so that it turns yellow The temperature now begins to fall with maximum cooling performance The new temperature setting appears in the display 22 F 30 C Switching off SuperCool The SuperCool function automatically switches off after approx 52 hours The sensor button turns white and the appliance continues running at normal power To save energy you ca...

Страница 21: ...Touch the water button until it flashes yellow Touch and hold the water button again This activates the flushing function which uses approximately 1 6 gallons 6 liters of water You can interrupt the flushing process at any time to empty the container by taking your finger off the water button During this time the water button will flash yellow again As soon as the flushing process is complete you ...

Страница 22: ...d under the dispenser to activate it via the light sensor All of the touch controls for the Ice Water Dispenser should now appear white If this is not the case the Safety Lock is activated i e lock will appear yellow See Safety Lock If lock is blinking the drip tray needs to be emptied see Cleaning and care Once the freezer has cooled to a freezing temperature the ice cube maker fills with water D...

Страница 23: ...ton when the jar is almost full Ice in the discharge may cause the cup to overflow or block the discharge The ice cube maker can produce approx 150 ice cubes within 24 hours Note Ice production will vary due to your water supply temperature pressure and hardness The amount of ice cubes produced depends on the temperature in the freezer section The lower the temperature the more ice cubes will be p...

Страница 24: ... now locked To unlock the buttons Touch the lock button so it turns white Lighting In order to turn the Ice Water dispenser lighting on or off Touch the light button so it turns yellow lighting on or white lighting off If the Ice Water dispenser is not used for longer than 2 minutes it switches into standby mode and the Ice Water dispenser lighting turns off Turning off the Ice Water dispenser The...

Страница 25: ...ock and light buttons turn yellow The lighting color of other buttons indicates their On Off setting Yellow On White Off Release both buttons Anti condensation heater A heater behind the control panel of the Ice Water dispenser ensures that frost and ice do not build up To save energy you can turn the heater off This feature is turned off by factory default To turn the anti condensation heater on ...

Страница 26: ...mation of ice clumps in the dispenser This feature is turned on by factory default To turn the anti clumping feature off Touch the cubes button until it turns white Button sound If you prefer the buttons to be silent when touched the button sound can be turned off This feature is turned on by factory default To turn button sound off Touch the crushed button until it turns white Exiting the setting...

Страница 27: ...ce collects in the evaporator It is automatically defrosted and dissipated by the condenser periodically This automatic defrosting system enables the freezer to remain permanently ice free while ensuring that the food stored in the freezer stays frozen Automatic defrost 27 ...

Страница 28: ...and cleaning the door shelf can be shifted or completely removed Using both hands grasp the door shelf by the frame lift it upward a bit then tip it slightly forward Slide the tipped shelf up or down along the side rails and click it back into place at the desired location Make sure that the basket is level Removing the door shelf Slide the shelf upwards all the way to the top of the side rails un...

Страница 29: ...ition before the drawer can be removed Using a suitable object turn the safety lock to a horizontal position a On both sides of the basket pull the latches b upward and lift the basket out of the freezer Replacing the freezer basket Fully extend the telescopic tracks Lay the basket onto the tracks so that it connects in the front and back Turn the safety lock back to the vertical position Slide th...

Страница 30: ...electrical components and cause a short circuit Do not allow water to get into the electronic unit or lights The data plate located inside the appliance must not be removed It contains information which is required in the event of a service call To better maintain your appliance avoid the following cleaners containing soda ammonia thinners or chlorides cleaners containing descaling agents or lime ...

Страница 31: ...e out any removable parts e g shelves baskets Cleaning the interior and accessories Use a mild solution of warm water and liquid dish soap Wash all accessories and drawers by hand Do not wash in a dishwasher Clean the appliance as needed After washing wipe down the interior and accessories with a clean wet cloth then dry with a soft cloth Leave the appliance door open for a short time so the moist...

Страница 32: ...ontainer and the anti clumping screw to prevent new ice cubes from sticking To re insert push the ice cube container all the way back onto the supports until it locks into position If the container cannot be pushed all the way back twist the anti clumping screw in the container Drip tray The drip tray collects excess water As soon as the drip tray is full the lock button on the Ice Water dispenser...

Страница 33: ...orous over time Clean the door seals with warm water and dry thoroughly After cleaning Return all shelves and accessories Plug in the appliance and turn it on with the main switch Switch on the SuperCool function The freezer section will cool down quickly Once the temperature is cold enough place the freezer baskets containing the frozen food into the freezer Turn off the SuperCool function on a t...

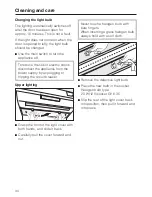
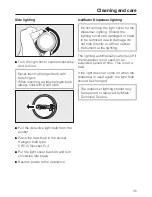
Страница 34: ...appliance from the power supply by unplugging or tripping the circuit breaker Upper lighting Grasp the front of the light cover with both hands and slide it back Carefully pull the cover forward and out Never touch a halogen bulb with bare fingers When inserting a glass halogen bulb always hold with a soft cloth Remove the defective light bulb Place the new bulb in the socket Halogen bulb type 20 ...

Страница 35: ...to the appliance Ice Water Dispenser lighting Do not remove the light cover for the dispenser lighting Should the lighting covers be damaged or need to be removed due to damage do not look directly or with an optical instrument at the lighting The lighting automatically switches off if the dispenser is not used for an extended period of time This is not a fault If the light does not come on when t...

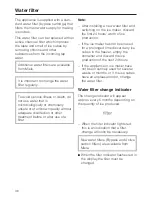
Страница 36: ...stalling a new water filter and switching on the ice maker discard the first 24 hours worth of ice production If the ice maker has not been used for a prolonged time discard any ice cubes in the freezer empty the container and discard the ice production of the next 24 hours If the appliance or ice maker have not been routinely used for several weeks or months or if the ice cubes have an unpleasant...

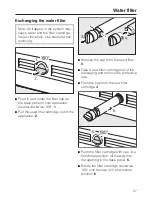
Страница 37: ... 180 1 Pull the used filter cartridge out of the appliance 2 Remove the cap from the used filter 3 Take a new filter cartridge out of the packaging and remove the protective cap Push the cap onto the new filter cartridge 4 Push the filter cartridge with cap in a horizontal position all the way into the opening in the base panel 5 Rotate the filter cartridge clockwise 180 until the cap is in a hori...

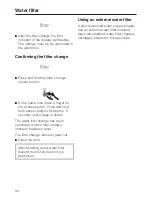
Страница 38: ...sor buttons for approx 5 seconds until a beep is heard The water filter change has been confirmed and the filter change indicator had been reset The filter change indicator goes out Close the door After installing a new water filter discard the first 24 hours of ice production Using an external water filter If your household water supply already has an external water filter installed leave the sta...

Страница 39: ...have met the testing requirements pursuant to Section 116830 of the Health and Safety Code for the following health related contaminants Cysts Turbidity None None Microbiological Contaminants and Turbidity Inorganic Radiological Contaminants Organic Contaminants Do not use where water is microbiologically unsafe or with water of unknown quality except that systems certified for cyst reduction may ...

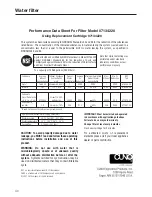
Страница 40: ...e Max Min NSF Influent Concentration Water Product Water Effluent Reduction Test Concentration mg L Concentration Reduction Concentration Cysts 166500 Minimum 50 000 L 1 99 99 99 95 1 99 99 516458 05 Turbidity 10 7 11 1 NTU 0 31 97 09 0 5 NTU 0 49 95 42 516456 05 Particulate Class I Particle size At least 10 000 0 5 to 1 um 5700000 particles ml 30583 99 52 85 69000 98 9 511079 03 Chlorine taste and ...

Страница 41: ...This product F 1471 Vi KIMIWD18US is tested and certified by WQA against ORD0902 for California lead free compliance Miele Cie KG Carl Miele Straße 29 D 33332 Gütersloh Lead free certificate 41 ...

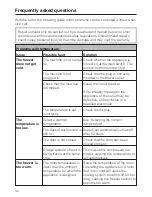
Страница 42: ...the breaker trips again the appliance or the outlet may be defective Contact Miele or a qualified electrician The temperature is set incorrectly Check the display The temperature is too low Select a warmer temperature See Selecting the correct temperature The SuperCool function is still on SuperCool automatically shuts off after 52 hours The door is not closed Check that the door has been closed p...

Страница 43: ...ow open without force The compressor kicks on very frequently and for too long The ventilation slits are covered or dusty Clean with a vacuum or brush The door has been opened too frequently or a large amount of unfrozen food has been put in at once for freezing Once the freezer gets down to the set temperature the compressor will turn off The door is not closed Check that the door has been closed...

Страница 44: ...to be changed soon Order replacement filters from Miele The filter display is flashing red The water filter needs to be changed See Exchanging the water filter The Lock indicator flashes in the display The drip tray for the Ice Water Dispenser is full Empty the drip tray by soaking up the water with a sponge or dish cloth The control panel has fogged up The heating element behind the panel is turn...

Страница 45: ...witched on the Safety Lock is turned on the water supply line is open there are ice cubes stuck together and blocking the exit the ice cube container is in the right position the freezer compartment temperature is too high the water pressure is too low The water pressure must be between 25 and 120 psi 1 72 8 25 bar See Ice Water Dispenser and or Plumbing for more information Check whether the corr...

Страница 46: ...ct water valve has been installed Self tapping valves and 3 16 4 76 mm saddle valves reduce the water pressure and can block the pipe The Ice Water has an unpleasant odor flavor When ice is stored for an extended period it may absorb odors which affects the taste Use the ice maker more frequently Check if the ice cube container is dirty Clean the container Unsealed packages in the freezer will tra...

Страница 47: ...s not plugged in Check that the appliance is connected to the power supply Check that the freezer is connected to the water supply See Plumbing The freezer temperature is too high See Setting the temperature Ice is forming in the supply hose to the ice maker Check the water pressure The water pressure must be between 25 and 120 psi 1 72 8 25 bar Contact a plumber Check whether the freezer compartm...

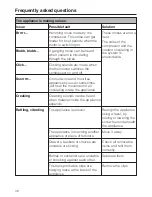
Страница 48: ... free appliances you can sometimes just hear the movement of air circulating inside the appliance Creaking Creaking sounds can be heard when material inside the appliance expands Rattling vibrating The appliance is uneven Realign the appliance using a level by raising or lowering the screw feet underneath the appliance The appliance is touching another appliance or piece of furniture Move it away ...

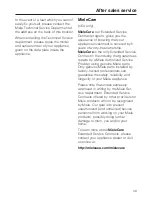
Страница 49: ... that guarantees repairs by a Miele Authorized Service Provider using genuine Miele parts Only genuine Miele parts installed by factory trained professionals can guarantee the safety reliability and longevity of your Miele appliance Please note that unless expressly approved in writing by the Miele Ser vice department Extended Service Contracts offered by other providers for Miele products will no...

Страница 50: ......

Страница 51: ...formation is subject to change Please refer to our website to obtain the most current product specification technical warranty information To prevent accidents and machine damage read these instructions before installation or use ...

Страница 52: ... reach of babies and young children Danger of suffocation Disposal of an old appliance Old appliances contain materials that can be recycled Please contact your local recycling center about the possibility of recycling these materials Before discarding an old appliance disconnect it from the electrical supply and cut off the power cord to prevent it from becoming a hazard Caring for the environmen...

Страница 53: ...talled in a dry well ventilated room Do not install the appliance outdoors in an environment with dripping water in rooms which are at risk of frost The installation location should not be exposed to direct sunlight nor near a heat source such as an oven radiator etc The ambient temperature should not drop below 55 F 13 C or rise above 110 F 43 C otherwise malfunctions may occur If installation ne...

Страница 54: ...al that all attachable furniture fixtures are connected securely to the base or the wall by suitable means Ventilation The air intake and outlet must not be blocked or covered in any way They also need to be dusted cleaned on a regular basis Installation niche To ensure safe trouble free installation and the best possible cosmetic result check to be sure that the installation space complies with t...

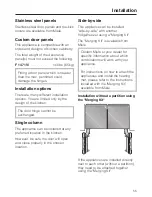
Страница 55: ...can be installed at any preferred location in the kitchen However be sure the door will open and close properly in the chosen location Side by side This appliance can be installed side by side with another fridge freezer using a Merging Kit The Merging Kit is available from Miele Contact Miele or your dealer for specific information about which combinations will work with your appliance For instru...

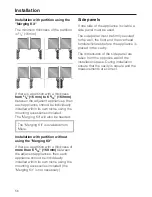
Страница 56: ...f there is a partition with a thickness of more than 6 5 16 160 mm between the adjacent appliances then each appliance should be individually installed within its own niche using the mounting accessories included the Merging Kit is not necessary Side panels If one side of the appliance is visible a side panel must be used The side panel must be firmly secured to the wall the floor and the overhead...

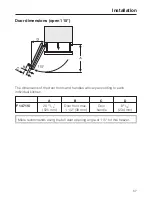
Страница 57: ...door fronts and handles will vary according to each individual kitchen A B C D F 1471 Vi 20 11 16 525 mm Door front max 1 1 2 38 mm Door handle 9 3 16 234 mm Miele recommends using the full door opening angle of 115 for this freezer Installation 57 ...

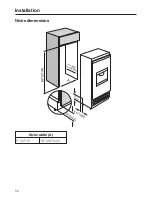
Страница 58: ...Niche dimensions Niche width A F 1471 Vi 18 457 mm Installation 58 ...

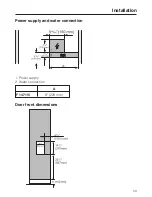
Страница 59: ...Power supply and water connection 1 Power supply 2 Water connection A F 1471 Vi 9 229 mm Door front dimensions Installation 59 ...

Страница 60: ... in accordance with the Canadian Electric code C22 1 latest edition Provincial and Municipal codes and or local codes Tools needed for installation Cordless screwdriver Torx screwdriver Hammer drill Wood drills in different sizes Hammer rachet 5 16 8 mm Adhesive tape Multi grip pliers Level Tape measure Square When fastening the cabinet to the wall behind it see Installing the appliance use suitab...

Страница 61: ...ce complies with the installation requirements Check the base see Installation Check the dimensions of the cavity Check that the cavity is square Check the location of the power outlet Check the location of the water connection see Plumbing Check that all furniture parts in the vicinity of the appliance are securely connected to the wall Check that the adjacent furniture fixtures do not collide wi...

Страница 62: ...o longer secured and may be unstable From the rear of the appliance carefully lift it from the pallet Once the appliance is on the ground it can be wheeled around RemoteVision module installation optional accessory Always disconnect the appliance from the power supply when performing installation maintenance or service work Install the RemoteVision module before placing the appliance in its instal...

Страница 63: ... that case repeat the process If that does not correct the problem contact Miele Pull the antenna d straight out Guide the cover b over the antenna d and screw on the cover Angle the antenna d so that it faces to the right or left If necessary disconnect the power supply and continue installing the appliance Preparing the installation niche Keep the appliance door closed until it is securely faste...

Страница 64: ...p brackets b so the appliance can be securely attached to the base or wall The length of the wooden beam a should be to the width of the installation space If possible always screw the wooden beam into existing studs The distance D between the anti tip brackets b is the width of the appliance Position the anti tip brackets b on the left and right walls of the appliance niche Mark the holes through...

Страница 65: ...cured to the wall behind it with several screws Only in this way can the appliance later secured in the built in cabinet be prevented from tipping In a cabinet with a back wall screw the back wall of the cabinet in several places directly to the wall behind it For this use suitable plugs screws depending on the type of wall In a cabinet without a back wall screw the cabinet to the wall behind it i...

Страница 66: ... appliance use a thicker wooden beam or attach two beams The beam must cover the appliance by at least 2 50 8 mm Mark the installation height lower edge of the beam on the rear wall of the niche Select screws according to the thickness of the wooden beam Determine the number of screws based on the niche width to ensure that the beam will be attached securely Locate wall studs near the rear wall of...

Страница 67: ...t breaker In the case of side by side installations a separate outlet must be used for each appliance To prevent the power cord from becoming caught Tie a piece of string to the middle of the power cord and feed it forward under the appliance When sliding the appliance in pull the cable forward c Carefully slide the appliance into the space until the height adjustable wheels interlock with the ant...

Страница 68: ... to align the installation aids e on the door Important When unscrewing the height adjustable feet proceed gradually alternating between left and right Unscrew the height adjustable feet until the mark on the base has reached the indicated guide dimension 1 1 4 32 mm The guide dimension of 1 1 4 32 mm is related to a niche height of 84 2134 mm Align the appliance again using a level Note When unsc...

Страница 69: ...h the top of the appliance it can be attached to the sides of the installation niche Pull out the plate side lugs i Secure the attachment plate side lugs If necessary shorten the filler strip j to the required height Place the 2 strips on top of each other k Insert the filler strip until you hear it click into place l Installing the appliance 69 ...

Страница 70: ...ide appliance Place the second filler strip on the peg and press both filler strips together Click the filler strips into place above the appliance Open the appliance door Screw the attachment plate lugs m to the adjacent furniture fixtures With side by side combinations only the external side of the appliances can be secured to the niche Now connect the water supply to the appliance see Plumbing ...

Страница 71: ... the screws and side strips o you will need them again later Remove the light switch cover see arrow Measure the distance X between the bracket from the door and the overhead furniture fixtures Loosen the two nuts Set aside the nuts you will need them again later With the inside facing up lay the custom door on a stable surface to avoid scratch marks place some plastic or a cloth on the surface In...

Страница 72: ... each attachment point with at least one screw Attach the bracket at the top with at least 6 screws The bracket includes a variety of holes for the various design options of custom doors When performing work on the custom door always observe the following Always select the best load bearing surface of the custom door as the location for screws Always select a screw length that is shorter than the ...

Страница 73: ... on both sides of the appliance door Bag E contains spare screws for this purpose Screw the nuts q a few turns onto the threaded bolts p Do not tighten the nuts completely Close the appliance door and check the distance to doors of adjacent furniture fixtures Align the custom door height with the threaded bolts p Now tighten the nuts q on top This secures the appliance door Installing the applianc...

Страница 74: ...r and the custom door Screw the brackets onto both sides of the appliance to hold the cover strip Insert the cover strip into the space between the appliance and the side panel For side by side combinations the cover strips on both sides of the appliance are applied to the outermost spaces only Attach the light switch cover Installing the appliance 74 ...

Страница 75: ...er plates in place Attach the toe kick cover to the plinth Mounting the air separator The air separator on the inside of the freezer door keeps the supply and exhaust air separate This prevents warm exhaust air from flowing into the machine optimizing the energy performance of the unit If necessary shorten the three parts of the air separator Insert the foam pieces back into the sides Open the fre...

Страница 76: ...ows the dispenser to be aligned with the custom door to achieve the best possible appearance Disconnect the appliance from the power supply Press the dispenser back and pull downwards to remove Remove the cover and the plastic grill Remove the screw from the rear casing then lift the tab on the drip tray up and off Installing the appliance 76 ...

Страница 77: ...al strips Insert a screwdriver into one of the four slots and push sideways until the dispenser is aligned with the custom door the gray arrow will adjust to the rear the black arrow will adjust front Re tighten the screws of the strips Insert the drip tray back into place then clip the water sensors back into the position Replace the rear cover panel and screw Replace the drip tray and cover Fini...

Страница 78: ...oors Slide the cover frame onto the Ice Water Dispenser and press until it is flush with the door front For 1 1 2 38 mm thick custom doors Fit the extension trim onto frame Fit the cover frame onto the Ice Water Dispenser and press it firmly into position until it is flush with the door surface Installing the appliance 78 ...

Страница 79: ... cold water supply The water pressure must be between 25 and 120 psi 1 72 8 25 bar A separate shut off valve must be installed so that the water supply can be interrupted as needed The maximum outer diameter of the water pipe without fittings 3 8 10 mm The shut off valve for the water connection must not be located behind the appliance It is recommended to place the shut off valve directly next to...

Страница 80: ...Always observe the indicated clearance dimensions to prevent damage to the connecting pipe when pushing in the appliance Secure the connecting pipe to the floor with adhesive tape You may now proceed to install the appliance See Installing the appliance For appliances with a hose guide position the device in front of the niche and push the stainless steel tube through the hose guide at the back of...

Страница 81: ... suit the location of the connection on the appliance 2 Push the union nut and seal onto the water pipe Push the end of the water pipe into the appliance connection and screw on the union nut 3 First tighten by hand Then use an open ended wrench to tighten the union nut Do not over tighten Open the shut off valve and the main water connection Check for leaks at the connection for the shut off valv...

Страница 82: ...estions regarding the electrical connection of this appliance to the power supply please consult a licensed electrician or call the Miele Technical Service U1 800 999 1360 V1 800 565 6435 The appliance is supplied with a UL listed 3 wire power cord and NEMA 5 15 P plug ready for connection to a 120 V 60 Hz supply The fuse rating is 15 amps The appliance requires a 3 wire receptacle The receptacle ...

Страница 83: ...nstallation section of this manual Be sure your wireless system meets the following requirements A wireless router that supports an IEEE 802 11b protocol Windows XP or newer operating system Mac OS X 10 3 or higher Cable or DSL modem Microsoft Internet Explorer 6 or higher Safari 2 0 or higher Firefox 1 5 or higher Please note that each wireless router manufacturer supplies their own device driver...

Страница 84: ...ess button p to confirm See the table on the following page for a description of each setting in the display Use the Y or X buttons to select the RemoteVision options The module has been connected to the network when appears in the display If does not appear refer to the Network options section of the XKM 2000 Installation Instruction manual Press and hold the access button p for 2 seconds to conf...

Страница 85: ...ork established no IP address assigned Solid Connected to network Flashing In Ad Hoc Mode not connected Flashing In Ad Hoc Mode connected Selectable options Description of function Back 2 Reboot the module 3 Reset to factory settings 4 Enter Ad Hoc Mode Note If you cannot select any option other than Back the module has not been installed correctly RemoteVision optional accessory 85 ...

Страница 86: ...86 ...

Страница 87: ...87 ...

Страница 88: ...Alteration rights reserved 4811 INFORMATION IS SUBJECT TO CHANGE PLEASE REFER TO OUR WEBSITE TO OBTAIN THE MOST CURRENT PRODUCT SPECIFICATIONS TECHNICAL WARRANTY INFORMATION M Nr 09 157 430 02 ...

Отзывы: