


CAUTION
Read the rules of safe operation and instructions carefully.
WARNING
1. Keep electrical appliances out of reach from Children or infirm persons.
Do not let them use the appliances without supervision.
2. Ensure that the fan is switched off from the supply mains before removing the guard.
3. If the supply cord is damaged, it must be replaced by manufacturer or its service agent or a similarly
qualified person in order to avoid a hazard.
4. This appliance is not intended for use by persons (including children) with reduced physical, sensory
or mental capabilities, or lack of experience and knowledge, unless they have been given supervision
or instruction concerning use of the appliance by a person responsible for their safety.
RULES FOR SAFE OPERATION
1. Fan should be used under rated voltage.
2. Connect power after the fan be fully assembled.
3. Never insert fingers, pencils, or any other object through the guard. when fan is running.
4. Unplug from outlet when not in use. When moving fan from one location to another before putting on
or taking off parts and before cleaning.
5. Disconnect fan when removing grilles for cleaning.
6. Be sure fan is on a stable surface when operating to avoid overturning.
7. Do not place the fan beside window because rain may create electrical hazard.
ASSEMBLY OF BASE
1. Take the base and pedestal parts from the packing box.
2. Match locking lug to base.
3. Tighten the screw from the base to lock the fan and base.
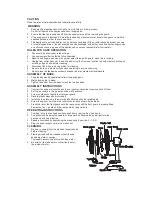
ASSEMBLY INSTRUCTIONS
1. Unscrew the spinner clockwise and the nut counter-clockwise to remove both of them.
2. Set the rear guard in the proper position with handle up.
3. Screw on plastic nut tightly to attach rear guard.
4. Discard plastic sleeve on motor shaft.
5. Install the fan blade onto the motor shaft until it reaches the retaining pin.
6. Screw the spinner onto the motor shaft counter-clockwise to fix the blade.
7. Press the rim of the front guard onto the rear guard untill the front guard is properly fitted.
Fasten the front guard and the rear guard by the guard clip.
OPERATING INSTRUCTIONS
1. To make / stop the fan head oscillate, push down / pull up the clutch knob.
2. The airflow can be adjusted upward or downward by Pushing the guard lightly to the
desired up or down direction.
3. Speed is controlled by depressing the piano keys (4 position: 0 -1-2-3).
4. Plug the power supply cord into a wall outlet.
CLEANING
1. Be sure to unplug from the electrical supply source
before cleaning.
2. Plastic parts should be cleaned with mild soap
and damp cloth or sponge.
Thoroughly remove soap film with clean water.
3. Be sure not to make water or other liquid enter
the inside of motor.
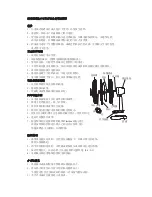
Rear
guard
Speed
knob
Tight
Spinner
Loose
Chassis
Circlip
Plasitc
Nut
Blade
Front
guard
Motor
Shaft
Clutch
knob
Motor
Housing


