Midea MCHSU-09PHH2 Скачать руководство пользователя страница 5


3


Do  not  insert  hands  or  other  objects 

through air inlet  or  outlet while  the  product 

is operated. 


Do  not  drink  the  water  drained  from 

the product. 


Use  a  firm  stool  or  ladder  when 

cleaning or maintaining the product. 

Be careful and avoid personal injury. 


Replace the all batteries in the remote 

control with new ones of the same type. Do 

not  mix  old  and  new  batteries  or  different 

types of batteries. 

There is risk of fire or explosion. 


Do  not  recharge  or  disassemble  the 

batteries.  Do  not  dispose  of  batteries  in  a 

fire. 

They may burn of explode. 


If  the  liquid  from  the  batteries  gets 

onto  your  skin or  clothes, wash  it well with 

clean  water.  Do  not  use  the  remote  of  the 

batteries have leaked. 


Содержание MCHSU-09PHH2

Страница 1: ...rves 41 8 Electric Characteristics 48 9 Sound Level 49 9 1 Indoor unit 49 9 2 Outdoor unit 52 10 Accessories 53 11 The Specification of Power 55 12 Installation Details 57 12 1 Location selection 57 1...

Страница 2: ...leshooting 85 16 1 Indoor Unit Error Display 86 16 2 Outdoor unit error display 87 For 9K 24K outdoor unit 87 For 36K 48K Outdoor Unit 88 Outdoor check function 88 16 3 Diagnosis and Solution 91 16 4...

Страница 3: ...t Sharp edges could cause injury be especially careful of the case edges and the fins on the condenser and evaporator For installation always contact the dealer or an authorized service center Do not...

Страница 4: ...epair of product Low refrigerant levels may cause failure of product Install the drain hose to ensure that water is drained away properly A bad connection may cause water leakage Keep level even when...

Страница 5: ...l injury Replace the all batteries in the remote control with new ones of the same type Do not mix old and new batteries or different types of batteries There is risk of fire or explosion Do not recha...

Страница 6: ...MEHSU 12CHC2 MCHSU 12PHH2 Duct MEHSU 12CHD2 Console MEHSU 12CHN2 Cassette 18K MEHSU 18CHC2 MCHSU 18PHH2 Duct MEHSU 18CHD2 Floor Ceiling MEHSU 18CHF2 Cassette 24K MEHSU 24CHC2 MCHSU 24PHH2 Duct MEHSU 2...

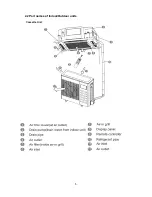
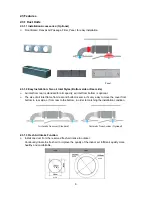
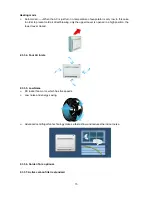
Страница 7: ...5 2 2 Part names of Indoor Outdoor units Cassette Unit...

Страница 8: ...6 Duct Units...

Страница 9: ...7 Console...

Страница 10: ...8 Ceiling floor Units...

Страница 11: ...ze of air inlet frame from rear and bottom is same it s very easy to move the cover from bottom to rear side or from rear to the bottom in order to matching the installation condition 2 3 1 3 Fresh Ai...

Страница 12: ...remove two bolts and then replace the motor or centrifugal fan easily 2 3 1 5 Reserved Remote On off and Central Control Ports Reserved remote on off ports and central control ports can connect the ca...

Страница 13: ...in the E box Move out the display and fix it in other place even in the distance of 2m 6 56ft The unit will realized remoter control The wired controller and the display board can display the error co...

Страница 14: ...Fire proof Controller Box Electrical control box adopts new design which can meet higher fire safety requirements 2 3 2 4 Fresh Air Fresh air intake function bring you fresh and comfortable air feeli...

Страница 15: ...mm 29 53in upmost It s convenient to install drainage piping under most space condition 2 3 2 7Terminals For Alarm Lamp and Long distance On off Controller Connection Are Standard Reserve terminals fo...

Страница 16: ...ooling To maintain room temp Air outlet from top and bottom to make quick cooling When the A C is just switched on or room temp is still high cold air will be blown out from top and bottom air outlet...

Страница 17: ...ing only the upper louver is opened in a high position the lower louver closed 2 3 3 4 Four Air Inlets 2 3 3 5 Low Noise DC indoor fan motor which has five speeds Low noise and energy saving Advanced...

Страница 18: ...air 2 3 1 2 Brief Design Brief design that is suitable for any interior will not only give you cooling and heating performance but also upgrade your lifestyle 2 3 1 3 3D Airflow Vertical air flow and...

Страница 19: ...ce Operating and Easy Maintenance Remote controller as standard wired controller for optional The filter without screw fixed can be took out easily 2 3 1 6 Easy Installation Save Working Time The pipe...

Страница 20: ...3 74 5 91 12 mm 700 210 635 570 65 493 35 119 595 200 80 740 350 120 143 95 150 in 27 56 8 27 25 22 44 2 56 19 41 1 38 4 69 23 43 7 87 3 15 29 13 13 78 4 72 5 63 3 74 5 91 18 mm 920 210 635 570 65 71...

Страница 21: ...le for Service 545 570 260 68 42 157 126 44 Wiring connection port 75 E parts box 4 Screw hole for install panel 523 570 Wiring connection port Capacity Btu h Body Panel W D H W1 D1 H1 9K 12K 18K mm 5...

Страница 22: ...92 92 92 D D 92 92 D D D D 92 92 92 92 92 92 92 92 D D Capacity Btu h Body Panel W C H A B D W1 D1 H1 24K mm 840 205 840 160 75 50 950 55 950 inch 33 07 8 07 33 07 6 30 2 95 1 97 37 40 2 17 37 40 36K...

Страница 23: ...21 Console Units 16 Drain pipe 195 Hanging arm Unit mm 700 600 210 Capacity Btu h W D H 9K 12K mm 700 210 600 inch 27 56 8 27 23 62 27 56in 23 62in 8 27in 7 68in 5 8in...

Страница 24: ...intake Drain discharge port Refrigerant pipe hole Hanging arm D Capacity Btu h A B C D 18K 24K mm 1068 675 235 983 inch 42 05 26 57 9 25 38 70 36K mm 1285 675 235 1200 inch 50 59 26 57 9 25 47 24 48K...

Страница 25: ...may be different Model W D H W1 A B MCHSU 09PHH2 MCHSU 12PHH2 mm 800 333 554 870 514 340 inch 31 5 13 1 21 8 34 3 20 2 13 4 MCHSU 18PHH2 mm 845 363 702 914 540 350 inch 33 3 14 3 27 6 36 0 21 3 13 8...

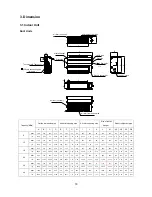
Страница 26: ...24 Model W D H W1 A B MCHSU 48CSH2 mm 952 415 1333 1045 634 404 inch 37 5 16 3 52 5 41 1 25 0 15 9...

Страница 27: ...ation and maintenance 200mm 7 87in or more 300mm 11 81in or more 600mmx600mm 23 62inx23 62in Check orifice All the indoor units reserve the hole to connect the fresh air pipe The hole size as followin...

Страница 28: ...26 Console Unit Ceiling floor Units 39 37 39 37in 3 94in 39 37in 1 38in...

Страница 29: ...27 4 2 Outdoor Unit More than 30cm 11 81in More than 60cm 23 62in More than 200cm 78 74in Air inlet Air inlet More than 30cm 11 81in Air outlet Wall or obstacle Maintain channel More than 60cm 23 62in...

Страница 30: ...CONDENSER Compressor 2 WAY VALVE 3 WAY VALVE 4 WAY VALVE COOLING HEATING T2B Evaporator temp sensor outlet T1 Room temp sensor T3 Condenser temp sensor T5 Discharge temp sensor T4 Ambient temp sensor...

Страница 31: ...29 6 Wiring Diagram 6 1 Indoor Unit MEHSU 09CHC2 MEHSU 12CHC2 MEHSU 18CHC2 MEHSU 24CHC2 MEHSU 09CHD2 MEHSU 12CHD2 MEHSU 18CHD2 MEHSU 24CHD2...

Страница 32: ...30 MEHSU 09CHN2 MEHSU 12CHN2 MEHSU 36CSC2 MEHSU 48CSC2...

Страница 33: ...31 MEHSU 36CSD2 MEHSU 48CSD2...

Страница 34: ...32 MEHSU 18CHF2 MEHSU 24CHF2 MEHSU 36CSF2...

Страница 35: ...33 MEHSU 48CSF2 MEHSU 36CSF2 MEHSU 48CSF2...

Страница 36: ...34 6 2 Outdoor Unit MCHSU 09PHH2 MCHSU 12PHH2 MCHSU 18PHH2...

Страница 37: ...35 MCHSU 24PHH2...

Страница 38: ...36 MCHSU 36CSH2...

Страница 39: ...178 C409 IC402 C403 IC11 E402 D 401 C401 R403 C411 C40 C50 D403 R401 R405 R406 R404 E404 D402 D404 C408 C402 E403 R407 R408 C404 C110 E409 E401 R402 C405 10 9 7 6 5 4 3 1 T401 C406 C407 D13 D14 E406 E...

Страница 40: ...2 C21 C20 C19 C17 C16 C15 C14 C13 C12 C11 C10 C9 C8 C7 C6 C5 C4 C3 C2 C1 JP1 JP2 D29 D30 CN23 SSR1 CN7 CN13 P 1 L1 R82 R83 R84 R85 R86 R87 R97 R119 R122 R132 CN35 N CN37 FAN L Q3 Q6 Q7 Q8 Q9 CN36 FAN...

Страница 41: ...39 For MCHSU 48CSH2...

Страница 42: ...IC14 24C08 IC10 IC7 IC4 IC2 E34 E33 E27 E25 E24 E22 E21 E20 E17 E16 E15 E14 E13 E12 E10 E9 E8 E7 E6 E5 E4 E1 DZ9 DZ8 DZ7 DZ6 DZ1 D26 D14 D13 D12 D11 D10 D9 D8 D6 D5 D4 D3 D2 CN57 1 CN56 CN54 L IN2 CN...

Страница 43: ...1 2 3 4 Model 12 0 02 5 0 04 10 0 08 20 0 12 30 0 16 40 0 0 18 0 45 Model 18 0 04 10 0 10 25 0 14 35 0 18 45 0 22 55 0 0 28 0 70 18 Model 24 0 04 10 0 10 25 0 16 40 0 22 55 0 28 70 0 0 40 0 100 24 Mod...

Страница 44: ...42 MEHSU 09CHD2 Code 0 Code 1 Code 2 Code 3 Code 4...

Страница 45: ...43 MEHSU 12CHD2 Code 0 Code 1 Code 2 Code 3 Code 4...

Страница 46: ...44 MEHSU 18CHD2 Code 0 Code 1 Code 2 Code 3 Code 4...

Страница 47: ...45 MEHSU 24CHD2 Code 0 Code 1 Code 2 Code 3 Code 4...

Страница 48: ...46 MEHSU 36CSD2 Code 0 Code 1 Code 2 Code 3 Code 4...

Страница 49: ...47 MEHSU 48CSD2 Code 0 Code 1 Code 2 Code 3 Code 4...

Страница 50: ...12CHN2 60 208 230V 187V 253V MEHSU 18CHC2 60 208 230V 187V 253V MEHSU 18CHD2 60 208 230V 187V 253V MEHSU 18CHF2 60 208 230V 187V 253V MCHSU 36CSH2 60 208 230V 187V 253V MEHSU 24CHD2 60 208 230V 187V 2...

Страница 51: ...Suction Discharge Microphone 1 4m Concealed Duct Type Duct Duct Model Noise level dB A H M L MEHSU 09CHD2 37 34 31 MEHSU 12CHD2 39 36 32 MEHSU 18CHD2 35 33 31 MEHSU 24CHD2 50 47 45 MEHSU 36CSD2 53 49...

Страница 52: ...50 1 4m Microphone Model Noise level dB A H M L MEHSU 09CHC2 41 39 37 MEHSU 12CHC2 41 38 35 MEHSU 18CHC2 46 43 41 MEHSU 24CHC2 51 47 43 MEHSU 36CSC2 52 47 44 MEHSU 48CSC2 53 49 45 4 59ft...

Страница 53: ...HSU 09CHN2 45 41 35 MEHSU 12CHN2 44 42 38 Microphone 1m 1m Air outlet side 1 5m 1m Microphone Model Noise level dB A H M L MEHSU 18CHF2 47 44 38 MEHSU 24CHF2 53 49 45 MEHSU 36CSF2 55 48 41 MEHSU 48CSF...

Страница 54: ...2 Outdoor unit Note H 0 5 height of outdoor unit Model Noise Level dB A MCHSU 09PHH2 59 MCHSU 12PHH2 56 MCHSU 18PHH2 59 MCHSU 24PHH2 61 MCHSU 36CSH2 65 MCHSU 48CSH2 63 H 1 0m Outdoor Unit Microphone 3...

Страница 55: ...Owner s manual 1 Installation manual 1 EMS It s fitting Magnetic ring twist the electric wires L and N around it to five circles 1 Cassette Units Name Shape Quantity Installation Fittings Installatio...

Страница 56: ...ook 4 Installation hook 4 Orifice 1 Console Units Name Shape Quantity Installation fittings Hook 2 Remote controller Its Frame Remote controller 1 Frame 1 Mounting screw ST2 9 10 C H 2 Alkaline dry ba...

Страница 57: ...nd Wiring 2 5 2 0 Outdoor Unit Power Wiring 3 2 5 3 2 0 Strong Electric Signal 4 1 0 4 1 5 Weak Electric Signal Model 36K 48K Power Phase 1 phase 1 phase Frequency and Voltage 208 230V 60Hz 208 230V 6...

Страница 58: ...56 12 Field Wiring 36K 48K...

Страница 59: ...or unit as possible The piping length and height drop cannot exceed the allowable value The place where the noise vibration and outlet air do not disturb the neighbors There is enough room for install...

Страница 60: ...elness of the main body is within 1 12 2 1 5 Install the air filter Insert the air filter through the filter slot and fix it with 2 screws 12 2 1 6 Install the air duct Please design the air duct as b...

Страница 61: ...2 Bolt pitch 12 2 2 3 Install the pendant bolt Select the position of installation hooks according to the hook holes positions showed in upper picture Drill four holes of 12mm 0 47in 45 50mm 1 57in 1...

Страница 62: ...e main body is within 1 Adjust the position to ensure the gaps between the body and the four sides of ceiling are even The body s lower part should sink into the ceiling for 10 12 mm 0 39 0 47in In ge...

Страница 63: ...Service space for indoor unit 12 2 3 2 Install the main body Fix the hook with tapping screw onto the wall Hang the indoor unit on the hook The bottom of body can touch with floor or suspended but th...

Страница 64: ...on Install the tapping screws onto the wall Refer to picture below 12 2 4 4 Install the main body Ceiling installation The only installation method for the unit with drain pump Remove the side board a...

Страница 65: ...hooks fittings 12 2 5 4 Install the main body Make the 4 suspender through the 4 hanger of the main body to suspend it Adjust the hexangular nuts on the four installation hooks evenly to ensure the ba...

Страница 66: ...ing to avoid condensate water Hang the air in grill to the panel then connect the lead terminator of the swing motor and that of the control box with corresponding terminators on the body respectively...

Страница 67: ...g the allowable pipe length and height drop to decide the installation position Make sure the distance and height drop between indoor and outdoor unit not exceeded the date in the following table Mode...

Страница 68: ...different pipe connection Pipe Diameter Torque Sketch map kgf cm N cm 1 4 6 35 144 176 1420 1720 3 8 9 52 333 407 3270 3990 1 2 12 7 504 616 4950 6030 5 8 15 9 630 770 6180 7540 3 4 19 990 1210 9270 1...

Страница 69: ...e set Loosen the flare nut on the 2 way valve approximately 45 for 3 seconds then closing it for 1 minute Repeat 3 times After purging the air use a torque wrench to tighten the flare nut on the 2 way...

Страница 70: ...ge hose for 5 seconds and then close it quickly 4 Close the 2 way valve 5 Turn on the air conditioner in cooling mode Turn it off when the gauge indicates 0 1MPa 14 5Psi 6 Immediately close the 3 way...

Страница 71: ...ttom up to ensure liquid charge 2 To purge the air from the charge hose open the valve at the bottom of the cylinder and press the check valve on the charge set be careful of the liquid refrigerant 3...

Страница 72: ...ipe PVC32 25 0 98 70 50 PVC40 31 1 22 125 88 Could be used for confluence pipe PVC50 40 1 57 247 175 PVC63 51 2 01 473 334 Attention Adopt PVC40 or bigger pipe to be the main pipe For Vertical drainag...

Страница 73: ...r the lifting pipe immediately to avoid wrong operation of water level switch Refer the following picture for installation reference Flexible pipe 300mm Hanger A A Length of horizontal pipe 150mm B Li...

Страница 74: ...pipes have not been distributed properly over back flow water shall cause the flashing of alarm indicator at remote controlled receiving board and even water shall run over the water collector b Cont...

Страница 75: ...755mmHg stop vacuum drying and keep the pressure for 1 hour If the indicator of vacuum gauge does not go up it is qualified If going up it indicates that there is moisture or leak source 2 Special va...

Страница 76: ...tion of refrigerant pipe 1 Operational procedure of refrigerant pipe insulation Cut the suitable pipe insulation except joint section flare the pipe piping layout and connection vacuum drying insulate...

Страница 77: ...ng installation All field wiring construction should be finished by qualified electrician Air conditioning equipment should be grounded according to the local electrical regulations Current leakage pr...

Страница 78: ...ns on the remote controller works well Whether the air flow louver moves normally Whether the room temperature is adjusted well Whether the indicator lights normally Whether the temporary buttons work...

Страница 79: ...e Hyper heat 30 50 22 122 30 50 22 122 CAUTION 1 If the air conditioner is used beyond the above conditions certain safety protection features may come into operation and cause the unit to operate abn...

Страница 80: ...the four fixing screws of the fan motor 5 Then remove the fan motor 3 Electrical parts How to remove the electrical parts 1 After finish work of item 1 and item 2 remove the connectors for the compres...

Страница 81: ...tors of the compressor top temp sensor condenser coil temp sensor T3 outdoor ambient temp sensor T4 and discharge temp sensor T5 4 disconnect the electronic expansion valve wire 5 remove the compresso...

Отзывы: