background image

3-6          ScanWizard  Pro for Windows User’s Guide

English

How to Scan a Color Negative

1. For dual bed-scanners (such as the ArtixScan

2500f), make use of the SnapTrans™ templates
feature explained in Chapter 5. Place the film to be
scanned on the appropriate template, and insert
the film and template into your scanner’s lower
bed. For flatbed scanners, use a Transparent
Media Adapter.

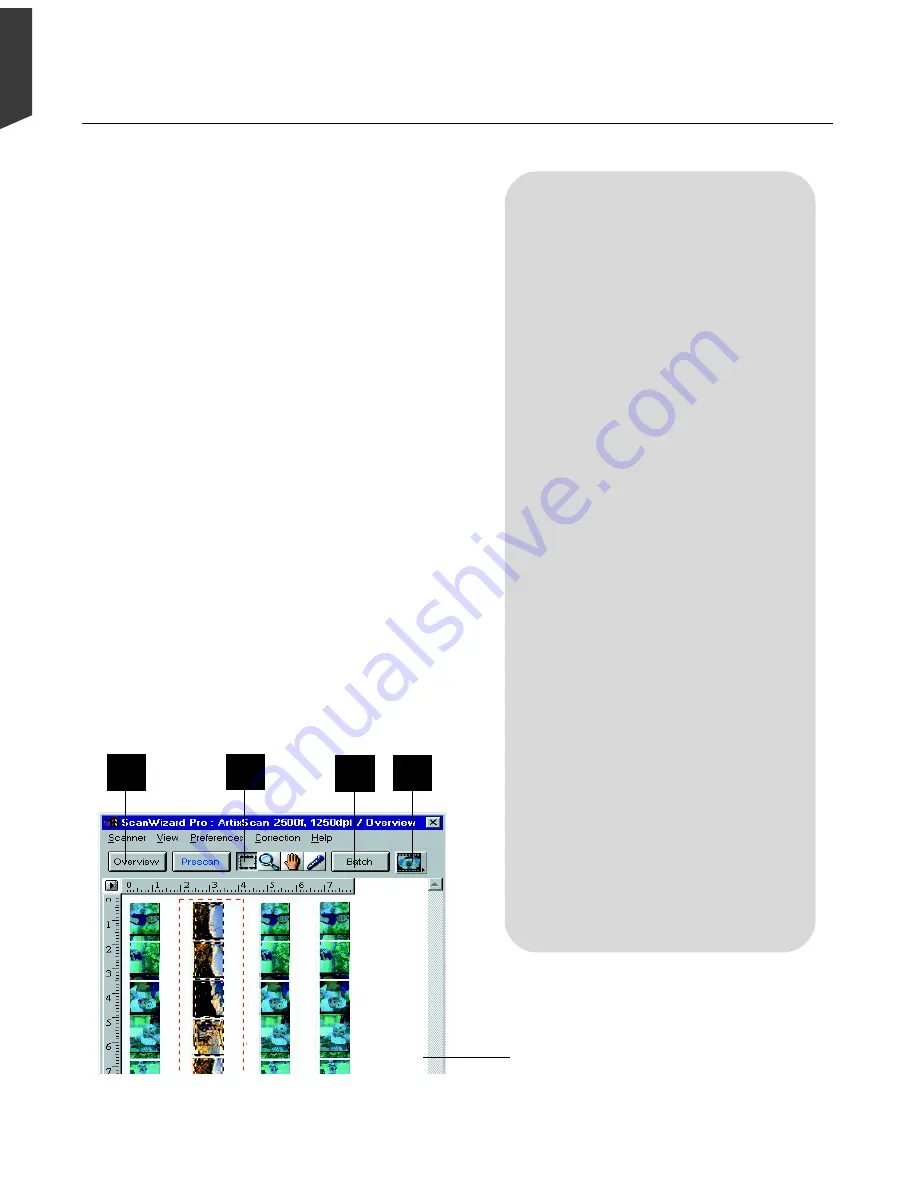
2. Go to the Preview window and click the Scan

Material icon. From the submenu that appears,
choose Negative Film. You will notice the change
in the appearance of the icon.

3. Click the Overview button to start an overview,

and you will see the image appear in your Preview
window.

4. Select the Scan Frame tool from the Toolbar in

the Preview window, and choose the area to be
scanned by dragging a rectangle around it. You
will see a flashing frame (marquee) around the
selected area.

5.  If you like what you see in the Preview window,

click the Scan button to start scanning.

5

3

View  the  prescanned  image  in  the

Preview 

window  to  see  a  real-time

display of the fine tuning results

If you want to....

     Before the Final Scan

•

Select  an  output  image  type  (after

step 2)

Go to the Settings window, and from the
Type box, choose the appropriate image
type for the image to be scanned.

•

Specify output dimensions (after step

2)

Go to the Settings window, and enter
the desired output dimensions (width and
height) in the output dimension edit
boxes. The scan frame may change
slightly, and you may want to go back to
the Preview window to readjust the
scan frame that selects the area you
want.

•

See  a  more  detailed  preview  image

(after  step  4)

Go to the Preview window, highlight
the scan job you wish to see in detail,
and click the Prescan button.

•

Fine-tune  the  preview  image  with

image processing options (after step

4)

Go to the Preview window, and select
the desired image-processing option
from the Correction menu. Alterna-
tively, you can go to the Settings
window and click an image processing
button; the Advanced Image Correction
dialog box will then appear.

•

Adjust film type (before step 5)

Go to the Film Type menu in the
Settings window and select the film
type and manufacturer.

2

4

Содержание ScanMaker 5

Страница 1: ...Microtek ScanWizard Pro User s Guide for Windows...

Страница 2: ...a violation of the rights of the copyright holder Microtek bears no responsibility for the unauthorized use of copyrighted materials To obtain optimal results from the Microtek scanning software and...

Страница 3: ...ow to Scan a Color Positive Transparency 3 4 How to Scan a Color Negative 3 6 How to Scan a Line Art Image 3 8 How to Scan a Newspaper or Magazine Image 3 10 4 Using the AIC Tools The LCH Color Model...

Страница 4: ...omize Negative Film 5 12 How to Scan and Display an Image on a 640 x 480 Monitor 5 14 Appendix A Color Matching for for Advanced Users Display using monitor compensation 2 Display 3 Native mode RGB co...

Страница 5: ...ure a separate but integrated program that lets you create and manipulate specific contexts or batches of jobs With Batch Scanning you can lay out your jobs beforehand make adjustments to each scan th...

Страница 6: ...window Function buttons for manipulating scan jobs Checked Indicates job will be scanned when you press the Scan button Selected highlighted scan job There can be multiple selected scan jobs Shift cli...

Страница 7: ...n Starts the final scanning process Unit of measurement Options are inch cm mm point pixel pica Ruler Overview image with multiple Scan Frames press Shift key to add new frames Toolbar Left to right S...

Страница 8: ...hat support ScanWizard Pro Installing ScanWizard Pro 1 Insert the Microtek ScanWizard Pro CD ROM into your CD ROM drive 2 Double click the CD ROM when it appears on your Windows desktop to open it 3 W...

Страница 9: ...sketches out a variety of scenarios that illustrate ScanWizard s versatility and how best to use the program for specific scanning tasks with applicable Microtek scanner For a more detailed listing o...

Страница 10: ...ch the image editing software e g Photoshop of your choice When the software program launches go to the File menu and choose the Import or Acquire command depending on the software you are using see s...

Страница 11: ...e scan to file operation Scan button displays for TWAIN scan to application operation Note that the final scan button for stand alone operation differs with that of ScanWizard Pro operation under a TW...

Страница 12: ...you to gain the assurance that the colors captured by the scanner are consistent with those displayed on your monitor and will be reproduced as closely as possible when they are printed You will be p...

Страница 13: ...on for each scenario can be found in a shaded sidebar next to the procedures Information on how to adjust and enhance images as well as more advanced scanning scenarios are provided in the succeeding...

Страница 14: ...e appropriate image type for the image to be scanned Specify output dimensions after step 2 Go to the Settings window and enter the desired output dimensions width and height in the output dimension e...

Страница 15: ...Basic Scenarios 3 3 English Typical Advanced Image Correction tool dialog box for fine tuning images Define output image settings and access Advance Image Correction tools from Settings window...

Страница 16: ...to Before the Final Scan Select an output image type after step 2 Go to the Settings window and from the Type box choose the appropriate image type for the image to be scanned Specify output dimension...

Страница 17: ...Basic Scenarios 3 5 English Typical Advanced Image Correction tool dialog box for fine tuning images Define output image settings and access Advance Image Correction tools from Settings window...

Страница 18: ...image in the Preview window to see a real time display of the fine tuning results If you want to Before the Final Scan Select an output image type after step 2 Go to the Settings window and from the...

Страница 19: ...e Correction tool dialog box for fine tuning images Define output image settings and access Advance Image Correction tools from Settings window When scanning Negative Film this pane will switch into F...

Страница 20: ...the Preview window click the Scan button to start scanning If you want to Before the Final Scan Specify output dimensions after step 2 Go to the Settings window and enter the desired output dimensions...

Страница 21: ...ning Line Art images When set to B W Diffusion this pane and all the Advance Image Correction AIC tools are dimmed unavailable When output image type is set to Line Art this pane will switch into Thre...

Страница 22: ...art magazine higher quality printing NOTE If you know the printed lpi lines per inch for the image you may enter the exact number You can measure the line screen by using a screen finder which can be...

Страница 23: ...n The solution rescan the image using the Descreen tool This will eliminate potential moir s from appearing in the resulting image as illustrated by the bottom image View the prescanned image in the P...

Страница 24: ...CH color model vs the Native color model as well as other concepts important to optimizing your workflow The scenarios provided are based on the Advanced Image Correction tools available through the L...

Страница 25: ...model in effect makes it easier to comprehend colors as they are couched in the terms we are familiar with Lightness how dark or light a color is Chroma or saturation how rich or dull a particular hu...

Страница 26: ...his is the default mode Select Native mode if you wish to edit or correct the individual RGB CMYK channels of an image LCH mode is the default working color space when you first starts ScanWizard Pro...

Страница 27: ...y balance by removing or adding color cast 4 Gradation Curve Manually or auto adjust midtones of the Lightness Channel L Selective Color Manipulate a specific color without affecting other colors 6 Fi...

Страница 28: ...ake the adjustments you desire to the image Then click the Add to Menu button in the AIC dialog box When another dialog box comes up enter the name for the new setting The new setting will appear in t...

Страница 29: ...ds Portraits Skin Tones An image with dominant skin tones and mid tone details Examples include portraits and objects with fleece or skin like covering Jewelry Gold Tones An image featuring dominant g...

Страница 30: ...fare as well when it was assigned the Standard image category too bright overall not enough contrast because this image category is best used for originals of fairly good quality sharp neither underex...

Страница 31: ...e the image to be corrected on your scanner 2 Click the Overview button to start an overview and you will see the image appear in your Preview window 3 Select the area to be prescanned with the Scan F...

Страница 32: ...the density capture range of the scanner In the example below the original has a narrow image histogram skewed heavily to the right In the corrected version the dynamic range is adjusted more evenly...

Страница 33: ...Overview button and you will see the image appear in your Preview window 3 Select the area to be prescanned with the Scan Frame tool then click the Prescan button to obtain a prescan image and switch...

Страница 34: ...use of the auto neutralizing and auto adjustment features the color cast is removed and the shadows and highlights are remapped accordingly 5 7 6 8 The shadow point is defined as the lightness value L...

Страница 35: ...s of the image being too dark The solution Lighten the tones to brighten up the image 1 Place the image to be corrected on your scanner 2 Click the Overview button and you will see the image appear in...

Страница 36: ...e midtones of the lightness channel L of an image In the example below the original is underexposed with the middle tones of the image being too dark The corrected image shows the middle tones being b...

Страница 37: ...ned with the Scan Frame tool then click the Prescan button to obtain a prescan image and switch to the Prescan preview from the Viewmenu 4 Click the Color Cast tool in the Settings window The Color Ca...

Страница 38: ...color cast or to add a color cast without altering the lightness channel L values In the example below the original has a slight cyan cast to it Using the Tag Windows tool and clicking on the watch t...

Страница 39: ...on to start an overview and you will see the image appear in your Preview window 3 Select the area to be prescanned with the Scan Frame tool then click the Prescan button to obtain a prescan image and...

Страница 40: ...ty chroma or saturation of an image without altering the hue and lightness values In the example below the colors are not as rich as they should be notice the slightly muddied wash to the overall imag...

Страница 41: ...corrected In the example move the pointer over the preview image notice that the pointer turns into Neutral Eyedropper pointer Point the Eyedropper over the blue sky and click Steps 5 to 9 are repeate...

Страница 42: ...ific color range without altering the other colors in an image In the example below the color of the blue sky is changed with an increase in saturation but all other colors in the image are held const...

Страница 43: ...ner 2 Click the Overview button and you will see the image appear in your Preview window 3 Select the area to be prescanned with the Scan Frame tool then click the Prescan button to obtain a prescan i...

Страница 44: ...e tones separately or as a whole forRGB CMYKimages In the example below the original looks cold with a preponderance of blue green tones The corrected version shows the image with adjusted tones in th...

Страница 45: ...to obtain a prescan image and switch to the Prescan view from the View menu 4 Click the Filter tool in the Settings window The Filter dialog box will appear 5 Check the option Simulate Unsharp Mask Ef...

Страница 46: ...ls 4 23 English 4 The Filters tool applies special effects to your images In the example below the Unsharp Masking USM filter is used to increase sharpness in the image and improve image quality 1 0 5...

Страница 47: ...ced scenarios on how to use the program How to Edit Multiple Scan Jobs How to Scan Multiple Jobs How to Use ScanWizard Pro Working Directory How to Use the SnapTrans Templates How to Use the Magic Dia...

Страница 48: ...ombination pressing the Shift key while clicking the mouse at the same time 3 Go to the Settings window and choose an image type that will apply to all the scan jobs In the example here we selected CM...

Страница 49: ...Special Features 5 3 English 2 1 3 4 5 Kid Beach City View...

Страница 50: ...Scan Jobs scenario 8 If you like what you see in the Preview window click the Scan button to start scanning If you want to Before the Final Scan Select an output image type after step 7 Go to the Set...

Страница 51: ...Special Features 5 5 English 6 8 4 2 5 3 7...

Страница 52: ...your digital album Here is what you should do to allow the working directory helps speed up things for you 1 If you are using a dual bed scanner load the appropriate template with your first set of ne...

Страница 53: ...ll apply to all selected scan jobs See How to Edit Multiple Scan Jobs in this chapter 5 At this stage you may elect to change the working directory or folder e g Gallery II for the new set of filmstri...

Страница 54: ...pTrans templated are then displayed on the Preview window At the same time the Scan Job window will also show the pre defined scan jobs 6 From hereon do an overview to see the images in the Preview wi...

Страница 55: ...Special Features 5 9 English 1 5 3 4 2 5 7 6...

Страница 56: ...area in the image where you wish to be your new highlight point A white Tag 2 window will appear indicated by a white strip at the bottom of the Tag window with the corresponding RGB LCH values of th...

Страница 57: ...Special Features 5 11 English 7 2 4 3 5 6...

Страница 58: ...tween two exposed frames 5 Click the Prescan Step 4 option When the prescan image appears fine tune the selection area you made in step 4 to make sure that the film blank area is properly selected 6 C...

Страница 59: ...Special Features 5 13 English 2 Prescan image showing blank unexposed area of film selected 1 0 3 6 4 5 7 9 8 1 1...

Страница 60: ...dpi resolution specified in Step 4 8 5 x 72 576 not 640 To compensate for the shortage in scan bed length we boost the scaling factor to 200 Do not worry about this the final scaling will be changed...

Страница 61: ...Special Features 5 15 English 4 5 2 8 3 7 6...

Страница 62: ...Appendix 1 English Appendix The following are the contents of the Appendix section A Color Matching for Advanced Users B Available File Formats for Scan to File Function...

Страница 63: ...d update your existing settings after installation by clicking the Color Matching Setup command from the Reference menu The default profile for color monitor is Generic P22 1 8 Gamma Monitor and print...

Страница 64: ...put devices e g printer or image typesetter If checked the ICC profile applies to both the color monitor and output devices This check box should generally be checked enabled unless you want to scan r...

Страница 65: ...vided with ScanWizard Pro 6 0 If you can not find the ICC profile for your monitor or RGB device contact your device manufacturer To add a specific ICC profile click Add Profiles button to load the re...

Страница 66: ...tional profiles into ScanWizard Pro 6 0 This may take a while to process NOTE When you purchase color monitor or color printer check to make sure your supplier provides the corresponding ICC profiles...

Страница 67: ...are available for different image types you should select the proper file format with the image type that meets your requirements For details see the following cross reference table TIF EPS BMP PSD SC...

Страница 68: ...Appendix 7 English...

Отзывы: