Microtek LS-3800 Скачать руководство пользователя страница 22

22     LS-3800 User's Manual

Using Optional ScanWizard Cubi Software

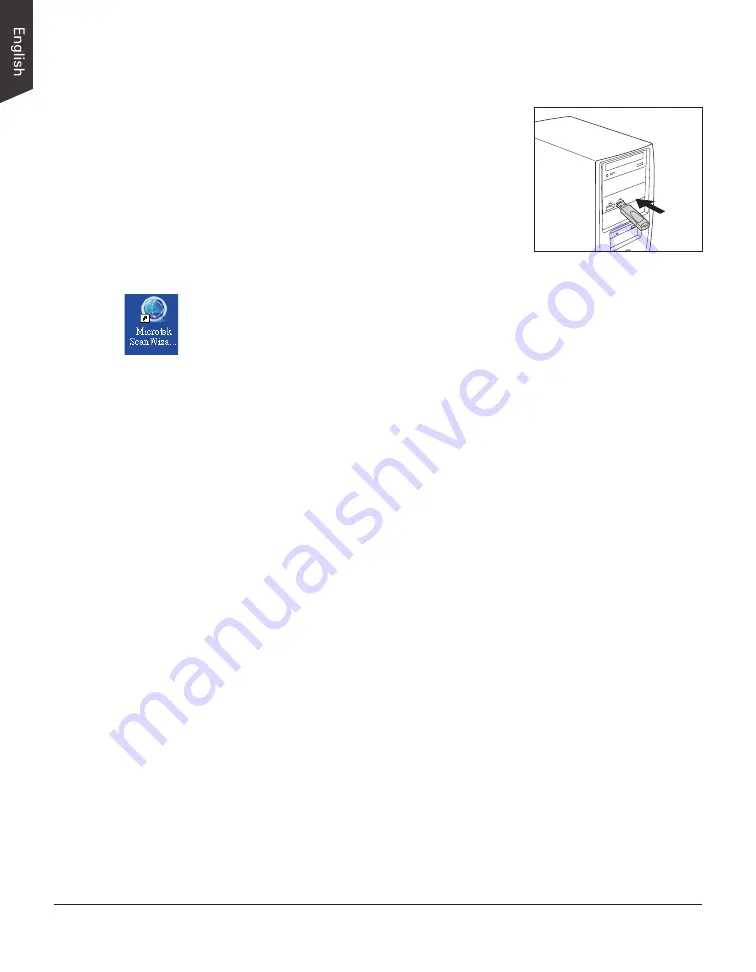
Before using the ScanWizard Cubi software, you 

have to plug the USB Dongle come with your 

ScanWizard Cubi software package into your 

computer's USB port; otherwise, the ScanWizard 

Cubi cannot be activated. 

When done, follow the steps below to scan your 

target. 

1.  Refer to the descriptions in “Positioning the 

Materials” to place the material to be scanned 

on the scan bed.

2.  Launch 

ScanWizard Cubi

 as a stand-alone by clicking on the program icon on 

the desktop. 


If ScanWizard Cubi is launched, you will see the ScanWizard Cubi (AP) 

interface on the screen on the screen. 

3.  If necessary, click the 

Scanner Control

 to set the direction of the light 

projecting. Select 

Left

Right

, or 

All 

from the Lamp Settings according to 

your specific requirements. The default setting is All.

4.  If necessary, click the 

Scan Setting

 button 

to bring up the ScanWizard Cubi 

(TWAIN) interface. By there, you can customize your scanning settings.

a)  Follow the procedure (steps 4 through 9) for “Using ScanWizard Graph 

Software” section to specify your scanning requirements. 

b)  Click the OK button in the Preview window to close the ScanWizard 

Cubi (TWAIN) interface and return to the ScanWizard Cubi (AP) 

interface. 

5.  Click the 

Scan

 button to start scanning.


The ScanWizard Cubi will perform the final scan of the image with the 

default or customized scanning settings you specified in the ScanWizard 

Cubi (TWAIN) interface. 


When the scan is done, the scanned image will be displayed in the 

Thumbnail view window on the left column of the interface.

6.  If necessary, adjust and optimize image by using the 

Image Adjustment 

controls.

a)  Select a scanned image to be optimized from the Thumbnail view 

window.


When done, the selected image will be displayed in the 

Navigation 

window and 

Index Preview

 window.  

b)  If necessary, click an area of the image in the Navigation window to 

display that area in the Index Preview Area .

Содержание LS-3800

Страница 1: ...www microtek com LS 3800 A1 Large Format Scanner User s Manual...

Страница 2: ...erty of their respective holders Specifications software and hardware bundles are subject to change without notice Not responsible for typographical errors Disclaimer The contents of this manual have...

Страница 3: ...se if you pull the cable only it may damage the core wire and result in fire or electric shock Place and route the power supply cord such that it is not likely to be walked on or pinched by items plac...

Страница 4: ...damage to users or equipment When opening or closing the upper cover of the scanner please use it carefully and watch out for pressing your hands Maintenance and Service When the scanner is going to b...

Страница 5: ...ing the Software 12 Step 3 Keeping the Scanner in Place 12 Step 4 Unlocking the Scanner 14 Step 5 Connecting the Scanner 15 To the Power Cord 15 To the Hi Speed USB Cable 15 Scanning the Materials 16...

Страница 6: ...6 LS 3800 User s Manual...

Страница 7: ...daily cleaning which is ideal for a busy working environment Microtek ScanWizard Graph software ScanWizard Graph is software exclusively designed for scanning and saving large format graphs It is pro...

Страница 8: ...ments DVD ROM drive for installing software Color display with 24 bit color output capability 8 GB RAM or more recommended Intel Core i5 processor at 3 0 GHz PC or higher with USB 2 0 port Microsoft W...

Страница 9: ...iginal is positioned 4 Indicator Green Displays the status of the scanner 5 Safety Locks 2 Locks the scanner cartridge 6 Power Connector Connects the scanner to the power adapter 7 Power Button Turns...

Страница 10: ...00 User s Manual Initiate Setup Step 1 Unpacking Package Contents After unpacking your scanner package please check for the major components listed below Scanner Hi Speed USB cable Power cord Software...

Страница 11: ...Setup exe to start the installer program 4 Click EXIT on the Microtek Software Installer screen when all the software has been installed 5 Restart your computer Note If the system displays a message F...

Страница 12: ...for and locate the Elevating Knobs next to the four casters at the bottom of the scanner 2 Spin a red gear of the Elevating Knob clockwise to move down a black pedestal located at the bottom of the E...

Страница 13: ...ed gear of the Elevating Knob counterclockwise to rise up the black pedestal located at bottom Continually spin the red gear until the black pedestal is fully raised from the ground 2 Repeat the step...

Страница 14: ...rce b Turn counterclockwise Unlocked Locked Note If you have to transport the scanner you will need to lock the scanner back Follow the steps below 1 Turn off the scanner if your scanner is on Make su...

Страница 15: ...e other end of the power cord into a power source 3 Press the Power button to turn the scanner on When the scanner is on the power button light the green power light will be turned on as well To the H...

Страница 16: ...f hinges used to unite the upper cover and scanner s main unit can be increased or decreased based on the demands of users The maximum numbers are up to 6 sets If you have special requirements toward...

Страница 17: ...icrotek Software CD DVD 3 Go to the Preview window of ScanWizard Graph and choose Reflective from the Scan Material menu 4 Click the Overview button to perform a preliminary scan of the image which wi...

Страница 18: ...vered to your application where the image can be saved printed or edited If ScanWizard Graph was launched in stand alone mode you will be prompted to specify the file attributes for the scanned image...

Страница 19: ...LS 3800 User s Manual 19...

Страница 20: ...tion to specify your scanning requirements b Click the OK button in the Preview window to close the ScanWizard DTG TWAIN interface and return to the ScanWizard DTG AP interface 4 Click the Scan button...

Страница 21: ...ck it to bring up a dialog box where you can set up file format settings for output image files Click to switch to the ScanWizard DTG TWAIN interface By there you can customize your scanning settings...

Страница 22: ...ing button to bring up the ScanWizard Cubi TWAIN interface By there you can customize your scanning settings a Follow the procedure steps 4 through 9 for Using ScanWizard Graph Software section to spe...

Страница 23: ...ng up a dialog box where you can set up file format settings for output image files Index Preview window c Click the Image Adjustment tab and to optimize the image by using the provided tools for your...

Страница 24: ...free cloth to gently wipe the glass surface area on the scanner s flatbed Maintenance After usage for a period of time the parts inside your scanner such as the light source may become worn out and a...

Страница 25: ...ke sure your scanner is unlocked see Unlocking the Scanner in the Initial Setup section Make sure your scanner is connected to your computer and plugged in to a power source see Connecting the Scanner...

Страница 26: ...x 880 mm Upper cover is not included Weight 379 lbs 172 kg Voltage AC 100V to 240V 50 60 Hz 1 7A Max Input Environment Operating temperature 50 to 95 F 10 to 35 C Relative humidity 20 to 85 Warranty...

Отзывы: