20
External Reader Installation
1. Follow the directions above to set up your SCSI interface card
unless you have already done so previously.
2. Close all applications, exit Windows to return to the command
prompt (or shutdown Windows 95), and turn off the system.
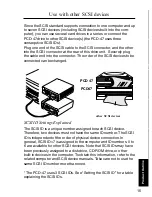
3. Connect the reader to the SCSI bus.
4. Set the SCSI ID number in the back of the device to a number
between 0 and 4. Be careful not to set it to a number already in use
by another SCSI device. If this is your only SCSI device including
internal SCSI hard disks, then any number will work.
5. Turn on the power to the reader and any other needed external
devices.
6. Turn on the computer and boot to Windows.
7. Insert the PC card to be accessed.
NOTE: Make sure everything is connected properly, the terminator is in the correct
position, and the SCSI ID is set to a number not currently in use by the system.
Internal Reader Installation
1. Follow the directions above to set up your SCSI interface card
unless you have already done so previously.
2. Close all applications, exit Windows to return to the command
prompt (or shutdown Windows), and turn off the system.
3. Set the SCSI ID number as shown later in this manual. Make sure
that the SCSI ID number is not already in use by another SCSI
device.
4. Connect the reader to the inside of your computer.
5. Turn on the computer and boot to Windows.
6. Insert the PC card to be accessed.

