background image


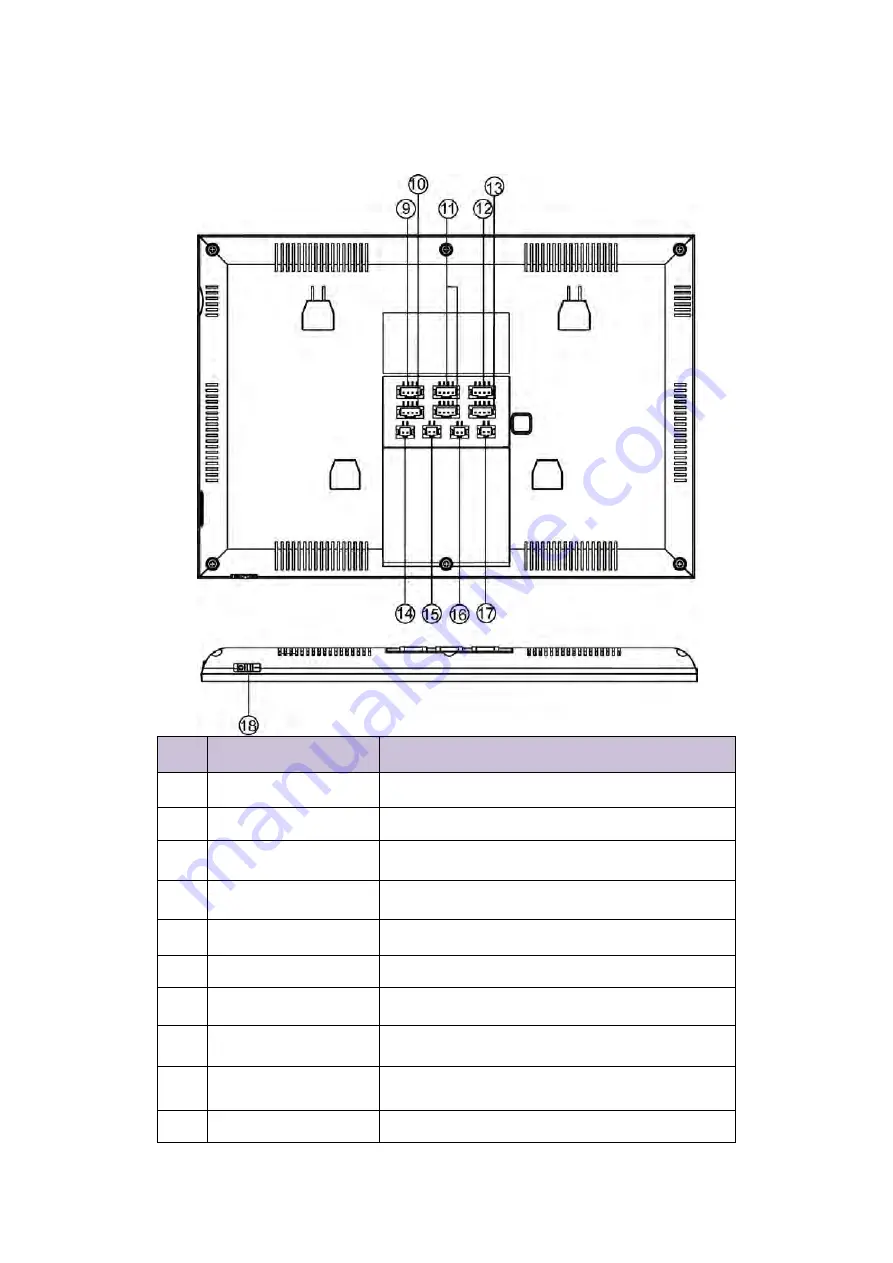
3.2 Rear & Bottom 


NO. 

Part Name 

Description 

CCTV Input 

Connection for CCTV 1 & CCTV 2 

10 

LAN 

Connection for home router (IM4TBW only) 

11 

Video Input 

Connection for door station 1 & door station 2   

12 

Intercom Output 

Connection In for additional Monitor   

13 

Intercom Input 

Connection Out for additional Monitor 

14 

CCTV Output 

NOT USED –Video Output 

15 

HOOK 

NOT USED - Technical connection 

16 

DC Power Input 

Power supply input 

17 

Relay Output 

Normally Open Relay output   

18 

Power Switch 

On / Off Switch for Monitor   

Содержание IM4TB

Страница 1: ...7 Inch Touch Button Monitor IM4TB IM4TBW MICRON HOME INTERCOM SYSTEMS USER MANUAL...

Страница 2: ...MANUAL Micron 7 Inch Touch Bu on Monitor IM4TB Touch Screen IM4TBW Touch Screen WiFi Informa on speci ca ons contained in this manual maybe changed for the bene t of product development and improveme...

Страница 3: ...8 6 3 1 Image Video Storage 8 6 3 2 Image Video Review 8 6 4 Intercom Function 9 6 5 Motion Detection SD Card Required 9 6 6 Scheduled Do Not Disturb Function 10 6 7 Screensaver Function 10 6 8 Custom...

Страница 4: ...tions whilst the power to the system is on Make sure to clean the monitor using a dry cloth to prevent any breakdown or electric shock If the product produces excessive noise or smoke immediately turn...

Страница 5: ...s will require additional power supplies Inner flash memory support micro SD card Auto Manual video and photo recording Monitor to Monitor Intercommunication Support motion detection from door station...

Страница 6: ...d Monitor power is on Led flashing Mute function is enable 3 Microphone Microphone to talk to the door station 4 Unlock Button Touch button for releasing door lock 5 Talk Button Touch button for talki...

Страница 7: ...ection for door station 1 door station 2 12 Intercom Output Connection In for additional Monitor 13 Intercom Input Connection Out for additional Monitor 14 CCTV Output NOT USED Video Output 15 HOOK NO...

Страница 8: ...5 4 Connection Diagram 4 1 Wiring Diagram Wiring Example of Intercom with one monitor and optional 2nd door station...

Страница 9: ...STANCE IS 100 METERS Note 1 Normally Open Contact can only switch 100mA and only operates from the gate unlock button 5 Monitor Installation Standard monitor installation height is about 1 500mm where...

Страница 10: ...video Short touch for call transfer manually Long touch for opening the third gate Short touch for switching between door stations and CCTV cameras Long touch for adjusting display parameters brightn...

Страница 11: ...videos with inner flash storage It also supports mirco SD card Max 128GB Not Supplied When the memory is full the newest picture video will automatically overwrite the oldest image video 6 3 2 Image...

Страница 12: ...you can talk with the corresponding monitor if the called monitor answers the call The talking and ringtone volume for intercom can be adjusted 6 5 Motion Detection SD Card Required The monitor suppor...

Страница 13: ...or supports scheduled do not disturb function You can enable disable the mute function and set the time range of do not disturb mode in setting page 6 7 Screensaver Function The monitor supports scree...

Страница 14: ...epare a SD card and format it 2 Open the SD card on your computer and create a new folder called melody 3 Open the melody folder and create folder CAM1 CAM2 Intercom 4 Copy your music to the CAM 1 or...

Страница 15: ...c separately in DOOR 1 and DOOR 2 and Intercom If the SD card is not recognized please format it on the device 7 Setting Page Touch or when the device is on standby and then the screen will enter main...

Страница 16: ...MP3 melody and also set ring time 5s 10s 20s In the Memory setting page you can delete all pictures or videos in the internal Flash memory of the monitor and also on the Micro SD card if fitted You c...

Страница 17: ...r images 40M for videos Micro SD card 8G 128G Dimensions mm 222 W x 154 H x 15 D without wall bracket 8 WiFi Connection IM4TBW Only 8 1 Adding a Device WIFI The monitor can connect to the Internet by...

Страница 18: ...call from door station needs to be transferred to your mobile phone In order to ensure normal connection all permissions of the APP need to be allowed The UID QR Code of each monitor is unique Add a...

Страница 19: ...ation calls in the mobile phone will receive message and show ringing page 4 Press the accept icon and talk with the visitor 5 Press the corresponding lock icon and then you can release the door lock...

Страница 20: ...1 Adding a Device Hardwired The monitor can be connected to the Internt by wiring directly to your router modem using the supplied 4 pin adapter 1 Connect your smart device to the home Wi Fi 2 Go into...

Отзывы: