background image

5


  MicroLinks  Technology  Co.,  Ltd.


If the Installation CD provided together with the product is lost 
or  unknown  damaged,  please  visit 

http://www.vitiny.com

  to 

download installation files. 
 
2.2


Install Application Program(Step2) 
Please click and select the position of Step 2. Press button of 

Install  Microscope  Application  Program  to  install  H-CAM 
Application Program. 


2.3


Install Driver(Step 3) 
Please click and select the position of Step 3. Press button of 

Install Microscope Driver to install H-CAM driving program.


Attention:  Before  install  diver,  please  connect  USB  Microscope 

Camera to the computer. If not, you can’t install the program. 
 
2.4


Exit Installation Program (Step 4) 
After  installing  Application  Program  and  Driver,  please  click 

and  select  the  position  of  Step  4.  Press  button  of  Exit  to  quit 
image of program installation.   
 
3.


Application Program 
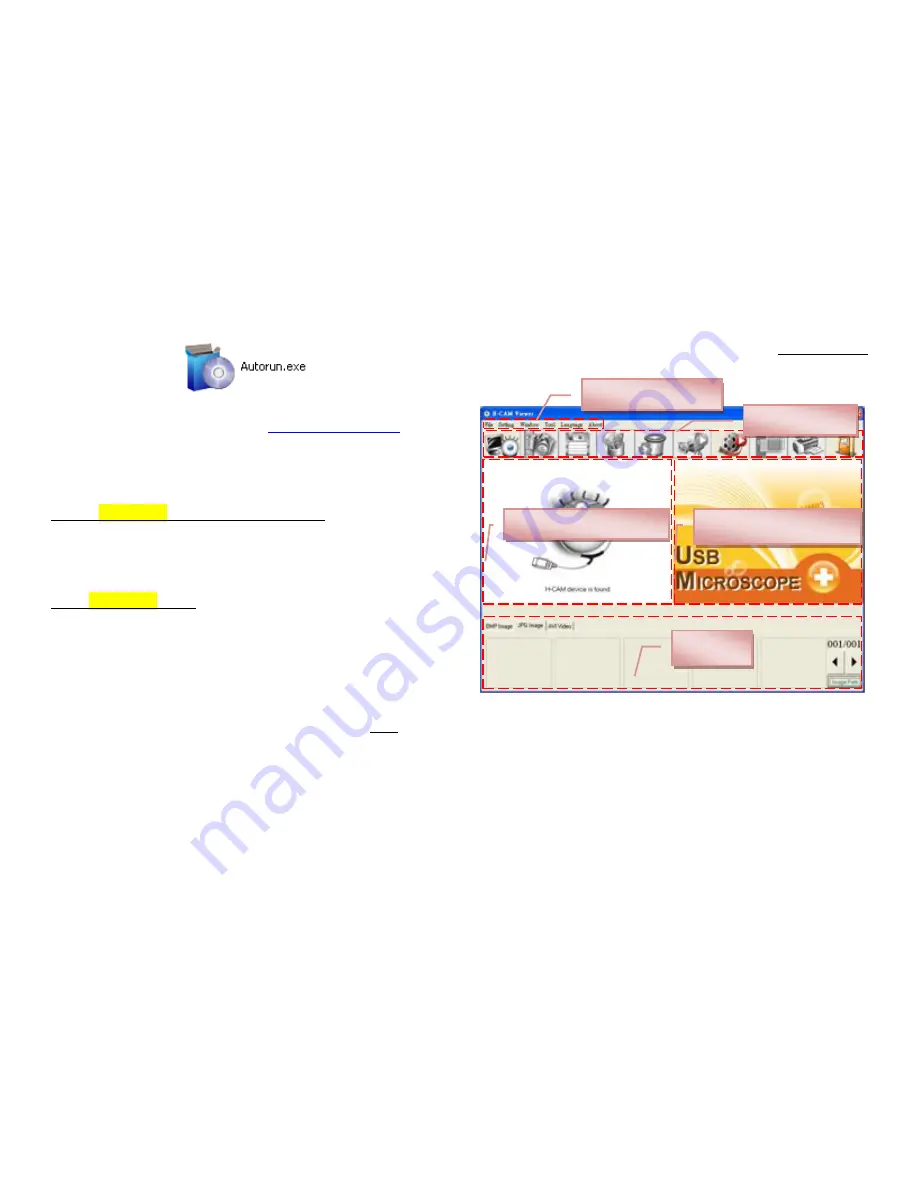
Operation Instruction of Application Program is composed of 6 

parts  about  primary  operation  functions.  For  detailed  contents, 

please refer to the Operation Instruction set in the Installation CD 
(User’s Manual). 


3.1


Video Preview Window 
After  connecting to microscope  camera, the window will 

show video information images, videos, played files, as well as 
operations and display of special function modules. 


3.2


Image Preview Window 

Files List 

Image Preview Window 

Video Preview Window 

Main Button 

Main Menu 

Содержание H-CAM

Страница 1: ...MicroLinks Technology Co Ltd H CAM User s Guide USB Microscope Version 2 3...

Страница 2: ...MicroLinks Technology Co Ltd...

Страница 3: ...ntity USB Digital Microscope 1 User s Guide 1 Mini USB2 0 Cable 1 Installation CD 1 Microscope Accessories 1 5 1 2 Microscope Accessories Except for skin piece a general PC material the materials of t...

Страница 4: ...Removal can clean ear wax 1 3 Exchange Accessories These accessories can be changed by hand with different types of pieces 1 4 USB Digital Microscope Function d Focus Dial b Light Control Dial a Captu...

Страница 5: ...ort It is USB2 0 port Please don t connect a different transmission line 1 5 USB Digital Microscope Operation a Focus mode 3 Focus points as L H L H and are focus positions L is low magnification H is...

Страница 6: ...please refer to the Manual set in the Installation CD User s Manual Programs shall be installed according to the following 4 steps 2 1 Insert Installation CD Step 1 Insert Installation CD provided tog...

Страница 7: ...mera to the computer If not you can t install the program 2 4 Exit Installation Program Step 4 After installing Application Program and Driver please click and select the position of Step 4 Press butt...

Страница 8: ...croscope camera Video image will be displayed in Video Preview Window after connection b Snapshot press the button to capture image from Video Preview Window The captured image will be displayed in Im...

Страница 9: ...ages and AVI videos 3 6 video flip control mode After opening H CAM program also click connect button under video preview window will show Video Control Mode toolbar In this mode it can filp video ima...

Отзывы: