background image

PICDEM Touch Sense 2 Demo Board User’s Guide

DS51748A-page 20


©

 2008 Microchip Technology Inc.

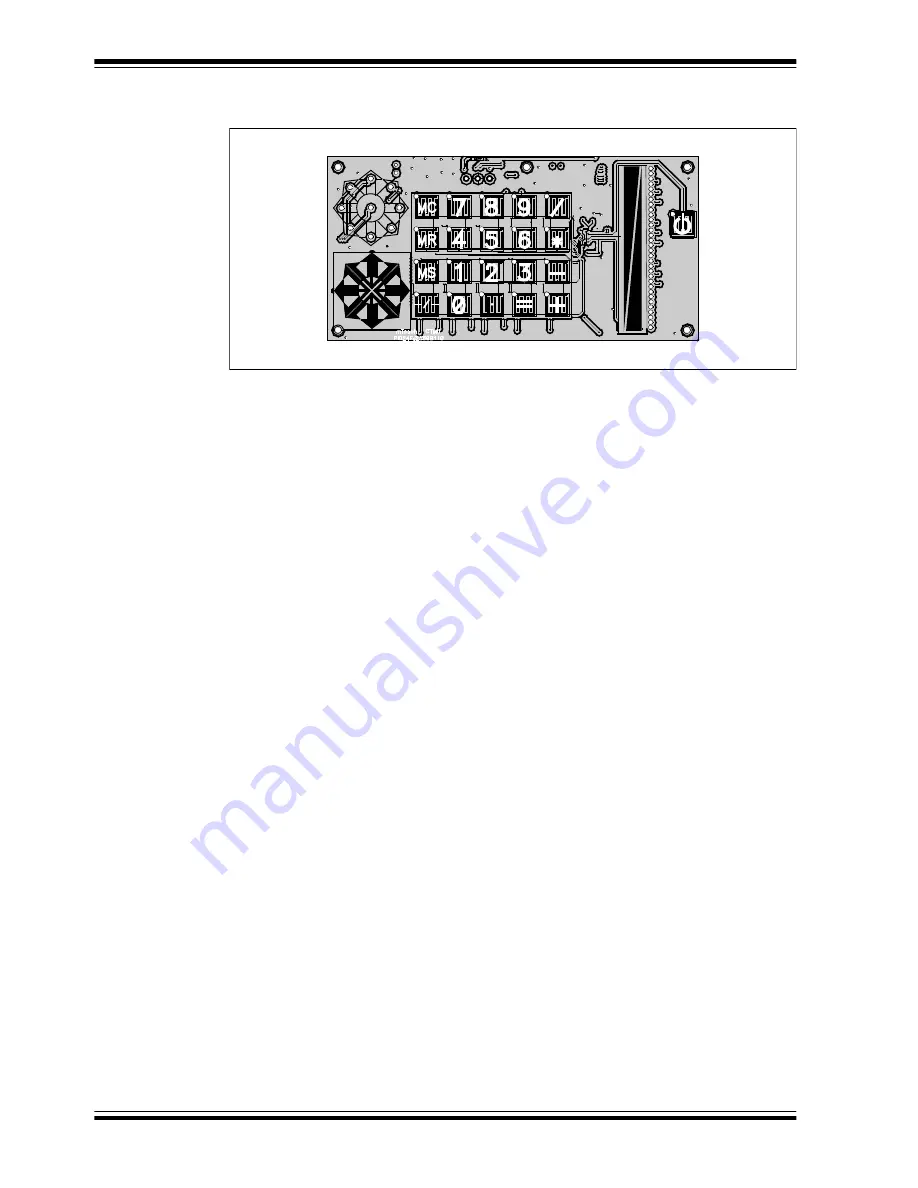
FIGURE 4-2:

TOUCH SENSE 2 DEMO BOARD, WITH TOP ACRYLIC 
COVER REMOVED TO SHOW SENSORS

Nine of the A/D channels are used to monitor the numeric keypad switches (S1 through 
S12 and S21 through S27), arranged in a 4x5 array. Each “switch” is composed of 
interleaved conductors from two channels. The location of the touched key is 
determined by a simultaneous capacitance change on any two channels. 

Four channels are used to monitor the directional keypad. The sensor consists of four 
arrow shaped, dual capacitive touch pads, oriented at the four cardinal compass points 
(N, E, S and W), with capacitive touch pads at the adjacent four compass points (NE, 
SE, SW and NW) and in the center. Touch events on the cardinal points causes a 
capacitance change in the corresponding channel. Touches between the cardinal 
points, or in the center, are interpolated from simultaneous changes on two adjacent 
channels, or all four channels, respectively. 

Two channels are used to monitor the touch slider, S14. The slider is composed of two 
large and adjacent capacitive touch pads, tapering from one side to the other and in 
opposite directions. The location of a touch event on the slider is determined by the 
differential change in capacitance between the channels. 

The remaining A/D channel is used to monitor the demo board’s “soft” power switch, 
S20; this is an interleaved capacitive touch pad similar to those in the numeric keypad. 
When power is applied to the Touch Sense 2 Demo Board, the microcontroller 
immediately initializes the demo application and starts in Full-Power mode. When the 
power switch is pressed and held for approximately 3 seconds, the microcontroller 
goes into Low-Power Sleep mode, monitoring S20 at intervals of 50 milliseconds. A 
touch event on S20 causes the application to wake again to full-power operation.

When an event occurs, the application firmware also provides feedback by activating 
one or more LEDs at that location. A total of 61 LEDs are driven directly by the 
microcontroller through pins on PORTC, PORTD, PORTE and PORTG. The LEDs for 
the numeric keypad are driven as a 4x5 matrix from PORTE, using 5 lines to source 
current and four to sink current. Individual LEDs are used for the directional keypad and 
the power switch. 

The linear LED display on the touch slider is driven in a method similar to those of the 
numeric keypad, using a 4x4 matrix on PORTD. Each node has two LEDs, connected 
in forward and reverse-biased pairs. To light a specific diode in each pair, the row and 
column ports are toggled to act as current sources or sinks, causing one diode or the 
other to be properly biased.

In addition to visual feedback, the demo board also provides audible feedback for each 
touch event on the numeric keypad. An audio signal is generated using one of the 
microcontroller’s PWM module, and directly drives the piezo speaker BZ1 through pin 
RG7.

Содержание PICDEM Touch Sense 2

Страница 1: ...2008 Microchip Technology Inc DS51748A PICDEM Touch Sense 2 Demo Board User s Guide...

Страница 2: ...p Technology Incorporated in the U S A All other trademarks mentioned herein are property of their respective companies 2008 Microchip Technology Incorporated Printed in the U S A All Rights Reserved...

Страница 3: ...Application 2 1 Introduction to the Touch Interface 11 2 2 Individual Touch Sense Demonstrations 12 Chapter 3 Using the mTouch Sensing Solution 3 1 About the mTouch Sensing Solution 13 3 2 Using the...

Страница 4: ...PICDEM Touch Sense 2 Demo Board User s Guide DS51748A page iv 2008 Microchip Technology Inc NOTES...

Страница 5: ...ibes the diagnostic software and how to use it with the Touch Sense 2 Demo Board Chapter 4 Demo Board Hardware This chapter provides a functional overview of the Touch Sense 2 Demo Board and identifie...

Страница 6: ...log A menu selection select Enable Programmer Quotes A field name in a window or dialog Save project before build Underlined italic text with right angle bracket A menu path File Save Bold characters...

Страница 7: ...ion Device Data Sheets and Flash Programming Specifications Refer to the appropriate device data sheet for device specific information and specifications Also refer to the appropriate device Flash Pro...

Страница 8: ...ication whenever there are changes updates revisions or errata related to a specified product family or development tool of interest To register access the Microchip web site at www microchip com clic...

Страница 9: ...E Technical Support Customers should contact their distributor representative or field application engineer FAE for support Local sales offices are also available to help customers A listing of sales...

Страница 10: ...PICDEM Touch Sense 2 Demo Board User s Guide DS51748A page 6 2008 Microchip Technology Inc NOTES...

Страница 11: ...d power to the board no additional external power supply is needed For independent operation the demo board may be disconnected from the PC and powered at test points for independent functionality The...

Страница 12: ...the CD ROM drive The installation process starts automatically The process pauses for user responses to accept the Microchip software licenses and to confirm the installation directories respond appr...

Страница 13: ...m to top and back again No other LEDs should be lit At the same time a sequence of pop up balloons in the system tray lower right of desktop should appear stating that 1 new hardware has been found 2...

Страница 14: ...PICDEM Touch Sense 2 Demo Board User s Guide DS51748A page 10 2008 Microchip Technology Inc NOTES...

Страница 15: ...the fixed current source will now charge the circuit to a lower voltage This change is how the microcontroller detects a touch event A more detailed description of the CTMU s operation is provided Sec...

Страница 16: ...an 8 point compass rose of red arrows surrounding a white circle Above this is a second compass rose with white arrows instead of red Touching any one of the arrows in the keypad causes the correspon...

Страница 17: ...se 2 Demo Board The mTouch sensing solution can also be used for development of custom applications The operation of the mTouch sensing solution described here is specific to its use with the Touch Se...

Страница 18: ...and 5 columns C1 through C5 When the directional keypad is selected four status displays are shown north south east and west For the touch slide sensor three displays are shown top bottom and power An...

Страница 19: ...orithms that use scaled values of the raw A D reading to improve averaging and overall performance of the hardware 3 2 2 1 GLOBAL DIAGNOSTIC WINDOW SETTINGS In the Diagnostic Tool window users can cha...

Страница 20: ...s is enabled by default Use Saved Values enables the values entered into the mTouch sensing solution to be sent to and used by the demo board via USB The trip and guardband values set by the mTouch se...

Страница 21: ...ure 3 6 that displays a plot of the channel s conversion value versus time Plotting of data begins immediately when the Chart R1 is pressed and continues to plot as long as the Run checkbox in the Plo...

Страница 22: ...Just like the sensor Setup dialog boxes clicking on another channel while a Data Charting window is open does not close the original window or open a second Charting window Instead the window becomes...

Страница 23: ...C based interface application The Touch Sense application uses the microcontroller s Charge Time Measurement Unit CTMU and all 16 of the microcontroller s A D input channels to monitor the touch inter...

Страница 24: ...he demo board s soft power switch S20 this is an interleaved capacitive touch pad similar to those in the numeric keypad When power is applied to the Touch Sense 2 Demo Board the microcontroller immed...

Страница 25: ...umeric keypad interface a separate switch S13 not shown in the figure allows users to connect or disconnect the ICD lines from the scan lines While this is not strictly necessary it does help to reduc...

Страница 26: ...Programmer Debugger module and the MPLAB REAL ICE module Switch S11 to the left of the header connects the PGD and PGC lines of the interface with columns 3 and 4 of the keypad which are also used as...

Страница 27: ...tly clean the surface with a moistened not wet soft cloth Only use water for cleaning do not use glass cleaner or commercial solvents Check the bar graph settings for the sensors in the mTouch sensing...

Страница 28: ...PICDEM Touch Sense 2 Demo Board User s Guide DS51748A page 24 2008 Microchip Technology Inc NOTES...

Страница 29: ...emo Board Schematics The following schematic diagrams are included in this appendix Programmer Debugger Figure A 1 Microcontroller and Associated Components Figure A 2 Keypad and Slider Touch Switches...

Страница 30: ...CDEM Touch Sense 2 Demo Board User s Guide DS51748A page 26 2008 Microchip Technology Inc FIGURE A 1 TOUCH SENSE 2 DEMO BOARD SCHEMATIC SHEET 1 MICROCONTROLLER AND ASSOCIATED COMPONENTS U1 PI2FJ256GB1...

Страница 31: ...Demo Board Schematics 2008 Microchip Technology Inc DS51748A page 27 FIGURE A 2 TOUCH SENSE 2 DEMO BOARD SCHEMATIC SHEET 2 KEYPAD AND SLIDER TOUCH SWITCHES AND ASSOCIATED LEDs...

Страница 32: ...2 Demo Board User s Guide DS51748A page 28 2008 Microchip Technology Inc FIGURE A 3 TOUCH SENSE 2 DEMO BOARD SCHEMATIC SHEET 3 DIRECTIONAL TOUCH SENSOR AND LEDs EXTERNAL CONNECTIONS AND POWER SUPPLY O...

Страница 33: ...EDs 20 M Microchip Internet Web Site 4 mTouch Sensing Solution 13 Board Window 14 Diagnostic Tool Window 14 Global Settings 15 Introduction 13 Sensor Charting and Logging 17 Sensor Setup 16 N Numeric...

Страница 34: ...24 2334 2393 China Shenzhen Tel 86 755 8203 2660 Fax 86 755 8203 1760 China Wuhan Tel 86 27 5980 5300 Fax 86 27 5980 5118 China Xiamen Tel 86 592 2388138 Fax 86 592 2388130 China Xian Tel 86 29 8833 7...

Отзывы: