USER MANUAL
m crob t
RC-1216H
Ba-RC1216H-PA9
Microbit 2.0 AB 2010. All rights reserved
a
User manual
Rev. PA9
– 2014 Sept 10
1 of 79
Web based remote control for
SteppIR, ACOM-2000A, Expert 1K-FA,
Elecraft KPA500 and Rotators
User Manual
Страница 1: ...RC 1216H Ba RC1216H PA9 Microbit 2 0 AB 2010 All rights reserved a User manual Rev PA9 2014 Sept 10 1 of 79 RC 1216H Web based remote control for SteppIR ACOM 2000A Expert 1K FA Elecraft KPA500 and R...
Страница 2: ...NS setting 26 Remoterig dynamic dns service 27 DynDNS dynamic DNSservice 29 Application firmware upgrade 31 Bootloader firmware upgrade 32 Restart device 32 Networks and Firewalls 32 Portforwarding 33...
Страница 3: ...t KPA500 control 62 Installation with Elecraft KPA500 63 Elecraft KPA 500 230VAC Power switching 64 Settings for Elecraft KPA500 64 Error and Warnings 69 AUX SW1 Relay 69 RC 1216H setup for Rotator co...
Страница 4: ...ges to the product described in this document without notice Microbit does not assume any liability that may occur due to the use or application of the product s or circuit layout s described herein A...
Страница 5: ...eb based user interface for the operator The web interface is much more convenient to use over the Internet as no special software need to be installed in the PC and it can be reach from any Internet...
Страница 6: ...iately The RC 1216 can be configured to remote control a Expert 1K FA Power amplifier The daily used controls and indicators are available direct from the web interface The RC 1216H also act as a seri...
Страница 7: ...tact with the internal web server everything is OK 8 Make the basic software configuration for your system which is described the later in this user manual 9 Prepare the cables needed for your PA Ante...
Страница 8: ...he remote configuring of your router you may need it later After that s done configure port forwarding see chapter Network and Firewalls When this is done your remote control unit should be reachable...
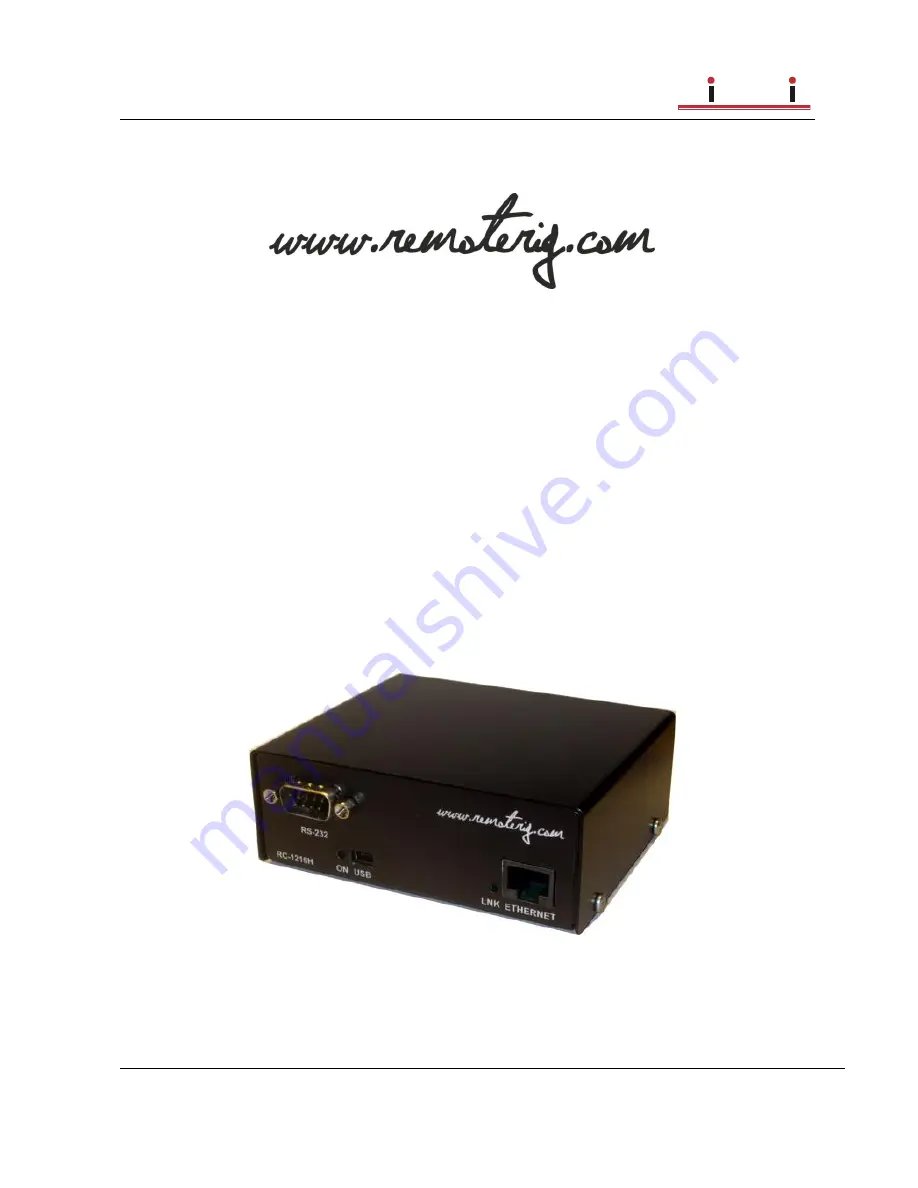
Страница 9: ...with the controlled equipment Eg the Power Amplifier SteppIR control box Rotator Control box etc It has a male connector configured like a PC The communication parameter is set via the web interface...
Страница 10: ...e WEB interface A USB cable is included with the product ETHERNETand LNK The unit can be connected to both 10 and 100 Mbit s Ethernet based TCP IP network The RC126H can be configured for different co...
Страница 11: ...s says that max 50V can be switched with this Relay output The Relay can are rated 10A DC at 30V or 2A DC at 40V This means that if you want to Switch On Off a 230V Power amplifier etc you must contro...
Страница 12: ...downloading the Microbit Setup Manager from the homepage www remoterig com Install the Setup Manager by following the instructions which shows up If you have an older Windows version where Netframewor...
Страница 13: ...2014 Sept 10 13 of 79 FW HW Click on the Get button and the version of the firmware will show up in the upper window Go to the page www remoterig com and under downloads you can find the latest firmw...
Страница 14: ...depending on the version and release date When you have selected the file click on the Update button and the update process will start the text in the bottom field will change to Updating firmware At...
Страница 15: ...A new window wills pop up with the basic IP settings Change the settings so they fit into your local network and press the Save button to save the new settings The RC will restart again and when the t...
Страница 16: ...AL m crob t RC 1216H Ba RC1216H PA9 Microbit 2 0 AB 2010 All rights reserved a User manual Rev PA9 2014 Sept 10 16 of 79 Net info Click on the Get button to read the IP setting currently in use by the...
Страница 17: ...be able to contact the RC 1216H via the network you must configure the units to fit into your home network You can check your network configuration from your PC On the start menu select Run In the Ru...
Страница 18: ...Sept 10 18 of 79 The Netmask is 255 255 255 0 the Netmask in the RC 1216H should be the same The Default gateway 192 168 0 1 the Gateway and DNS server in the RC should be the same In this case all th...
Страница 19: ...hat the IP of the RC 1216H must have IP s in the area 192 168 128 2 to 192 168 128 255 The Netmask is 255 255 128 0 this the Netmask in the RC should be the same The Default gateway is 192 168 128 1 t...
Страница 20: ...USER MANUAL m crob t RC 1216H Ba RC1216H PA9 Microbit 2 0 AB 2010 All rights reserved a User manual Rev PA9 2014 Sept 10 20 of 79...
Страница 21: ...216H If the default IP address the RC not fit your network please use the PC program Microbit Setup Manager to change the IP addresses via USB Select setup page from the links on the left side and edi...
Страница 22: ...6H Ba RC1216H PA9 Microbit 2 0 AB 2010 All rights reserved a User manual Rev PA9 2014 Sept 10 22 of 79 The info page shows some static information about the RC 1216H as firmware revision etc and also...
Страница 23: ...2 0 AB 2010 All rights reserved a User manual Rev PA9 2014 Sept 10 23 of 79 IP Settings The IP Settings menu is used to setup the initial IP parameters needed for the unit to connect to the IP network...
Страница 24: ...address is used 255 255 255 0 default nnn nnn nnn nnn Gateway Gateway only when fixed IP address is used 192 168 0 1 default nnn nnn nnn nnn Dns server DNS address only when fixed IP address is used 1...
Страница 25: ...ge user Enable password protection for the web by entering a username this field and a password next field If this field is empty the RC will not ask for password Some of the pages are still accessibl...
Страница 26: ...and DynDNS which is not free anymore You can choose to use one of them The Dynamic DNS client checks what IP address your router has got from the ISP and sends the information to the Dynamic DNS s ser...
Страница 27: ...16H etc The Remoterig dynamic dns service do not need any registration it s automatically generated based on the serial number on the equipment To activate the Remoterig dynamic dns client select ddns...
Страница 28: ...nd Password are automatically generated The only important information is the Own host name copy the whole row this is the information you should put into your web browsers address field when you cont...
Страница 29: ...DynDNS do not accept multiple updates from same IP The DynDNS client checks what IP address your router has got from the ISP and sends the information to DynDNS s DNS server When using DynDNS you ent...
Страница 30: ...outer should be checked value in minutes Off Dynamic DNS client disabled 10 20 30 40 50 60 180 600 1440 Dynamic DNS host name Sets which DNS service you will use ddns remoterig com our own free servic...
Страница 31: ...ike 1216H CRC_v1 38_2011 09 04 bin Connect to the RC 1216H and select Application upgrade Then click on the Browse button and select the file with the new firmware After that you click on the Upgrade...
Страница 32: ...IP addresses on the inside your little LAN to one common IP address on the outside using port conversion At the remote end the router must be configured so that port 80 default settings is directed t...
Страница 33: ...l rights reserved a User manual Rev PA9 2014 Sept 10 33 of 79 Portforwarding A typical setup screen for activating port forwarding is shown below There is one row assigned for each port service all re...
Страница 34: ...you have to connect the data line from the radio to the SDA 100 via the RC 1216H AUX SW1 Relay as there the SDA 100 protocol do not support switching on off the Autotrack remotely We hope they will im...
Страница 35: ...PA9 Microbit 2 0 AB 2010 All rights reserved a User manual Rev PA9 2014 Sept 10 35 of 79 Manual You have also to prepare the cabling and do the Initial setup see Step by step RC 1216H setup Installat...
Страница 36: ...a few settings needed for the SteppIR besides the standard IP settings described under Step By Setup When you do the setup only connect the 12V power do not connect the cables to the SDA 100 Click on...
Страница 37: ...th the new settings The unit will restart Now connect the cables to the SDA 100 When the cables are connected click on Main pwr and the SDA 100 will power up The Green Online LED will be steady if it...
Страница 38: ...r explanations Note that the SDA 100 has a memory of it s state before it s loosing it s DC power For example removing the DC cord or in this case switching of the DC power with the relay To store the...
Страница 39: ...ted from the RC 1216H to the PA RS 232 port If you also have the ACOM antenna switch you need to make a special Y cable Another cable is needed from the RC 1216H AUX SW1 socket to the PA for Remote po...
Страница 40: ...ling and do the Initial setup see Step by step RC 1216H setup Installation with ACOM 2000A Standard installation of the RC 1216H and ACOM 2000A 230 VAC 230 VAC 230 VAC 230 VAC 12V ACOM 2000A ACOM 2000...
Страница 41: ...al Rev PA9 2014 Sept 10 41 of 79 ACOM 2000A with ACOM 2000S Antenna Switch When the ACOM 2000S antenna switch is already connected to the RS 232 port at the PA you must use a split cable ACOM 2000A AC...
Страница 42: ...42 of 79 ACOM 2000A 230VAC Power switching If you need to control the 230VAC Mains power a relay can be controlled by the RC 1216H Be sure it s 2 pole relay and that it can handle the large current ne...
Страница 43: ...w settings needed for the ACOM 2000A besides the standard IP settings described under Step By Step Setup When you do the setup only connect the 12V power do not connect the cables to the ACOM PA Click...
Страница 44: ...ings in the PA Cclick on apply changes to update the RC 1216H with the new settings The Unit will restart After restart you will see the ACOM 2000 window Now connect the cables to the ACOM 2000A Click...
Страница 45: ...e ACOM control panel RCU They can be a little slower as the PA is not responding very fast There is two dropdowns the left one is to preselect band segment same as can be done via the up dwn buttons o...
Страница 46: ...USER MANUAL m crob t RC 1216H Ba RC1216H PA9 Microbit 2 0 AB 2010 All rights reserved a User manual Rev PA9 2014 Sept 10 46 of 79...
Страница 47: ...rier and the tune will be done The window will indicate the result of the tuning and the new values will be stored You have to manually close the window after tuning The Main Power button controls an...
Страница 48: ...d segment Temp indicators etc The web based control is very handy to use specially when traveling etc as you can control the PA from any device with a web browser like smartphones pads etc A serial ca...
Страница 49: ...rnal relay Remember that the relay should be 2 pole and should handle the large current needed by the Expert 1K FA The PWR SW relay is controlled by the MAIN PWR Button The MAIN PWR Button must be act...
Страница 50: ...of 79 Edxpert 1K FA 230VAC Power switching If you need to control the 230VAC Mains power a relay can be controlled by the RC 1216H Be sure it s 2 pole relay and that it can handle the large current ne...
Страница 51: ...few settings needed for the Expert 1K FA besides the standard IP settings described under Step By Step Setup When you do the setup only connect the 12V power do not connect the cables to the PA Click...
Страница 52: ...change the settings in the PA Click on apply changes to update the RC 1216H with the new settings The Unit will restart After restart you will see the Expert window Now connect the serial cable to th...
Страница 53: ...ower selection operating status and temp are shown as they are reported from the PA The frequency is what the PA reports and the accuracy can vary There are control buttons for OUTPUT POWER Switching...
Страница 54: ...are able to use the PA as normal controlled from the front panel of the PA Remember that the PA cannot be set in to operate if it has no communication with the radio Error and Warnings If a Fault situ...
Страница 55: ...USER MANUAL m crob t RC 1216H Ba RC1216H PA9 Microbit 2 0 AB 2010 All rights reserved a User manual Rev PA9 2014 Sept 10 55 of 79...
Страница 56: ...ept 10 56 of 79 AUX SW1 Relay At the Advanced settings page there is a Settings where you can decide how the spare relay output AUX SW1 should behave It can be set to follow either the Main on off but...
Страница 57: ...terface meaning that you can use the Expert PC software to control the PA simultaneously This is convenient if you need to change some settings like the automatic selection of antenna ports or other t...
Страница 58: ...sing Setup Microbit Setup Manager to create a virtual serial port Start the Microbit Setup Manager it must be v1 27 or later select the serial port tab select a free serial port enter the IP address o...
Страница 59: ...erved a User manual Rev PA9 2014 Sept 10 59 of 79 Open the Setup tab and select the same COM port as you selected in the Setup manager When you have selected serial port go back to the Setup Manager W...
Страница 60: ...served a User manual Rev PA9 2014 Sept 10 60 of 79 Browse the System info page in the RC 1216H you should see that RFC2217 now have changed to connected If you already have the page up click F5 to ref...
Страница 61: ...program and the program should be able to control the PA as normal You can now use both the web page and the PC program simultaneously When you have done this setup once the virtual serialport is inst...
Страница 62: ...rd power SWR Band segment Temp indicators etc The web based control is very handy to use specially when traveling etc as you can control the PA from any device with a web browser like smartphones pads...
Страница 63: ...PA The PWR SW relay is controlled by the MAIN PWR Button The MAIN PWR Button must be activated for the software function even if you don t have connected anything to the PWR SW relay The AUX SW1 rela...
Страница 64: ...the KPA 500 230 VAC 230 VAC RELAY 230V 16A COIL 12V 230 VAC 230 VAC 12V Elecraft KPA 500 GND GND GND Settings for Elecraft KPA500 There are only a few settings needed for the Elecraft KPA500 besides...
Страница 65: ...USER MANUAL m crob t RC 1216H Ba RC1216H PA9 Microbit 2 0 AB 2010 All rights reserved a User manual Rev PA9 2014 Sept 10 65 of 79...
Страница 66: ...change the settings in the PA Click on apply changes to update the RC 1216H with the new settings The Unit will restart After restart you will see the KPA500 window Now connect the serial cable to th...
Страница 67: ...mp are shown as they are reported from the PA There are control buttons for MAIN PWR Controls the Relay for Mains on the RC 1216H must be on even if you have not connected the relay OPR STBY Change mo...
Страница 68: ...014 Sept 10 68 of 79 In operate mode the PWR scale is rescaled and are showing PA output power ATTENTION Before you try to operate the PA via RC 1216H be sure that you have done all settings in the PA...
Страница 69: ...tion a popup window will show up with the Error Warning code Click on the Confirm button to clear the Fault situation Note You must allow popup windows in your web browser to be able to use this funct...
Страница 70: ...ou can program to your favorite directions A serial cable has to be connected from the RC 1216H to the rotator control box or serial interface The example shows cabling for the Prosistel rotators If y...
Страница 71: ...you can start using the RC 1216H You have also to prepare the cabling and do the Initial setup see Step by step RC 1216H setup Installation example with Prosistel or AlfaSpid Standard installation of...
Страница 72: ...relay can be controlled by the RC 1216H It should be connected to the PWR SW connector Be sure it s 2 pole relay and that it can handle the current and voltage needed 230 VAC 230 VAC 230 VAC 230 VAC...
Страница 73: ...Rotator control function besides the standard IP settings described under Step By Setup When you do the setup only connect the 12V power do not connect the cables to Rotator Click on the Advanced set...
Страница 74: ...Rotator settings link The Rotator settings page will show up On the top there is a Rotator image URL It point out where the pictures for the compass is stored Do not change the address if you do not h...
Страница 75: ...216H Ba RC1216H PA9 Microbit 2 0 AB 2010 All rights reserved a User manual Rev PA9 2014 Sept 10 75 of 79 After restart you will see the Rotator Screen Until you have connected the rotator and power it...
Страница 76: ...nect to the rotator and show the Azimuth As long as the green LED is on it will show live data when it change to red data is not updated live Reload the page to get it live again You can now rotate th...
Страница 77: ...6H Dimensions LxHxD 105 x 90 x 39 mm Weight 250 g Ip class IP20 Power supply requirement 10 18V DC via DC Plug 2 1 mm 5 5mm Current drain at 13 8V App 160 mA Network connection RJ45 T Base10 100 Relay...
Страница 78: ...o radio or television reception which can be determined by turning the equipment off and on the user is encouraged to try to correct the interference by one or more of the following measures Reorient...
Страница 79: ...author or Microbit takes no responsibility for damage or injuries of any kind that may arise from the use and miss use of the product or information contained The author do not warrant the accuracy a...