background image

Assembly

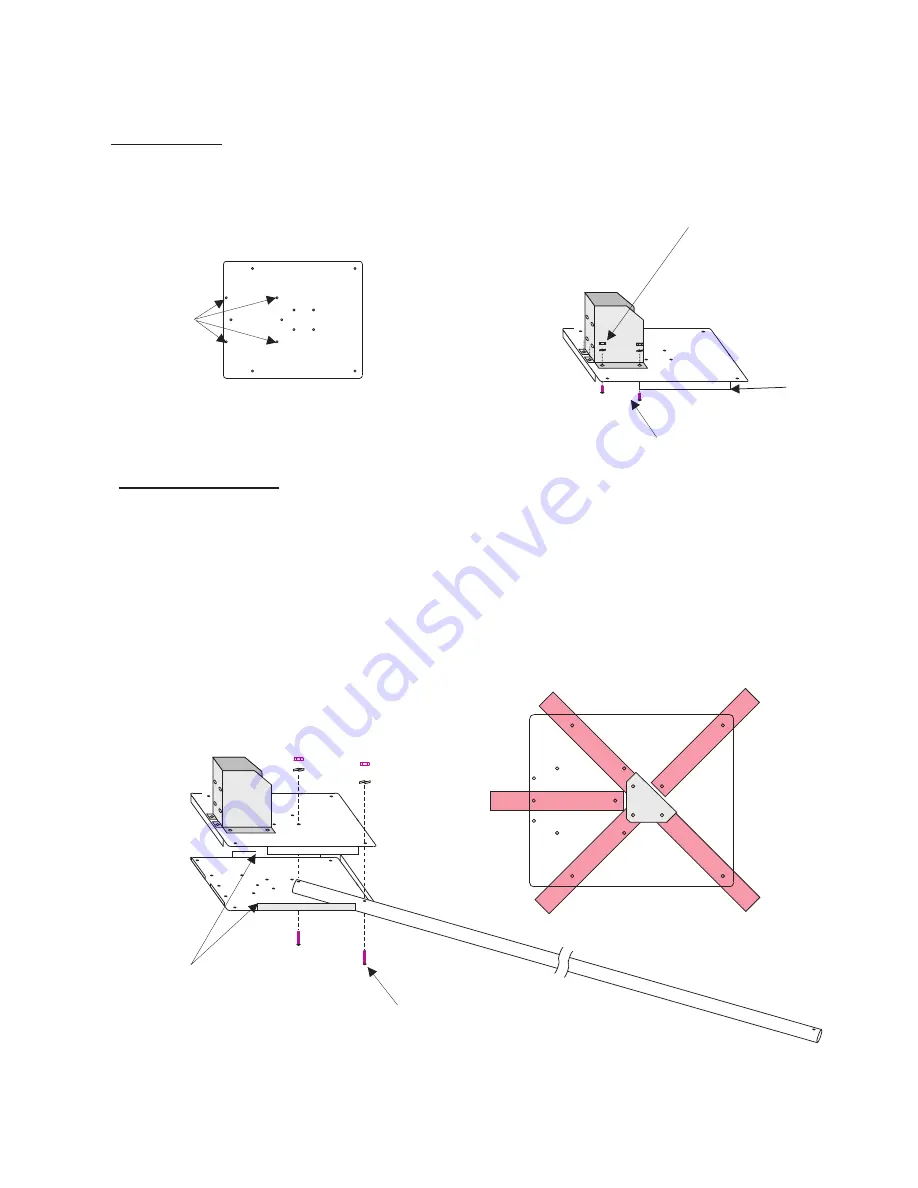
Select one of the two mounting plates.  Install the mount bracket onto the plate
using four 10-24 x ½ bolts split washers and nuts.  Make sure the nuts are on 
the bracket side.

6 places

mounting 
bracket
holes

Select one of the four larger (1-1/4” ) element arms.  Install the arm between the two plates
using two 10-24 x 1-3/4 inch bolts, split washer and nuts.  If you Wish to use the top support
arm, now is when you need to install the u-bolt bracket on the top plate using the same bolts
that hold the arms in and the plates together.   Pick any 3 of the 4 holes used to mount the 
end of the element tubes.  Snug the nuts but do not tighten.  If you do not do this now, you 
can still do it later, but you will have to remove three of the bolts that hold the element tubes
in the bracket. 
Install the remaining three and the shorter feed tube (has mount holes) in the same manner.  

Support arms

10-24 x 1-3/4

10-24 x ½

Flanges come together
to form an enclosure

Flap down

Top side of 
bracket

Содержание MFJ-1838

Страница 1: ...ions Before Operating Equipment 300 Industrial Park Road Starkville MS 39759 USA Tel 662 323 5869 Fax 662 323 6551 COPYRIGHT 2018 MFJ Enterprises Inc MFJ 1838 6 10 12 15 17 20 30 40 METER INSTRUCTION...

Страница 2: ...but take your time anyway As with all antennas safety glasses are recommended during the assembly and tuning We don t want you to Poke your eye out Pick a clear open spot and assemble the antenna awa...

Страница 3: ...g bracket 4 x 1 1 4 element arms 1 feed arm 8 insulators 1 matching box Parts pack 1 roll of element wire for each band Lots of Nuts and Bolts 10 12 15 17 20 30 40 4 x 1 element arms 1 support arm 1 u...

Страница 4: ...pport arm now is when you need to install the u bolt bracket on the top plate using the same bolts that hold the arms in and the plates together Pick any 3 of the 4 holes used to mount the end of the...

Страница 5: ...Install the smaller one inch tubes into the larger tubes Align the holes and install the 1 4 20 bolt washer and nylon lock nut as shown 4 places...

Страница 6: ...the tube back towards the mounting plates Mounting plate Now would be a good time to mount the antenna on a temporary mast if you haven t already Use the two silver U bolts to secure the mast inside t...

Страница 7: ...hose clamp band around the element and restart the band in the screw housing by slowly turning the screw while inserting Placement of the clamps Is shown by distance A and B in the diagram These dist...

Страница 8: ...ed to be tight against the washers A A Mounting plate Clamp the support tube onto the mounting plate using the gold colored u bolt assembly Cut the supplied rope into 4 equal sections Route the rope t...

Страница 9: ...16 screws and lock nuts Tighten them securely Thread the other end though the abs insulators You will have too much wire when you reach the other side Thread the wire ends through the insulator eyele...

Страница 10: ...e trouble determining which dip is associated with which band fold one set of wire ends back on themselves effectively shortening the wire to its shortest possible length The SWR dip that is associate...

Страница 11: ...lass tube match box mount 1 1 4 x 33 inch Fiberglass tube support tube 2 4 1 10 1838 1 735 1838 13 1838 6 13 1838 10 13 1838 12 Matching Box Mast Mounting bracket 6 meter wire assembly 10 meter wire a...

Страница 12: ...e of a house or garage at eaves level is acceptable as long as the wires will not be in contact with anything Antenna Grounding Although the MFJ 1838 is designed to operate efficiently without the req...

Страница 13: ......

Страница 14: ......

Страница 15: ...postage and handling 4 This warranty is NOT void for owners who attempt to repair defective units Technical consultation is available by calling 662 323 5869 5 This warranty does not apply to kits sol...

Страница 16: ......

Отзывы: