background image

8

ADJUSTMENT

The. specialist. dealer. hands. your.

SCOOTER

. over. under. consideration.

of.all.relevant.safety.regulations.in.an.
operationally.ready.state.and.adjust-
ed.to.your.demands.

.Note:

.We. recommend. a. regular. check.

of. the. adjustments. with. the. goal.
of. achieving. a. long. term. optimal.
provision.even.in.case.of.changing.
disease-/handicap. patterns. of. the.
user.. Especially. for. children. and.
juveniles. an. adjustment. every. 6.
months.is.recommendable.

.We. recommend. regular. physical.

check.ups.by.a.doctor.in.order.to.
ensure.active.use.of.the.

SCOOTER.

.Retrospective. adjustments. should.

be.carried.out.solely.by.the.special-
ist.dealer!

LIFESPAN

We. expect. an. average. lifespan. of.
about.5.years.for.this.product,.as.far.
as. the. product. is. applied. for. its. des-
ignated.purpose.and.all.maintenance.
and.service.guidelines.
The.lifespan.of.your.product.depends.
upon.the.frequency.of.use,.the.appli-
cation.environment.and.care.
The. implementation. of. spare. parts.
can.prolong.the.lifespan.of.the.prod-
uct..As.a.rule.spare.parts.are.available.
up.to.5.years.after.production.is.dis-
continued.

.The. indicated. lifespan. does. not.

constitute.additional.guarantee.

Содержание 1.164

Страница 1: ...GB W e m o v e p e o p l e Operating manual SCOOTER Model 1 164 4 wheel...

Страница 2: ...e SCOOTER 12 Functional checks 12 Locking the SCOOTER 12 Drive key 12 Position of drive key 12 Drive push mode 13 Selecting the push mode 13 Selecting the motor mode 13 Selecting the operation 14 Pre...

Страница 3: ...teering column lock 24 Releasing the steering column lock 24 Loading and transportation 25 Loading 25 Transport in vehicles 25 Passenger transport in handicapped transport vehicles HTV 25 Transport se...

Страница 4: ...ealer 40 Programming the driving behaviour 40 Technical data 41 Kilometric performance 41 Hill climbing ability 41 Model 1 164 42 Fuses 44 Tools 44 Meaning of the labels on the SCOOTER 45 Symbols 45 M...

Страница 5: ...te from your model We have therefore also listed chapters with options that might not be appli cable for your vehicle Attention Read and observe the following documentation belonging to the SCOOTER be...

Страница 6: ...ted when the use of manual wheel chairs is no longer possible due to the handicap but the electronic vehicle can still be operated appro priately ACCEPTANCE All products are checked for faults in the...

Страница 7: ...COOTER should be carried out by your special ist dealer before first use The proce dure considers the driving capabilities the physical limitations of the user and the main area of application of the...

Страница 8: ...ysical check ups by a doctor in order to ensure active use of the SCOOTER Retrospective adjustments should be carried out solely by the special ist dealer LIFESPAN We expect an average lifespan of abo...

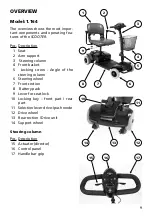
Страница 9: ...Arm support 3 Steering column 4 Front basket 5 Locking screw Angle of the steering column 6 Steering wheel 7 Front section 8 Battery pack 9 Lever for seat lock 10 Locking key front part rear part 11 S...

Страница 10: ...eadiness error display Battery gauge Battery capacity indicator View chapter Battery gauge Horn When pressing this key a horn signal sounds Adjustment wheel for speed Rabbit highest selectable max fin...

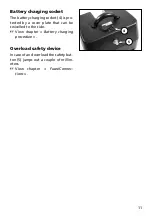
Страница 11: ...g socket 4 is pro tected by a cover plate that can be swivelled to the side View chapter Battery charging procedure Overload safety device In case of and overload the safety but ton 5 jumps out a coup...

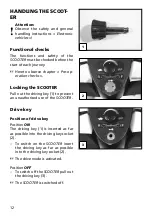
Страница 12: ...eration checks Locking the SCOOTER Pull out the driving key 1 to prevent an unauthorised use of the SCOOTER Drive key Position of drive key Position ON The driving key 1 is inserted as far as possibl...

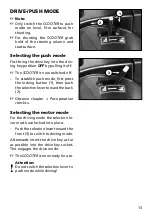
Страница 13: ...o establish push mode first press the locking button 1 then push the selection lever toward the back 2 Observe chapter Pre operation checks Selecting the motor mode For the driving mode the selection...

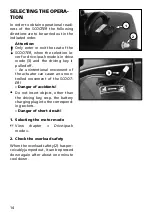
Страница 14: ...the driving key is pulled off An unintentional movement of the actuator can cause an uncon trolled movement of the SCOOT ER Danger of accidents Do not insert objects other than the driving key resp t...

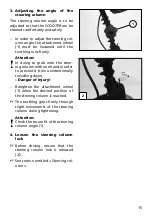
Страница 15: ...to the steer ing column with one hand in order to prevent it from unintentionally swivelling down Danger of injury Retighten the attachment wheel 1 when the desired position of the steering column is...

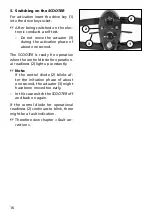
Страница 16: ...d The SCOOTER is ready fro operation when the control diode for operation al readiness 2 light up constantly Note If the control diode 2 blinks af ter the initiation phase of about one second the actu...

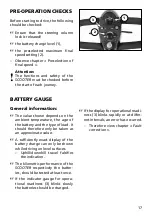
Страница 17: ...ambient temperature the age of the battery and the type of load It should therefore only be taken as an approximate value A sufficiently exact display of the battery charge can only be shown while dri...

Страница 18: ...tem test the battery gauge 2 shows the remaining bat tery capacity as follows The colours of the display have the following meaning green regular operating area y e l low Begin of the reserve sector R...

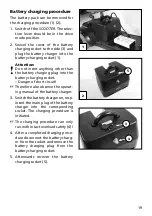
Страница 19: ...tery charging plug into the battery charging socket Danger of short circuit Therefore also observe the operat ing manual of the battery charger 3 Switch the battery charger on resp insert the main plu...

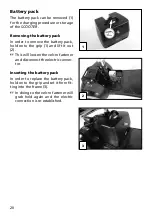
Страница 20: ...he battery pack hold onto the grip 1 and lift it out 2 This will loosen the velcro fastener and disconnect the electric connec tor Inserting the battery pack In order to replace the battery pack hold...

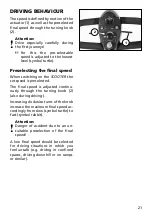
Страница 21: ...n switching on the SCOOTER the set speed is preselected The final speed is adjusted continu ously through the turning knob 2 also during driving Increasing clockwise turns of the knob increase the max...

Страница 22: ...s driving speed Slowly move the left side of the actua tor 3 forward The speed is automatically reduced while driving backwards Direction of travel The driving direction is determined by the motion di...

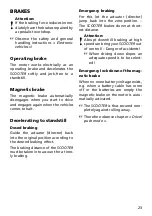
Страница 23: ...position according to the desired braking effect The braking distance of the SCOOTER must be taken into account for a time ly braking Emergency braking For this let the actuator director jump back in...

Страница 24: ...1 when the desired position of the steering column is reached The toothing grips firmly through slight movements of the steering column during tightening Attention Check the secure fit of the steerin...

Страница 25: ...amps and lifting platforms Transport in vehicles Attention Transport of the SCOOTERS may only be carried out in driving direc tion To save space for the transport in ve hicles a reduced SCOOTER dimens...

Страница 26: ...vehicles chapter Transport in motor vehicles or conveyors Establish electrical safety Removing the battery pack Use the battery grip handle in or der to remove the battery pack The SCOOTER is only to...

Страница 27: ...sket See section entitled Front bas ket 3 Remove the seat See section entitled Seat 4 Remove the battery pack fro trans port See section entitled Battery pack 5 Lock down the steering column See secti...

Страница 28: ...s as fol lows for the transport in a small ve hicle Front basket see section entitled Front bas ket Seat see section entitled Seat Battery pack see section entitled Battery pack Rear section Drive uni...

Страница 29: ...nt the front basket is slid onto the bracket from the top 2 Seat Note The seat supplied may vary from the one shown in the illustration 3 Turning the seat After activating the locking lever 4 the seat...

Страница 30: ...he arm supports back down 2 Attention Do not grab into the stopper mechanism Danger of crushing Back support The back support can be folded down onto the seat surface 3 To raise the back support swive...

Страница 31: ...rry the seat Inserting the seat To insert the seat 3 first activate the lever for the seat locking device 2 the insert the seat tube from the top into the seat column Attention Grab sideways under the...

Страница 32: ...with the other hand slightly lift the seat tube 2 In doing so the drive will tilt back wards with the support castors to the floor and the upper locking mechanism is released 3 2 Afterwards lift the f...

Страница 33: ...nnecting contacts for the drive and battery pack must be clean and free of grease First position the drive behind the front part and set to drive mode 1 1 Lift the front part over the seat tube onto t...

Страница 34: ...at the positions 1 to 4 indicated with the hand Reassembly of SCOOTER components Assembly of the components is car ried out in reverse order to chapter SCOOTER disassembly into compo nents Before ass...

Страница 35: ...and maintenance results in a limita tion of the product liability Maintenance The following maintenance schedule gives you a guide for carrying out the maintenance They do not give information about...

Страница 36: ...e checked for tight fit Carry out test yourself or with a helper Loosened adjustment screws need to be re paired by the specialist dealer immediately Every 6 8 weeks depending on dis tance covered Whe...

Страница 37: ...use Check Cleanness General condition See Care See Repairs Do it yourself or with the aid of a helper Manufacturer recom mendation Every 12 months depending on fre quency of use Safety inspection Vehi...

Страница 38: ...ht on travel of the SCOOTER Fuses connections Overload safety device The overload safety 3 in form of a fuse button of the circuit breaker is located at the front of the battery pack Note The safety b...

Страница 39: ...l readi ness status blinks after activation The actuator moved too early Switch the SCOOTER off and on again if this happens The selection lever drive push mode is set to push mode Move the selection...

Страница 40: ...in the check list They are a guide for the performance of the inspection work Note It does not outline the actual scope of the necessary work which can only be ascertained by an inspec tion of the ve...

Страница 41: ...Nominal load of 75 kg Without repeated acceleration Level firm driving surface The kilometric performance is greatly reduced by frequent uphill driving ramps poor drive battery charge condi tion low...

Страница 42: ...8 53 cm Standard seat height centre hole in seat tube 50 5 cm Seat swivelling 360 Seat depth 40 cm Seat width min max 43 55 cm Seat width manufacturers setting 45 cm Back support height 34 cm Arm supp...

Страница 43: ...h 480 Watt max current of the power electronic 6 km h 70 A Performance mechanical view Kilometric performance Obstacle height 0 50 mm Ground clearance 60 mm Climb in height 120 mm Turning radius min...

Страница 44: ...tery pack 13 5 kg Rear section Drive unit 13 0 kg Seat 8 5 kg Basket 0 5 kg Fuses Therefore observe chapter Fuses connections Overload safety circuit breaker 30 A Charging Control safety self activati...

Страница 45: ...s or leg supports Removable parts are not suitable for car rying Drive mode Push mode Push only on level surfaces Indication for charging socket Attachment possibility of the transport safety Danger o...

Страница 46: ...week Permitted user weight Permissible total weight Permitted axle loads Permissible rising gradient Permissible falling gradient Permitted final speed The product is licensed as a seat inside a hand...

Страница 47: ...Place date Signature Recommended safety inspection 5th year at least every 12 months Stamp of specialist dealer Next safety inspection in 12 months Date Place date Signature Recommended safety inspec...

Страница 48: ...48 NOTES...

Страница 49: ...49 NOTES...

Страница 50: ...for surface damages tyres of the wheels dam ages due to loosened screws or nuts as well as worn out attachment holes due to frequent assembly work Furthermore damage to the drive and electronics caus...

Страница 51: ...e specialist dealer Serial no SN Delivery note no Model Stamp of specialist dealer Next safety inspection in 12 months Date Place date Signature 51 Warrantee Guarantee section Please fill out Copy if...

Страница 52: ...ra Ring 2 D 32689 Kalletal Kalldorf P O Box 1 703 D 32591 Vlotho Fon 49 0 5733 922 311 Fax 49 0 5733 922 9311 info meyra ortopedia de www meyra ortopedia de W e m o v e p e o p l e 205 337 701 Status...

Отзывы: