background image

29

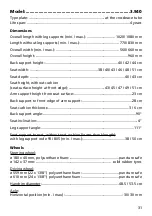
Model:..................................................................................9.050

Type plate: .............................................................................. at the crossbrace tube
Life span: .......................................................................................................... 4 years

Dimensions

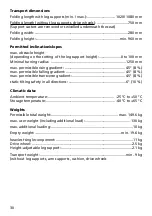
Overall length with leg supports (min. / max.): ............................. 1020 / 1080 mm
Length without leg supports (min. / max.): ........................................ 770 / 830 mm

Overall width (min. / max.): ................................................................. 560 / 660 mm

Overall height: ............................................................................................... 960 mm

Back support height: .........................................................................................42 cm

Seat width: ......................................................................38 / 40 / 43 / 46 / 48 / 51 cm

Seat depth: .........................................................................................................43 cm

Seat height, without cushion (seat surface height at front edge): .47 / 49 / 51 cm

Arm support height from seat surface: ...........................................................23 cm

Back support to front edge of arm support: ...................................................28 cm

Seat cushion thickness: ...................................................................................3 / 6 cm

Back support angle: ............................................................................................... 90°

Seat inclination: ....................................................................................................... 4°

Leg support angle: ............................................................................................... 111°

Foot support to seat, without seat cushion (lower shank length):
with leg support code 93 / 805 (min. / max.): ...........................................38 / 50 cm

Wheels

Steering wheel:
ø 180 x 40 mm, polyurethane foam: ...................................................puncture safe

Driving wheel:
ø 610 mm (24 x 1 3/8“) polyurethane foam: ......................................puncture safe

Handrim diameter: .........................................................................................53.5 cm

Axle:
Horizontal position (min. / max.): ...........................................................-30 / 30 mm

Содержание 3.940

Страница 1: ...GB W e m o v e p e o p l e OPERATING MANUAL FOLDING WHEELCHAIR Model 9 050 Model 3 940...

Страница 2: ...Calf belt 12 Removing the calf belt 12 Attaching the calf belt 13 Length adjustment of the calf belt 13 Leg support lower part 13 Footplates 13 Leg support upper part 14 Turning the leg supports to th...

Страница 3: ...ors 22 Removing inserting the support castors 22 Retaining strap 23 Person transport inside a motor vehicle 24 Securing the wheelchair 24 Maintenance 24 Maintenance 24 Maintenance schedule 25 Technica...

Страница 4: ...eviate from your model We have therefore also listed chapters with options that might not be appli cable for your individual wheelchair Attention Read and observe the following documentation belonging...

Страница 5: ...The need to be able to leave home for a short walk in fresh air or in or der to reach the places commonly in the perimeter of the home re quired to fulfil basic needs ACCEPTANCE All products are check...

Страница 6: ...ce the physical limits of the user and the main place of use of the wheelchair Attention Always have adaptation and ad justment work carried out by a specialist dealer Do not insert fingers into open...

Страница 7: ...ical exams in order to ensure safety for active participation in traffic Retrospective adjustments should be carried out solely by the special ist dealer LIFE SPAN We expect an average lifespan of abo...

Страница 8: ...ing lever leg support 6 Calf belt 7 Footplate OVERVIEW The overview shows representative for all models the most important compo nents of the standard folding wheelchair Pos Description 8 Steering whe...

Страница 9: ...ir can be equipped with pressure brakes 2 or with drum brakes 3 Note Therefore observe the mainte nance instructions as well as safety and general handling instructions Mechanical and muscle powered w...

Страница 10: ...ers forward all the way 1 Note It should not be possible to push the wheelchair forward when both brakes are locked Releasing the brakes Pull both brake levers back all the way 2 Operating brake The w...

Страница 11: ...both brake levers evenly in order to secure the wheelchair against unintentional motion 2 Press the surface A of the locking latch down with one finger and let it snap into place Release both brake l...

Страница 12: ...pter Brakes Calf belt The removable calf belt 1 prevents the feet from sliding off the back of the footplates Attention Never drive without calf belt ex cept when scuttling Danger of accidents Note Th...

Страница 13: ...support lower part The footplates are to be folded up for entry into exiting the wheelchair or scuttling moving the wheelchair with help of the feet 2 Check the locking points Remove both feet from t...

Страница 14: ...be swivelled away toward the in outside 1 and 2 Note Before removing the leg supports remove the calf belt and fold the footplates up View chapter Calf belt and chapter Lower leg support Attention Leg...

Страница 15: ...length important for transport the leg supports can be removed 2 Note Before removing the leg supports loosen or remove the calf belt on one side View chapter Calf belt First swivel the leg support si...

Страница 16: ...rame and arm support Danger of jam ming Do not lift the wheelchair using the arm supports The wheelchair should only be used with the arm supports assem bled When the wheelchair is being pushed by an...

Страница 17: ...upport inward For inward swivelling first turn the arm support upward 1 and then turn it toward the rear behind the back support 2 View chapter Swivelling up the arm support Note On smaller back belt...

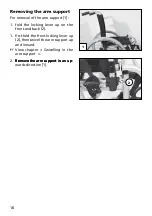
Страница 18: ...he arm support 1 1 fold the locking lever up on the front and back 2 1 first fold the front locking lever up 2 then swivel the arm support up and inward View chapter Swivelling in the arm support 2 Re...

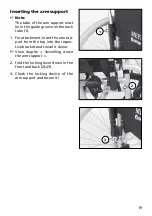
Страница 19: ...e groove on the back tube 1 1 For attachment insert the arm sup port from the top into the respec tive bracket and swivel it down View chapter Swivelling down the arm support 2 fold the locking lever...

Страница 20: ...ver Quick release axle The drive wheels can be removed and reassembled without any tools First press the locking knob 2 of the quick release axle in the center of the hub Afterwards remove or attach t...

Страница 21: ...e Pull the back belt off and fold it to the front 2 Open the Velcro fastener of the belt 3 that you wish to adjust and close it again after adjustment Attention The overlapping of the loop and hook st...

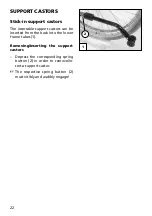
Страница 22: ...support castors can be inserted from the back into the lower frame tubes 1 Removing inserting the support castors Depress the corresponding spring button 2 in order to remove in sert a support castor...

Страница 23: ...nto the back tubes Note The subsequent assembly of a lap retaining strap must be carried out by a specialist workshop Attention The retaining strap is not part of the retaining system for the wheel ch...

Страница 24: ...d through the four securing points 1 and 2 The anchor positions are marked with the symbol 3 The procedure for securing the wheelchair can be read in the doc ument Safety and general han dling instruc...

Страница 25: ...out Check pressure brake for wear Move brake lever to the side Carry out tests yourself or have a helper do it If you notice any increasing slackness on the brake lever take the wheelchair to your spe...

Страница 26: ...rs Danger of ac cidents Before starting out Especially before driv ing in the dark Check the lighting Check the light and indicator signal equip ment as well as reflec tors for immaculate performance...

Страница 27: ...the side frame attachment of the footplate to the side frame Every 6 months depending on fre quency of use Check Cleanness General condition View Maintenance in document Safety and general handling in...

Страница 28: ...ns are determined with drive wheels of 610 mm 24 The widths were determined with a handrim distance of 15 mm Dimensional tolerance 1 cm 2 Short form of wheelchair dimensions SH Seat height SW Seat wid...

Страница 29: ...n seat surface height at front edge 47 49 51 cm Arm support height from seat surface 23 cm Back support to front edge of arm support 28 cm Seat cushion thickness 3 6 cm Back support angle 90 Seat incl...

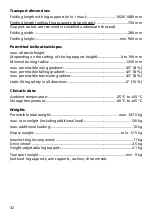
Страница 30: ...ius 1250 mm max permissible rising gradient 4 5 8 max permissible falling gradient 4 5 8 max permissible transverse gradient 4 5 8 static tilting safety in all directions 6 10 Climatic data Ambient te...

Страница 31: ...47 49 51 cm Arm support height from seat surface 23 cm Back support to front edge of arm support 28 cm Seat cushion thickness 3 6 cm Back support angle 90 Seat inclination 4 Leg support angle 111 Foot...

Страница 32: ...ius 1250 mm max permissible rising gradient 4 5 8 max permissible falling gradient 4 5 8 max permissible transverse gradient 4 5 8 static tilting safety in all directions 6 10 Climatic data Ambient te...

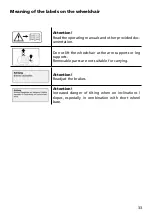
Страница 33: ...other provided doc umentation Do not lift the wheelchair at the arm supports or leg supports Removable parts are not suitable for carrying Attention Readjust the brakes Attention Increased danger of...

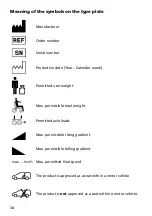
Страница 34: ...ear Calendar week Permitted user weight Max permissible total weight Permitted axle loads Max permissible rising gradient Max permissible falling gradient Max permitted final speed The product is appr...

Страница 35: ...Next safety inspection in 12 months Date Place date Signature Recommended safety inspection 4th year at least every 12 months Stamp of specialist dealer Next safety inspection in 12 months Date Place...

Страница 36: ...36 NOTES...

Страница 37: ...37 NOTES...

Страница 38: ...for surface damages tyres of the wheels dam ages due to loosened screws or nuts as well as worn out attachment holes due to frequent assembly work Furthermore damage to the drive and electronics caus...

Страница 39: ...e specialist dealer Serial no SN Delivery note no Model Stamp of specialist dealer Next safety inspection in 12 months Date Place date Signature 39 Inspection certificate for transfer Vehicle data War...

Страница 40: ...D 32689 Kalletal Kalldorf P O Box 1 703 D 32591 Vlotho Fon 49 0 5733 922 311 Fax 49 0 5733 922 9311 info meyra ortopedia de www meyra ortopedia de Your specialist dealer W e m o v e p e o p l e 205 33...

Отзывы: