


1.800.221.0932
|
MetraOnline.com
2
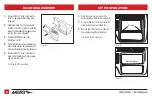
1.
Remove (2) 9/32” screws securing the
driver’s side knee bolster to the dash.
(Figure A)
2.
Slightly pull down on the knee bolster
to expose the 9/32” screws securing the
base of the dashboard trim panel, then
remove the screws. (Figure A)
3.
Remove (1) Phillips screw in the
instrument cluster.
4.
Unclip and remove the dashboard trim
panel, using caution not to damage the
hazard switch while removing the panel.
5.
Remove (2) 9/32” screws securing the
radio. Slide the radio out, then unplug
and remove the radio.
Continue to Kit Preparation
(Figure A)
DASH DISASSEMBLY
KIT PREPARATION
1.
Place the
radio trim panel
over the
factory dashboard trim panel. (Figure A)
2.
Using a scribe tool, score the area in the
radio section to be cut. (Figure B)
3.
Remove the
radio trim panel
, then cut
the scored area with a cutting tool.
Continued on the next page
(Figure A)
(Figure B)
Remove shaded area
Mark here