PITCHED DRUM SECTIONS
These sections each use a bandpass filter. A decaying tone is
made by striking the resonant filter with a short pulse. The trigger
signal for these sections MUST be a short pulse or a “double-strike”
effect will be heard. The “Reson” knob sets the filter resonance,
and is an extremely critical setting. You must set the resonance to
a point just before the filter “howls”. It is a finicky setting and an
unavoidable aspect of the circuit used. IT IS NOT “BROKEN”. The
“Pitch” knob sets the initial pitch, and is also a somewhat picky
setting. Use care when setting these controls. The CV input controls
the center frequency (pitch) of the filter via a “vactrol”. This circuit
is very similar to our previous R-54 module and the pitched-drum
voices in the D-1000, and will behave similarly.
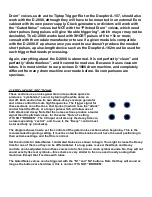
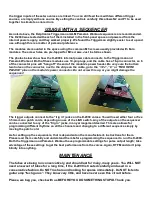
The diagram shows how to set the controls of the pitched drum sections when beginning. This is the
recommended beginning setting. It must be noted that the knobs do not have the usual positioning in
their extreme settings, and that this is normal. Also note that these circuits produce a small amount of
background noise all the time; because they are high-gain bandpass filters, this is normal and
unavoidable. IT IS NOT “BROKEN”. If it bothers you, an external noise-gate is recommended.
Set the controls for Pitched Drum 1, 2 and 3 as shown to begin. You might set different pitches for
each, so they can be differentiated. If a long pulse is used, you will know it, because you will hear two
sounds in sequence rather than one. No, they will not sound exactly like real drums—this scheme is
very similar to the one used in early analog drum machines. Except that it is done with tubes.
The Pitched Drum voices can be triggered with the “P1”, “P2” and “P3” buttons. To strike them
properly, you MUST hit each button quickly and release it immediately; if you don't, you will hear a
sound when the button is pressed AND when it is released. This is normal, and inherent to the
operation of the D-2000. IT IS NOT “BROKEN”.
HOW TO SET UP AND USE
The D-2000 needs 12 volts DC power at 2 amps minimum. DO NOT attempt to power it with AC, you will
DAMAGE IT AND THE POWER SUPPLY. DO NOT experiment with random AC-DC adapters. The power
connector is a 2.1mm coaxial type, and can usually also accept 2.5mm connectors. (No, it DOES NOT
use the same power adapter as Metasonix's previous D-1000 drum machine. It is totally different from
the D-1000. BE WARNED.) Also note that the pitched-drum voices might “howl” when power is applied
and the tubes warm up; this is normal, it is NOT “BROKEN” – keep the volume DOWN when first
applying power, and adjust the “Reson” controls as needed.
Connect the main audio output (the 1/4" jack that pokes out of the D-2000 panel) to an amplifier or PA,
set ALL the knobs on the D-2000 as shown ABOVE, and turn on the D-2000 power switch. You should
see the red LED next to the rightmost tube glowing. (The tubes might glow visibly, or they might not.
Tube construction varies. Do not whine at us that the D-2000 is "broken" if you can't see the tubes
glowing. The only way to know the D-2000 is working properly is to hear sound out of every drum
circuit. Please don't be a whiny dick.)
Press each of the yellow buttons. Note that the N1 and N2 buttons produce noise while held down.
Note that the P1-P3 buttons produce a sound when pressed and when released; this is NORMAL and it
is NOT “BROKEN”. To sound these voices properly, strike the buttons very briefly and do not hold
them down. Thank you.
Between the Gated Noise 2 and Pitched Drum 1 voices is a “LINK” switch. By setting this switch UP,


