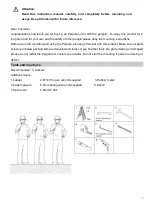
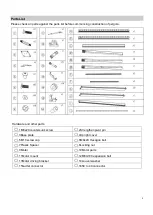
Metalcraft GR-102 Скачать руководство пользователя страница 3


Parts List


Please check all parts against the parts list before commencing construction of pergola.   


  Hardware and other parts: 

,1M8x20 countersunk screw 

,2Strengthen pivot pin 

,3Base plate 

,4Upright cover 

,5M10 screw cap 

,6M8x20 Hexagon bolt 

,7Plastic Spacer 

,8Locking nut 

,9Motor 

,10Motor parts 

,11Motor mount 

,12M8X100 expansion bolt 

,13Motor driving bracket 

,14Louver washer 

,15Gutter connector 

,1650 to 40 connector 


Содержание GR-102

Страница 1: ...unting and User Instructions for GR 102 pergola Size 300x300 cm Content Tools and man force 2 Parts List 3 4 Product Description 4 Safety Instruction 4 Mounting 4 16 Discounting 17 Storage 17 Disposal...

Страница 2: ...tions Before you start mounting and using the Pergola please get familiar with this product Make sure all parts listed up in below packing lists are delivered and intact If you find that there are par...

Страница 3: ...Hardware and other parts 1M8x20 countersunk screw 2Strengthen pivot pin 3Base plate 4Upright cover 5M10 screw cap 6M8x20 Hexagon bolt 7Plastic Spacer 8Locking nut 9Motor 10Motor parts 11Motor mount 12...

Страница 4: ...For your own and the safety of other persons it is important to follow below instructions and obey warnings Symbol explanation This warning triangle calls attention to hazards that that can lead to d...

Страница 5: ...e sure that your hands are clean at the time of the assembly otherwise you may soil frame Nobody is allowed to climb onto the Pergola Hanging anything on the Pergola is forbidden Sheeting was used to...

Страница 6: ...6 Step 1 Attach base plate 3x4 to the bottom of posts D1x1 D2 x2and D3x1 use bolts 1x8 to attach with hex key or electric drill D2 posts should be installed diagonally as below...

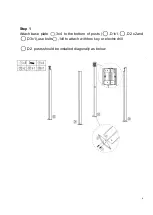
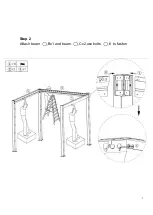
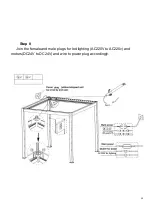
Страница 7: ...7 Step 2 Attach beam Bx1 and beam Cx2 use bolts 6 to fasten...

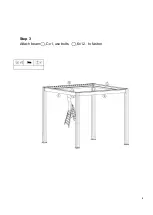
Страница 8: ...8 Step 3 Attach beam Cx1 use bolts 6x12 to fasten...

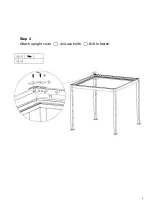
Страница 9: ...9 Step 4 Attach upright cover 4x4 use bolts 6x8 to fasten...

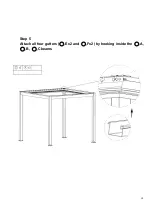
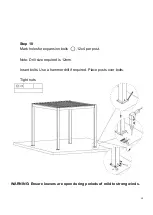
Страница 10: ...10 Step 5 Attach all four gutters Ex2 and Fx2 by hooking inside the A B Cbeams...

Страница 11: ...11 Step 6 Fasten motor 9x1 motor parts 10x1 and motor mount 11 x1 as diagram below and confirm 13 and 11 joining well...

Страница 12: ...nd B Place centre louver Hinto eleventh slot lining up with the holes Using M10 nut 5X2 secure the louver in place Place Driving louver Iin line with fifth slot on the beam A and B Fit all common louv...

Страница 13: ...13 Step 8 Join the female and male plugs for led lighting AC220V to AC220v and motors DC24V to DC24V and wire to power plug accordingly...

Страница 14: ...rod Jx 2 Flat L shape aluminum bar One is required for each end of the louvers Using bolt 6 plastic spacer 7and nut 8 secure the louvers at each end Note Do not over tighten Over tightening will prev...

Страница 15: ...es for expansion bolts 12x4 per post Note Drill size required is 12mm Insert bolts Use a hammer drill if required Place posts over bolts Tight nuts WARNING Ensure louvers are open during periods of mi...

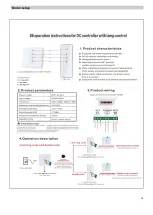
Страница 16: ...16 Motor setup...

Страница 17: ...smounting as well Storage When you do not want to use the Pergola for a longer period of time it is recommended to take the Pergola out of the brackets and store it Make sure that the frame is dry com...

Отзывы: