Metabo ES 7700 Скачать руководство пользователя страница 8

8

ENGLISH

1.

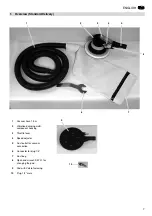
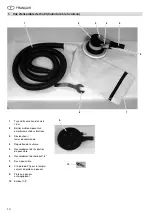
Overview (Standard Delivery) ....7

2.

Please Read First! .......................8

3.

Safety ...........................................8

3.1 Specified conditions of use ...........8

3.2 General safety instructions............8

4.

Operation .....................................8

4.1 Before initial operation ..................8

4.2 Using the tool ................................9

4.3 Changing the sanding disc ............9

4.4 Changing the sanding pad ............9

5.

Care and Maintenance ................9

6.

Available Accessories ................9

7.

Repairs .........................................9

8.

Environmental Protection ..........9

9.

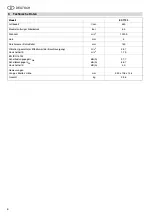
Technical Specifications ............9

These instructions are written in a way to
let you work with the tool quickly and
safely. Here is how to use the instruc-
tions: 

Read these instructions fully before
operating the tool. Pay special
attention to the safety information. 

If you notice transport damage while
unpacking, notify your supplier
immediately. Do 

not

 operate the

tool! 

These instructions are intended for
individuals having a basic technical
knowledge in the handling of tools
like the one described herein. If you
have no experience whatsoever with
such tool, we strongly recommend
to seek the advise of experienced
individuals. 

Keep all documents supplied with
this tool for future reference. Also,
retain proof of purchase in case of a
warranty claim. 

Should you rent or sell the tool, pass
on all documents supplied with the
tool. 

The manufacturer is not liable for any
damage arising from neglect of these
operating instructions. 

Information in these instructions is
denoted as under: 

Danger! 
Risk of personal injury or 
environmental damage. 

Caution! 
Risk of material damage. 

Numbers in illustrations (

1

2

3

, ...) 

denote component parts; 

are consecutively numbered; 

Instructions to be carried out in a
certain sequence are numbered. 

Instructions which can be carried
out in any sequence are indicated
by a bullet. 

Listings are indicated by an En Dash. 

3.1

Specified conditions of 
use 

This random orbit finishing sander is an
air tool for use by craftsmen. It can be
used for sanding, polishing and for sur-
face preparation. 

This tool shall only be powered by an air
compressor. The max. permissible work-
ing pressure stated in the Technical
Specifications must not be exceeded.
This tool must not be operated with
gases that are explosive, combustible or
detrimental to health. 

Any other use is not as specified. Use
not as specified, modification of the tool
or use of parts not approved by the
equipment manufacturer can cause
unforeseeable damage! 

3.2

General safety instruc-
tions 

When using this air tool follow the
safety instructions given below, to
exclude the risk of personal injury or
material damage.

Please also observe the special
safety instructions in the respective
chapters.

Observe the statuary accident insur-
ance institution regulations and reg-
ulations for the prevention of acci-
dents pertaining to the operation of
air compressors and air tools, where
applicable. 

A

General hazards!

Keep your work area tidy – a messy
work area invites accidents. 

Be alert. Do not operate this tool
while under the influence of drugs,
alcohol or medication. 

Keep children and bystanders away
from the work area. 

Store air tools out of the reach of
children. 

Always use a quick coupler to con-
nect this air tool to a compressor. 

Do not work materials detrimental to
health. 

Working with this tool may generate
sparks. Do not use the tool near

flammable materials, liquids or
gases.

Sanding dust is flammable. Keep
the amount of flammable material to
a minimum by periodically emptying
the dust bag.

Avoid whirling up dust when empty-
ing the dust bag. Do not inhale the
sanding dust.

Do not touch any rotating parts. 

Disconnect from air supply before

changing sanding dics or sanding
pad, 

servicing or 

when tool is left unattended. 

Use only sanding discs and pads
intended by the manufacturer for
this tool. 

A

Hazard generated by insuffi-
cient personal protection gear! 

Wear hearing protection. 

Wear safety glasses. 

Wear dust mask. 

Wear safety gloves. 

A

Hazard generated by tool
defects!

Do not attempt to repair the tool
yourself! Only trained specialists are
permitted to service or repair com-
pressors, pressure vessels and air
tools. 

A

Danger by vibration!

Vibrations are tansmitted to the
entire body, particularly to arms and
hands. Very heavy vitrations may
cause nerve and vascular disorder. 

A

Caution!

Protect the tool, air inlet and operat-
ing elements in particular, from dust
and dirt. 

Make sure that the max. permissible
working pressure stated in the Tech-
nical Specifications is not exceeded. 
The working pressure must be
adjusted by a pressure regulator. 

Do not overload tool – use it only
within the performance range it was
designed for (see Technical Specifi-
cations). 

Let tool run idle for a short time only. 

4.1

Before initial operation

Install plug.

Press sanding disc on the pad,
observing position of vac holes.

Table of Contents

2.

Please Read First! 

3.

Safety 

4.

Operation

Содержание ES 7700

Страница 1: ...tructions d utilisation originales 10 Origineel gebruikaanwijzing 14 Original brugsvejledning 18 Original bruksanvisning 21 Oryginalna instrukcja obsługi 24 Originální návod k osbluze 28 Alkuperäiskäyttöohje 32 Original instruksjonsbok 35 Оригинальное руководство по эксплуатации 38 K0067_30IVZ fm ...

Страница 2: ...C 00 4 6 2 C 8 4 2 4 2 8 4 2 8 4 6 30 4 00 2 2 8 8 2 2 0 4 8 00 4 2 4 8 8 4 8 8 2 4 8 40 2 4 8 4 4 4 4 4 00 ª ª ª ª ª 0 ª 00 4 4 4 4 4 8 0 4 4 4 00 4 2 8 2 0 2 00 4 6 2 C 8 2 2 4 µ 4 2 4 C 4 C 0 2 4 00 2 2 2 2 2 2 0 2 4 00 Volker Siegle D 72622 Nürtingen Nürtingen 20 01 2010 1001340 Metabowerke GmbH Metabo Allee 1 Director Innovation Research and Development Exzenterschleifer Disc Sander Ponceuse ...

Страница 3: ...ndes Mehrkomponentengehäuse 3 Auslöser Bedienhebel 4 Geschwindigkeitsregulierung 5 Anschluss für Staubabsaugung 6 Anschluss für Stecknippel 1 4 7 Staubsack 8 Maulschlüssel SW 21 zum Wechseln des Schleiftellers 9 Schleifteller mit Klettverschluss 10 Stecknippel 1 4 9 10 XK0038D2 fm Betriebsanleitung DEUTSCH ...

Страница 4: ...den Dieses Werkzeug darf nicht mit explo siven brennbaren oder gesundheitsge fährdenden Gasen betrieben werden Jede andere Verwendung ist bestim mungswidrig Durch bestimmungswid rige Verwendung Veränderungen am Werkzeug oder durch den Gebrauch von Teilen die nicht vom Hersteller geprüft und freigegeben sind können unvorher sehbare Schäden entstehen 3 2 Allgemeine Sicherheits hinweise Beachten Sie ...

Страница 5: ... zeug Druckluftanschluss trennen 1 Maulschlüssel zwischen Gummi manschette und Schleifteller auf Haltemutter schieben 2 Alten Schleifteller gegen den Uhr zeigersinn abschrauben dabei mit Maulschlüssel gegenhalten 3 Neuen Schleifteller im Uhrzeiger sinn festschrauben dabei mit Maul schlüssel gegenhalten A Gefahr Vor allen Arbeiten am Werk zeug Druckluftanschluss trennen Weitergehende Wartungs oder ...

Страница 6: ... min 1 12000 Hub mm 5 Durchmesser Schleifteller mm 150 Vibration gewichteter Effektivwert der Beschleunigung Unsicherheit K m s2 m s2 3 57 1 79 EN ISO 15744 Schallleistungspegel LWA Schalldruckpegel LPA Unsicherheit K dB A dB A dB A 97 7 86 7 4 0 Abmessungen Länge x Breite x Höhe mm 230 x 108 x 148 Gewicht kg 0 96 ...

Страница 7: ...ration damping multi component housing 3 Throttle lever 4 Speed adjuster 5 Dust outlet for vacuum connection 6 Connector for plug 1 4 7 Dust bag 8 Open end wrench SW 21 for changing the pad 9 Pad with Velcro fastening 10 Plug 1 4 male 9 10 XK0038E2 fm Operating Instructions ENGLISH ...

Страница 8: ...anufacturer can cause unforeseeable damage 3 2 General safety instruc tions When using this air tool follow the safety instructions given below to exclude the risk of personal injury or material damage Please also observe the special safety instructions in the respective chapters Observe the statuary accident insur ance institution regulations and reg ulations for the prevention of acci dents pert...

Страница 9: ... tighten if necessary If the tool is not lubricated by a serv ice unit or line lubricator add 3 5 drops of pneumatic oil to air inlet every 15 minutes of use constant operation Do not store tool unprotected out doors or in damp environment Pneumatic oil 0 5 litre Special lubricant for air tools serv ice units and line oilers Stock no 090 100 8540 Line oiler R3 8 female For fitting directly to air ...

Страница 10: ...ts à amortissement des vibrations 3 Déclencheur levier de commande 4 Régulation de la vitesse 5 Raccordement de l aspiration de poussière 6 Raccordement de l embout 1 4 7 Sac à poussière 8 Clé plate de 21 pour le rempla cement du plateau à poncer 9 Plateau à poncer auto agrippant 10 Embout 1 4 9 10 XK0038F2 fm Instructions d utilisation FRANÇAIS ...

Страница 11: ...onctionner cet appareil avec des gaz explosibles combustibles ou présentant un danger pour la santé Toute autre utilisation est contraire aux prescriptions Une utilisation non conforme aux prescriptions des modifi cations apportées à l appareil ou l emploi de pièces qui n ont pas été contrôlées ni approuvées par le fabricant peuvent entraîner des dommages imprévisibles 3 2 Consignes de sécurité gé...

Страница 12: ...écrou de maintien entre le manchon en plasti que et le plateau à poncer 2 Dévisser l ancien plateau à poncer dans le sens contraire des aiguilles d une montre en utilisant la clé plate comme contre clé 3 Visser fermement le nouveau pla teau à poncer dans le sens des aiguilles d une montre en utilisant la clé plate comme contre clé A Danger Avant toute intervention de maintenance débrancher l alime...

Страница 13: ...otation tr mn 12000 Course mm 5 Diamètre du plateau à poncer mm 150 Vibration valeur efficace pondérée de l accélération Incertitude K m s2 m s2 3 57 1 79 EN ISO 15744 Niveau de puissance acoustique LWA Niveau sonore LPA Incertitude K dB A dB A dB A 97 7 86 7 4 0 Dimensions longueur x largeur x hauteur mm 230 x 108 x 148 Poids kg 0 96 ...

Страница 14: ... Trillingsdempende meercompo nenten kast 3 Ontspanner Bedienhendel 4 Snelheidsregeling 5 Aansluiting voor stofafzuiging 6 Aansluiting voor steeknippel 1 4 7 Stofzak 8 Steeksleutel SW 21 voor het vervangen van het slijpbord 9 Slijpbord met klitteband 10 Steeknippel 1 4 9 10 XK0038H2 fm Handleiding NEDERLANDS ...

Страница 15: ... de technische gegevens mag niet worden overschre den Dit gereedschap mag niet met explosieve brandbare of gezondheids bedreigende gassen worden geëxploi teerd Elk ander gebruik is verboden Door onreglementair gebruik veranderingen aan het gereedschap of door gebruik van onderdelen die niet door de fabri kant werden gekeurd en vrijgegeven kan onvoorziene schade ontstaan 3 2 Algemene veiligheidsin ...

Страница 16: ...schap 1 Steeksleutel tussen rubbermanchet en slijpbord op houdermoer schui ven 2 Oud slijpbord tegen de wijzers van de klok in losschroeven hierbij met steeksleutel tegenhouden 3 Nieuw slijpbord in richting van de wijzers van de klok vastschroeven hierbij met steeksleutel tegenhou den A Gevaar Koppel de persluchtaanslui ting los vóór alle werkzaamheden aan het gereedschap Service en of onderhoudsw...

Страница 17: ...rental min 1 12000 Slag mm 5 Doorsnede slijpbord mm 150 Trilling geschatte effectieve waarde van de versnelling Onzekerheid K m s2 m s2 3 57 1 79 EN ISO 15744 Geluidsdrukniveau LWA Geluidsdruknivau LPA Onzekerheid K dB A dB A dB A 97 7 86 7 4 0 Afmetingen lengte x breedte x hoogte mm 230 x 108 x 148 Gewicht kg 0 96 ...

Страница 18: ...onsdæmpende multikomponentkabinet 3 Udløser betjeningshåndtag 4 Hastighedsregulering 5 Tilslutning til støvudsugning 6 Tilslutning til nippel 1 4 7 Støvpose 8 Gaffelnøgle SW 21 til udskiftning af slibetallerken 9 Slibetallerken med velcrobånd 10 Nippel 1 4 9 10 XK0038C2 fm Betjeningsvejledning DANSK ...

Страница 19: ...endt af producenten kan med føre uforudsete skader 3 2 Generelle sikkerhedshen visninger Overhold altid de følgende sikker hedsanvisninger under anvendelsen af dette værktøj for at undgå fare for personer eller tingskader Overhold de særlige sikkerhedshen visninger i de pågældende kapitler Overhold altid de særlige arbejds sikkerheds eller ulykkessikkerheds bestemmelser for omgangen med kompressor...

Страница 20: ...bindelserne om nødvendigt efterspændes disse Hvis værktøjet ikke smøres med en trykluftsunit eller et påmonteret smøremodul skal der efter 15 minutters drift uden stop manuelt tilføjes ca 3 til 5 dråber pneuma tikolie i tryklufttilslutningen Opbevar ikke værktøjet ubeskyttet i det fri eller i fugtige omgivelser Pneumatikolie 0 5 liter Specialolie til trykluftdrevet værktøj trykluftunits og påmonte...

Страница 21: ... m 2 Vibrationsdämpande flerkomponentshölje 3 Utlösare manöverspak 4 Hastighetsreglering 5 Anslutning för dammutsugning 6 Anslutning för sticknippel 1 4 7 Dammpåse 8 Skruvnyckel SW 21 för byte av slipskiva 9 Slipskiva med kardborrfäste 10 Sticknippel 1 4 9 10 XK0038A2 fm Bruksanvisning SVENSKA ...

Страница 22: ...e kontrollerats och god känts av tillverkaren kan oförutsedda skador uppstå 3 2 Allmänna säkerhetsan visningar Observera följande säkerhetsanvis ningar när du använder detta verk tyg för att förhindra fara för personer eller sakskador Beakta de speciella säkerhetsanvis ningarna i respektive kapitel Följ även särskilda arbetarskyddsfö reskrifter eller föreskrifter för före byggande av olycksfall so...

Страница 23: ...trollera att alla skruvförband är fast åtdragna eller dra ev åt dem Om verktyget inte smörjs med hjälp av en serviceenhet eller en påmon terad smörjapparat ska cirka 3 till 5 droppar tryckluftsolja droppas för hand i tryckluftsanslutningen var 15 e arbetsminut kontinuerlig användning Förvara inte verktyget oskyddat utomhus eller i fuktig miljö Pneumatikolja 0 5 liter Specialolja för tryckluftsverk...

Страница 24: ...wa tłumiąca wibracje 3 Wyzwalacz Dźwignia sterująca 4 Regulacja prędkości 5 Wyjście dla urządzenia odsysającego pył 6 Wyjście dla złączki wtykowej 1 4 7 Worek na pył 8 Klucz maszynowy płaski SW 21 do wymiany talerza szlifierskiego 9 Talerz szlifierski z mocowaniem na rzep 10 Złączka wtykowa 1 4 9 10 XK0038K2 fm Instrukcja obsługi POLSKI ...

Страница 25: ...ylacyjna to urządzenie o napędzie pneumatycznym przeznaczone do użytku rzemieślniczego Może być wykorzystywana do szlifowania polerowania oraz obróbki powierzchniowej Urządzenie może być napędzane jedynie przez kompresor Nie wolno przekraczać podanego w danych technicznych maksymalnego dopuszczalnego ciśnienia roboczego Do napędzania urządzenia nie wolno używać gazów wybuchowych łatwopalnych lub s...

Страница 26: ...bkodziałającego 4 Aby włączyć urządzenie Całkowicie opuścić dźwignię spustową Ustawić prędkość przy pomocy regulatora prędkości 5 Papier ścierny przyłożyć do obrabianej powierzchni lekko i równomiernie go przyciskając 4 3 Wymiana papieru ściernego A Niebezpieczeństwo Proszę używać tylko papieru ściernego przewidzianego dla tego urządzenia przez producenta Przed rozpoczęciem jakichkolwiek prac przy...

Страница 27: ...utylizacji Wysłużone maszyny i akcesoria zawierają dużą ilość wartościowych surowców i tworzyw sztucznych które również mogą zostać poddane procesowi utylizacji Instrukcja została wydrukowana na papierze bielonym bez chloru 7 Naprawa 8 Ochrona środowiska 9 Dane techniczne Model ES 7700 Zapotrzebowanie na powietrze l min 550 Maksymalne dopuszczalne ciśnienie robocze bar 6 3 Prędkość obrotowa min 1 ...

Страница 28: ... kryt tlumící vibrace 3 Spouš ovládací páčka 4 Regulace rychlosti 5 Přípojka pro odsávání prachu 6 Přípojka pro spojku k nasazení hadice 1 4 7 Sáček na prach 8 Stranový klíč OK 21 k výměně brusného talíře 9 Brusný talíř se suchým zipem 10 Spojka k nasazení hadice 1 4 9 10 XK0038CS2 fm Návod k obsluze ČESKY ...

Страница 29: ...užití je v rozporu s určením Použitím v rozporu s určením úpravami na nástroji nebo použitím dílů které nejsou přezkoušeny a schváleny výrobcem mohou vzniknout nepředvídatelné škody 3 2 Všeobecné bezpečnostní pokyny Při používání tohoto nástroje dodržujte následující bezpečnostní pokyny aby nemohlo dojít k ohrožení osob a k věcným škodám Dodržujte speciální bezpečnostní pokyny v jednotlivých kapit...

Страница 30: ...te proti směru hodinových ručiček přitom přidržujte matici stranovým klíčem 3 Nový brusný talíř našroubujte ve směru hodinových ručiček přitom přidržujte matici stranovým klíčem A Nebezpečí Před prováděním všech prací na nástroji odpojte přípojku stlačeného vzduchu Údržbu a opravy které náročností překračují úkony popsané v této kapitole smí provádět jen kvalifikovaní pracovníci Zkontrolujte dotaž...

Страница 31: ...min 1 12000 Zdvih mm 5 Průměr brusného talíře mm 150 Vibrace vážená efekt hodnota zrychlení Nejistoty měření K m s2 m s2 3 57 1 79 EN ISO 15744 Hladina akustického výkonu LWA Hladina akustického tlaku LPA Nejistoty měření K dB A dB A dB A 97 7 86 7 4 0 Rozměry Délka x šířka x výška mm 230 x 108 x 148 Hmotnost kg 0 96 ...

Страница 32: ... 9 m 2 Värinöitä vaimentava moniosakotelo 3 Laukaisin käyttövipu 4 Nopeudensäädin 5 Pölynimurin liitäntä 6 Pistoliittimen 1 4 liitäntä 7 Pölysäkki 8 Kita avain 21 mm hiomalautasen vaihtoa varten 9 Hiomalautanen tarrapinnan kanssa 10 Pistoliitin 1 4 9 10 XK0038B2 fm Käyttökäsikirja SUOMI ...

Страница 33: ...isesta käy töstä koneen muutoksista tai osien käy töstä joita valmistaja ei ole tarkastanut ja hyväksynyt voi aiheutua ennalta arvaamattomia vaurioita 3 2 Yleisiä turvallisuusoh jeita Huomioi tätä työkalua käytettäessä seuraavat turvallisuusohjeet jotta henkilö ja esinevahinkojen vaarat vältettäisiin Huomioi kappaleissa olevat erityiset turvallisuusohjeet Huomioi tarvittaessa ammattiyhdis tyksen o...

Страница 34: ...kiris tä tarvittaessa Mikäli työkalua ei öljytä huoltoyksi kön tai erillisöljyäjän kautta laita joka 15 käyttöminuutti jatkuva käyt tö noin 3 5 pisaraa paineilmaöljyä käsin paineilmaliitäntään Älä säilytä laitetta suojaamattomana ulkona tai kosteissa tiloissa Paineilmaöljy 0 5 litraa Erikoisöljy paineilmatyökaluja huoltoyksiköitä ja erillisöljyäjiä varten Tuotenro 090 100 8540 Erillisöljyäjä R3 8 ...

Страница 35: ...m 2 Vibrasjonsdempende flerkomponenthus 3 Utløser betjeningsspak 4 Hastighetsregulering 5 Tilkobling for støvavsugning 6 Tilkobling for pluggnippel 1 4 7 Støvpose 8 Fastnøkkel str 21 for å skifte slipeskive 9 Slipeskive med borrelås 10 Pluggnippel 1 4 9 10 XK0038N2 fm Bruksanvisning NORSK ...

Страница 36: ... av deler som ikke er prøvet og godkjent av produsenten kan forårsake uforutsette skader 3 2 Generelle sikkerhetshen visninger Ved bruk at verktøyet skal du følge disse sikkerhetshenvisningene for å utelukke at personer eller gjenstan der utsettes for fare Følg de spesielle sikkerhetshenvis ningene i de respektive kapitlene Følg eventuelle spesielle forskrifter om arbeidsvern eller ulykkesfore byg...

Страница 37: ...ller at skruforbindelser sitter godt fast trekk ev til Når verktøyet ikke blir smurt over en vedlikeholdsenhet eller en påmon tert oljesmører skal du dryppe ca 3 til 5 dråper pneumatikkolje manuelt i trykklufttilkoblingen hvert 15 drifts minutt kontinuerlig bruk Ikke oppbevar verktøyet i friluft eller i fuktige omgivelser uten beskyttelse Pneumatikkolje 0 5 liter Spesialolje for trykkluftverktøy v...

Страница 38: ...составной корпус 3 Спуск рычаг управления 4 Регулятор скорости 5 Штуцер для пылеотсоса 6 Штуцер для вставного ниппеля 1 4 7 Мешок для пыли 8 Ключ с открытым зевом SW 21 для замены шлифовального круга 9 Шлифовальный круг с липучкой 10 Вставной ниппель 1 4 9 10 XK0038RU2 fm Руководство по эксплуатации ...

Страница 39: ... Он может использоваться для шлифования полировки и подготовки поверхностей Данный инструмент должен приводиться в действие только компрессором сжатого воздуха Запрещается превышать предельно допустимое рабочее давление указанное в технических характеристиках Запрещается использовать инструмент с взрывоопасными горючими и вредными газами Любое иное применение является ненадлежащим Ненадлежащее исп...

Страница 40: ...лотна предусмотренные изготовителем для данного инструмента Перед выполнением любых работ на инструменте отсоединять подачу сжатого воздуха 1 Снять старое полотно с тарелки 2 Установить новое полотно на тарелке при этом следить за положением положением вытяжных отверстий 4 4 Замена шлифовальной тарелки A Опасность Перед выполнением любых работ на инструменте отсоединять подачу сжатого воздуха 1 За...

Страница 41: ...хлорным способом 8 Защита окружающей среды 9 Технические характеристики Модель ES 7700 Расход воздуха л мин 550 Предельно допустимое рабочее давление бар 6 3 Частота вращения мин 1 12000 Ход мм 5 Диаметр тарелки мм 150 Вибрация взвешенное эффективное значение ускорения Погрешность K м с2 м с2 3 57 1 79 EN ISO 15744 Уровень звуковой мощности LWA Уровень звукового дваления LPA Погрешность K дБ A дБ ...

Отзывы: