background image


10 

III.


WDS Links 

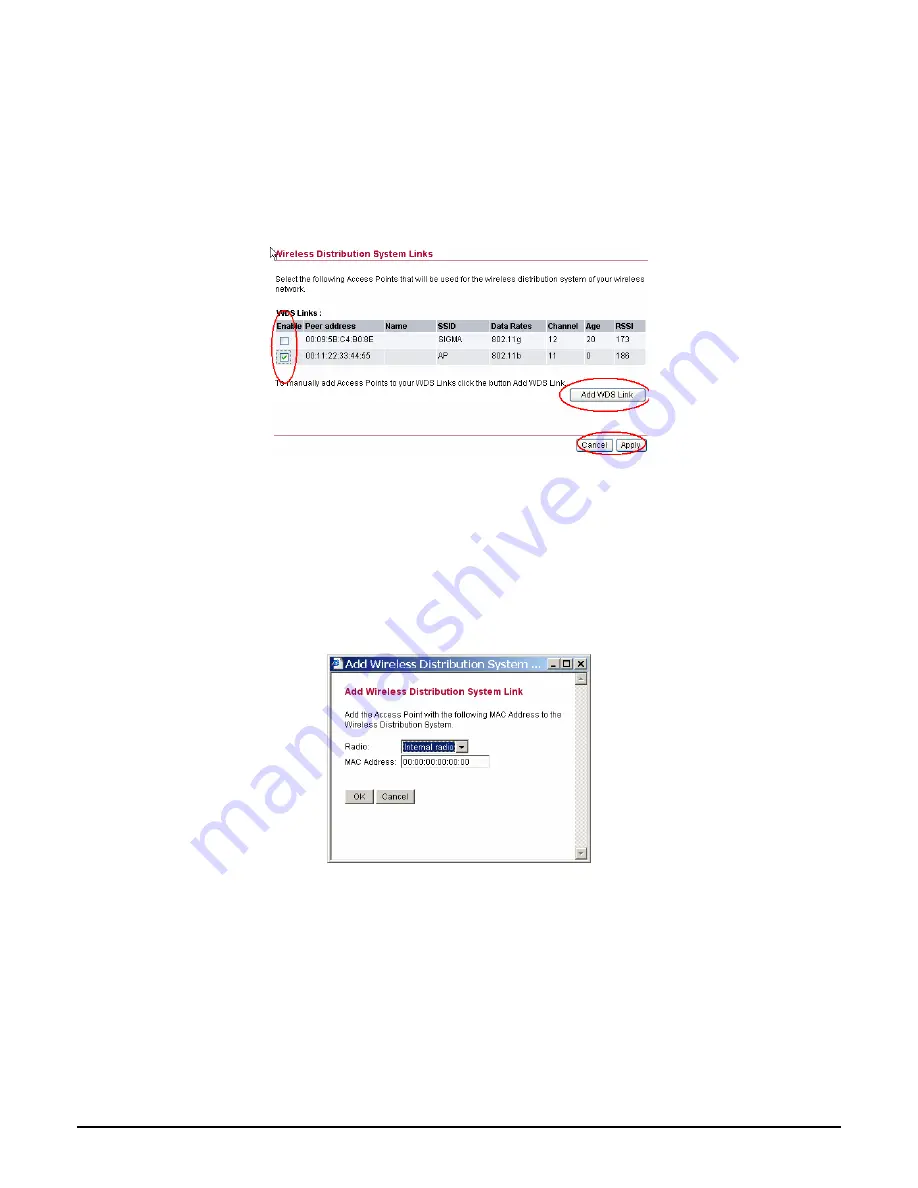
WDS (Wireless Distribution System) uses wireless media to communicate with 
other APs. When you enter the screen of the WDS, there are list of other APs will 
appear, click enable in the left side of the screen and click apply to add the AP to 
your WDS Link, or click the “Add WDS Link” button to add the APs that you need 
to add. 


This WDS Link will scan only other APs channel within the range of 3 channels 
among your AP radio channel, two other ways to connect to the APs that are not 
listed in the WDS Link.  
1.


Click the “Add WDS Link” button, a window will pop out, type in the MAC 
address of the AP that you need to communicate. 

2.


Change your AP radio channel within the range of 3 channels to scan the AP 
that you want to connect. 


To remove an AP in the WDS Link list, unclick the enable dialog box to remove 
the WDS Link where you set before. 
In Addition, make sure you configure all WDS APs to work on the same radio 
channel and in the same WEP key. 

Содержание KOB WL560

Страница 1: ......

Страница 2: ...OR BUSINESS INTERRUPTION HOWEVER CAUSED WHETHER IN CONTRACT STRICT OR OTHER LEGAL THEORY OF LIABILITY OR TORT INCLUDING NEGLIGENCE OR OTHERWISE ARISING IN ANY WAY OUT OF THE USE OF THIS PRODUCT AND SO...

Страница 3: ...evice must be in strict accordance with the instructions included in the user documentation provided with the product Any changes or modifications made to this device that are not expressly approved b...

Страница 4: ...ccur in a particular installation If this equipment does cause harmful interference to radio or television reception which can be determined by turning the equipment off and on the user is encouraged...

Страница 5: ...cted These are considered relevant and sufficient Protection requirements for electromagnetic compatibility Article 3 1b Testing for electromagnetic compatibility according to EN 301 489 1 EN 301 489...

Страница 6: ...lation 3 LED Indicator 3 Rear Panel 3 Hardware connections 4 Connect to the Switch Hub 4 Check the installation 4 Configuring the Wireless LAN Access Point 5 Login to the Wireless AP through WLAN 5 Lo...

Страница 7: ...ns at a speed of up to Fifty four megabit per second With WLAN networking you can locate your PC wherever you want without wires and cables WLAN networking provides users with an access to real time i...

Страница 8: ...g steps Locate an optimum location for the Wireless LAN Access Point AP The best place for your AP is usually the center of your wireless network with line of sight to all of your mobile stations Visu...

Страница 9: ...eless AP is always broadcasting packets Rear Panel The figure below shows the rear panel of the Access Point E thernet Re set Antenna 1 Antenna 2 Dual Antenna Model Rear Panel Ethernet Ethernet uplink...

Страница 10: ...lug in the other end of the RJ45 network cable to the Wireless Access Point Check the installation The control LEDs of the Access Point are clearly visible and the status of the network link can be se...

Страница 11: ...perly The default setting of the Wireless AP that you will use SSID default Channel 6 WEP Encryption disable Login Before you configure this device note that when the AP is configured through an Ether...

Страница 12: ...ord settle type in the password you entered before There is no need to enter any password when you first login the AP the default setting is without password Type a name or leave the username dialog b...

Страница 13: ...l show the station summary of the AP when you login to the AP There are six main functions included in the left side of the main screen Network Security Status Clients Tools and Configuration Point th...

Страница 14: ...etting Dynamic DHCP Client Click on the Dynamic for dynamic IP address allocation from the Server PCs Static IP Click on the Static IP to fill up the IP Address Subnet Mask and Gateway from the Networ...

Страница 15: ...ated WLANs The SSID value must be the same in all stations and AP in the extended WLAN Band you can select to change the radio band to mixed mode G only or B only a window will pop out to change the p...

Страница 16: ...channel within the range of 3 channels among your AP radio channel two other ways to connect to the APs that are not listed in the WDS Link 1 Click the Add WDS Link button a window will pop out type i...

Страница 17: ...how many Radius servers were set I Access Control List Access Control function allows clients whose MAC addresses in the list will be able to connect to this Access Point When this function is activat...

Страница 18: ...ng RADIUS Remote Authentication Dial In User Service utilizes a RADIUS server for authentication and the use of dynamic TKIP AES or WEP Re authentication Time type in how long the seconds that you wan...

Страница 19: ...selecting the 64bit you must type 10 values in the following range 0 F hexadecimal 128 bits selecting the 128bit you must type 26 values in the following range 0 F hexadecimal IV 802 1x Security To ad...

Страница 20: ...d Encryption System which utilizes a symmetric 128 Bit block data encryption Disable WPA Security to disable the WPA security Use WPA with Pre Shared Key type in 8 63 characters inside the dialog box...

Страница 21: ...n will show the statistics of the Station Wireless Statistics and Event Reporting I Station This screen will show the status summary of the system II Wireless Statistics This screen shows the statisti...

Страница 22: ...16 III Event Report This screen shows the event happened on the AP press Reset Event Log to clear the record of the event happened...

Страница 23: ...eless Clients This function shows the list of the wireless clients that connected to this AP II Access Points This function shows the list of the Wireless Access Point that this AP can connect with th...

Страница 24: ...pgrade Firmware button in the left side of the menu screen and a window will pop out Press Next Type the firmware file that you need to upgrade inside the dialog box or press the Browse button to find...

Страница 25: ...hen finish uploading the file to the AP do not power off the AP until the Firmware Upgrade Complete screen appears Press the Reset button on the rear panel of the AP to set back to factory default set...

Страница 26: ...d inside the New password and Confirm password dialog box press the Change password button to activate this function II Lock Access Point Lock the Access Point to deny configuration changes to it You...

Страница 27: ...to 54Mbps with Automatic Scale Back Receiver Sensitivity 54Mbps Typical 68dBm 10 PER 11Mbps Typical 81dBm 8 PER Transmit Power 802 11g Minimum 12dBm typically 802 11b Minimum 15dBm typically Transmiss...

Отзывы: