mcr WIP type multi-blade fire dampers
“MERCOR” S.A. –
the Company reserves the right to make modifications and changes.
6/15
resistance rating. In such cases, fire dampers will have a fire-resistance rating equal to that of a space dividing
element, with the condition of smoke leakage rating being satisfied. When installing a fire damper in a given type of
wall which is thinner than required, its thickness should be increased along the perimeter of the fire damper, e.g. by
installing an additional board or other building element.
Fire transfer dampers WIP/T and WIP/T-G are assembly including the fire grille, according to the manufacturer
guidelines.
6.1.
PRE-INSTALLATION INSPECTION
Each fire damper is inspected by the manufacturer before packing and transport. Once the product has been
unpacked at the destination, visual inspection should be conducted to check for possible deformations of the
housing or fire damper transport damage.
6.2.
INSTALLATION OPENING
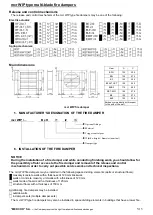
The minimum size of an installation opening necessary for correct installation of the mcr WIP type fire damper is:
Bo = (A + Bz + 80) [mm]
Ho = (H + 180) [mm]
BF
BFL
BFN
BE
BLE
KW1
EXBF
C1 [mm]
385
335
385
385
335
335
460
A [mm]
125
125
125
125
125
165
175
6.3.
BUILDING IN (EMBEDDING)
The mcr WIP type fire damper works correctly if the rotation axis of the partition is horizontal. The release and control
mechanism may be located on the right or left of a fire damper irrespectively of the air flow direction. Installing a fire
damper on its side, i.e. with rotation axes of the partition being vertical, is only permitted when this has been
previously made known to the manufacturer at the time of placing the order.
Before building in/embedding, a fire damper should be placed axially in a space dividing element (a wall or structural
floor that divides separate fire compartments), i.e. in a previously prepared opening. Next, level and secure the fire
damper so that it does not move. For fire dampers with dimensions greater than 700 x 700, a strut should be used.
Once the above have been completed, start manually the fire damper’s partition (blades assembly), checking if it
rotates correctly (it should not touch the housing elements, etc.). Close the fire damper’s partition. The gap between
the fire damper and the wall should be completely filled with appropriate mixture of your choice (but with all the
required certificates), which will provide the desired fire-resistance rating of the wall and the fire damper. Moreover,
special attention should be paid to ensure that the mixture does not come into contact with the equipment of the fire
damper responsible for its proper operation (release and control mechanism, partition, seals and limiters). For this
purpose, it is essential that you put plastic film or other material on the fire damper, which will protect it while masonry
and finishing work is being carried out. The partition has to remain closed until the mixture sets. Once it has set,
remove the protection and struts. Then, again open and close the fire damper’s partition in order to check if it works
correctly. In the case of installation of a fire damper in a wall made of boards, the space between the fire damper
housing and the wall should be completely filled with A1 class non-flammable (certified) mineral wool. Its density and
thickness should ensure fire-resistance not lower than that of the wall in which the fire damper has been installed.
Additionally, the filled space should be sealed with an appropriate mixture or mastic having fire-resistance required
by the wall. In order to ensure fire-resistance of a fire damper, the depth to which it can be built in should never be
Mixture


