
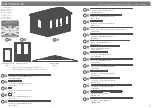


P 7
Please retain product label and instructions for future reference
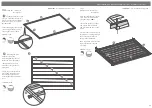
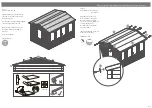
Step 10
Parts Needed - No. 9 QTY 2
Following the same method
outlined in
Pre-Assembly
, lay
log board (No. 9) onto
the front and rear of the
building.
Fix with 2x70mm screws per
board, 1 at either end.
4x70mm Screws
9
9
Pre drill
hole
70mm
screw
Pre drill
hole
70mm
screw
13
13
13
a
b
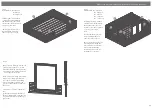
Step 11
Parts needed - No. 13 QTY 3
Align the Roof Purlin(
s
) (No.
13) into the cut out slots on each
gable top ensuring each roof purlin
interlocks the boards.
Secure the roof purlins at
each end by screwing through the
bars into the boards (ensure to
pre-drill to avoid the boards split-
ting) using 4x70mm screws per roof
purlins.
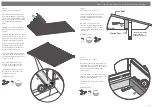
*Please note:
The gable shown is for
illustrative purposes and may differ
in width from your choice in prod-
uct.
Nevertheless, despite any differenc-
es
the process of fixing the
roof purlins
is the same.
a
b
IMPORTANT:
Pre-drill before fixing screws.


