background image

8

Pairing Your Indoor Chime Unit

1.   In a location near your door and with good Wi-Fi coverage, power on your indoor 

chime unit with either a standard USB-A port or the provided DC power adaptor. 

The status light will blink red to indicate that the chime is ready for pairing.

2.   To put the chime in pairing mode, push the reset button once (located at the 

rear of the chime unit). The status light will blink continuously. Ensure that it is 

blinking for at least 5 seconds before completing step 3.

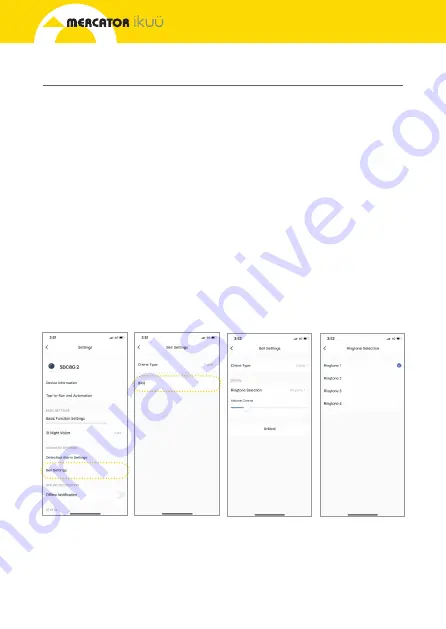
3.   In the app, navigate to settings > bell settings > bind. The status light will 

stop blinking and remain solid blue to indicate that the chime is paired. After 

successfully pairing the indoor chime unit, you can adjust the ringtone    

and volume.

Note: If your chime unit is showing as paired, but makes no sound when the doorbell 

is pressed, try unbinding the chime unit and binding it again. Ensure that the status 

light indicator is blinking slowly and continuously before tapping ‘bind’ in the app.  

If there is still no sound when the doorbell is pressed, try moving it closer to the video 

doorbell unit.

Содержание ikuu SDC8G

Страница 1: ...SMART VIDEO DOORBELL QUICK START GUIDE SDC8G www ikuu com au...

Страница 2: ...ideo doorbell remotely through the Mercator Iku app which can be downloaded forfree from the Apple App Store and Google Play Store 1 x Smart Video Doorbell 1 x IndoorChime 1 x 16GB Micro SD Card 1 x 5...

Страница 3: ...Rolling storage micro SD card 16GB included Max 128GB card supported StatusLight RED Solid Light indicates the device has been reset and is unpaired RED Blinking Light waiting forWi Fi connection Pai...

Страница 4: ...ercator Iku app Note Ensure your Video Doorbell is in pairing mode The LED should be flashing red If it isn t use the reset pin to press and hold the reset button on the back of the unit for5 seconds...

Страница 5: ...bell to the App cont Select Doorbell from the sidebar and then tap the Video Doorbell icon 3 When the prompt appears tap next step 4 Enteryour Wi Fi name and password then tap Confirm 5 When the promp...

Страница 6: ...ting to yourvideo doorbell When it reaches 100 you will be taken to the product s settings page 8 Update the name of the device optional then tap Done 9 The Video Doorbell feed will open and you will...

Страница 7: ...phone Take a video of the live video feed which will be saved to the photo album 24 7 recording and event recording available Review camera footage from the SD card if installed Adjust motion detectio...

Страница 8: ...rat least 5 seconds before completing step 3 3 In the app navigate to settings bell settings bind The status light will stop blinking and remain solid blue to indicate that the chime is paired After s...

Страница 9: ...dereave and avoid placing it in direct sunlight and extreme weather Do not mount the doorbell unit on metal ornearmetal door frames security door orproximity any metal doorfurniture as this might affe...

Страница 10: ...12V DC poweradaptorto an outlet asclose to yourmounting location aspossible Donotplugin youradaptor 2 Route adaptorwire with extension cord to doorbell location Do not connect to the doorbell 3 Mark...

Страница 11: ...be based on time sensors or even other products Routines Use Mercator Iku with other household products to create simple voice commands that trigger customised actions based on your daily activities T...

Страница 12: ...wish to make a claim under this guarantee the product and proof of purchase must be returned pre paid by you to the place of purchase This guarantee is in addition to and does not take away from any o...

Отзывы: