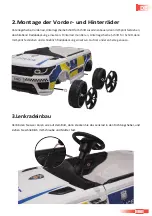
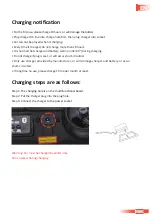
Merax TX288704 Скачать руководство пользователя страница 20

2.

1

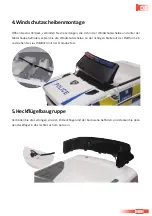
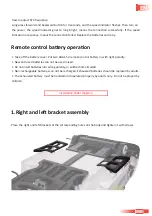
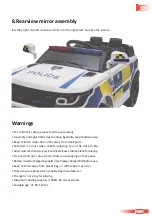
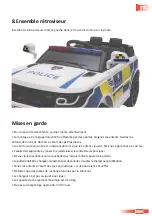
8.Rearview mirror assembly

Inserting right and left rearview mirror into the right place hole like the picture. 

Warnings

• 

For children‘s safety, please read these carefully.

• 

Assembly and adjustment must be done by adults, keep children away.

• 

Keep children under 36 months away from small parts.

• 

Safe belt is a must when children playing. Do not be close to fire.

• 

Adult must teach how to play it and never leave children alone for playing.

• 

Do not stand up or play when children are stepping on foot pedal.

• 

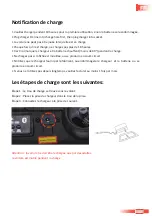
Battery must be charged by adults only. Please charge it first before use.

• 

Keep children away from plastic bag, or suffocation may occur.

• 

Only use spare parts which provided by manufacturer.

• 

Charger is not a toy for playing.

• 

Maximum loading capacity is 30KG. Do not overload.

• 

Suitable age: 37-95 months.

02

03

04

05

06

07

08

09

10

11

12

13

14

15

16

17

18

19

20

21

22

23

24

25

26

27

28

29

30

31

32

33

01

Содержание TX288704

Страница 1: ...ts Hohe und niedrige Geschwindigkeit WARNUNG Das Spielzeug muss von einem Erwachsenen zusammengebaut werden Im nicht zusammengebauten Zustand enth lt es potenziell gef hrliche scharfe Spitzen scharfe...

Страница 2: ...02 Inhaltsverzeichnis TEILELISTE 03 PRODUKTSPEZIFIKATIONEN 03 KONTROLLSYSTEM 03 DIAGRAMM DER INSTALLATIONSREIHENFOLGE 05 VORSICHTSMA NAHMEN 09 LADEANLEITUNG 10 WARTUNG UND SERVICE 11...

Страница 3: ...Produkt Produktspezi kationen Batterie Bruttogewicht Nettogewicht Geeignetes Alter Maximal Gewichtskapazit t Ladezeit Ladeger t Geschwindigkeit N O P Q Teileliste Name und Menge A B C D E F G H I J K...

Страница 4: ...rt ist Die Fernbedienung sollte unter Aufsicht von Erwachsenen verwendet werden Die Fernbedienung hat Vorrang vor der Fernbedienung ist vor der manuellen Steuerung Tastenfunktion Leistungsanzeige Lade...

Страница 5: ...e die Batterien und versuchen Sie es erneut Nehmen Sie die Batterieabdeckung ab Legen Sie zwei AAA1 5V Fernbedienungsbatterien mit der richtigen Polarit t ein Neue und gebrauchte Batterien k nnen nich...

Страница 6: ...end Radabdeckung einsetzen Hinterrad montieren Unterlegscheibe Schritt f r Schritt dann mit Splint festziehen und schlie lich Radabdeckung einsetzen Auf der anderen Seite genauso 3 Lenkradeinbau Verb...

Страница 7: ...der Motorhaube be nden setzen Sie die Windschutzscheibe an der richtigen Stelle auf der Plattform ein und ziehen Sie sie schlie lich mit der Schraube fest 5 Heck gelbaugruppe Verbinden Sie die Leitun...

Страница 8: ...nschluss der Batterieleitung Schlie en Sie die Batterieleitung richtig an rot an rot schwarz an schwarz 7 Sitzmontage Den Sitz an der richtigen Stelle im Auto einsetzen und dann mit Schrauben festzieh...

Страница 9: ...der N he von Feuer sein Erwachsene m ssen das Spielen beibringen und d rfen Kinder zum Spielen nie alleine lassen Stehen Sie nicht auf oder spielen Sie nicht wenn Kinder auf das Fu pedal treten Der A...

Страница 10: ...rm werden unter 60 Nicht au aden wenn der Stecker nass ist oder einen Kurzschluss verursacht Verwenden Sie nur das vom Hersteller bereitgestellte Ladeger t da sonst Ladeger t und Akku besch digt oder...

Страница 11: ...sonst zu einem Brandunfall kommen kann Laden Sie es nach dem Gebrauch auf und d rfen nur von Erwachsenen durchgef hrt werden Wenn Sie es l ngere Zeit nicht verwenden laden Sie es bitte einmal pro Mon...

Страница 12: ...tment Power display Forward and backward High and low speed WARNING The toy is to be assembled by an adult In unassembled state contain potentially hazardous sharp points sharp edges and small part so...

Страница 13: ...Contents PARTS LIST 14 PRODUCT SPECIFICATIONS 14 CONTROL SYSTEM 15 INSTALLATION ORDER DIAGRAM 16 PRECAUTIONS 20 CHARGING INSTRUCTION 21 MAINTENANCE AND SERVICE 22 13...

Страница 14: ...ctual product Product Speci cations Battery G W N W Suitable age Maximum load Charging time Charger Speed N O P Q Parts List Name and Quantity A B C D E F G H I J K L M Name Quantity A B C D E F G H I...

Страница 15: ...ttery assembled Remote control should be used under adults supervision Remote control is prior to manual control Remote control function and explaination Button function Power display Charging hole Po...

Страница 16: ...ction failed Replace the batteries and retry Take o the battery cover Put two AAA1 5V remote control battery in with right polarity New and used batteries can not be used mixed Do not insert batteries...

Страница 17: ...nally inserting wheel cover Assembling rear wheel washer step by step then using cotter pin to tighten nally inserting wheel cover Same way to the other side 3 Steering wheel assembly Connecting two l...

Страница 18: ...the windshield and under the hood inserting the windshield into the right place on the platform nally using screw to tighten it 5 Rear wing assembly Connecting the lines which are in the rear wing an...

Страница 19: ...8 6 Battery line connecting Connect the battery line correctly red to red black to black 7 Seat assembly Inserting the seat into the right place in the car then using screws to tighten 19...

Страница 20: ...e belt is a must when children playing Do not be close to re Adult must teach how to play it and never leave children alone for playing Do not stand up or play when children are stepping on foot pedal...

Страница 21: ...r 60 during charging Do not charge if plug is wet or will occur short circuited Only use charger provided by manufacturer or will damage charger and battery or occur short circuited If long time no us...

Страница 22: ...rom ammable things or may occur re accident Charge it after use and must be done by adults only If long time no use please charge it 1 time per month in order to maintain battery Clean the vehicle wit...

Страница 23: ...nce En avant et en arri re Haute vitesse et basse vitesse AVERTISSEMENT le jouet doit tre assembl par un adulte l tat non assembl il contient des points tranchants des bords tranchants et de petites p...

Страница 24: ...24 Sommaire LISTE DES PI CES 25 SP CIFICATIONS DU PRODUIT 25 SYST ME DE CONTR LE 26 SCH MA D ORDRE D INSTALLATION 27 PR CAUTIONS 31 INSTRUCTIONS DE CHARGE 32 ENTRETIEN ET SERVICE 33...

Страница 25: ...ci cations du produit Batterie Poids brut Poids net ge appropri Capacit de charge maximale Temps de charge Chargeur La vitesse N O P Q Liste des pi ces nom et quantit A B C D E F G H I J K L M Nom Qua...

Страница 26: ...lorsque la batterie est assembl e La t l commande doit tre utilis e sous la surveillance d adultes La t l commande est avant le contr le de l homme Fonction du bouton A chage de la puissance Trou de...

Страница 27: ...emplacez les piles et r essayez Retirez le couvercle de la batterie Mettez deux piles de t l commande AAA1 5V avec la bonne polarit Les piles neuves et usag es ne peuvent pas tre utilis es en m lange...

Страница 28: ...ins rant l enjoliveur Assemblage de la roue arri re rondelle tape par tape puis en utilisant la goupille fendue pour serrer en n en ins rant l enjoliveur De la m me mani re de l autre c t 3 Ensemble...

Страница 29: ...t sous le capot ins rez le pare brise au bon endroit sur la plate forme en n utilisez une vis pour le serrer 5 Ensemble d aile arri re Connectez les lignes qui se trouvent dans l aile arri re et la ca...

Страница 30: ...de la ligne de batterie Connectez correctement la ligne de la batterie du rouge au rouge du noir au noir 7 Assemblage du si ge Ins rez le si ge au bon endroit dans la voiture puis utilisez des vis po...

Страница 31: ...es enfants jouent Ne vous approchez pas du feu L adulte doit apprendre y jouer et ne jamais laisser les enfants seuls pour jouer Ne vous tenez pas debout ou ne vous battez pas lorsque l enfant appuie...

Страница 32: ...arge Ne chargez pas si la che est mouill e ou se produira en court circuit N utilisez que le chargeur fourni par le fabricant ou endommagera le chargeur et la batterie ou se produira en court circuit...

Страница 33: ...produire un incendie Chargez le apr s utilisation et ne doit tre e ectu que par des adultes En cas d inutilisation prolong e veuillez le charger 1 fois par mois a n d entretenir la batterie Nettoyez l...

Отзывы: