Memorex MX3905 Скачать руководство пользователя страница 10

9

OPERATING INSTRUCTIONS (CONTINUED)
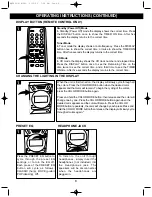
MUTE

To temporarily mute the sound, press the MUTE button on the
remote control; the Mute indicator will appear in the display and the
sound will be muted. Press the MUTE button again to restore the
sound and the Mute indicator will disappear from the display.

1

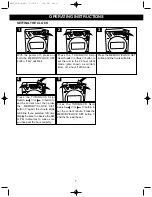
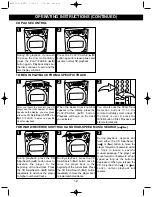
Press the POWER button to turn
the unit on.

1

Press the TUNING/CD Skip/Search

❶ 

or 

❷ 

button to select a

station (see Tuning note below).

NOTE:

If the FM band is selected

and you have tuned to an FM Stereo
station, the FM Stereo indicator will
light in the display.
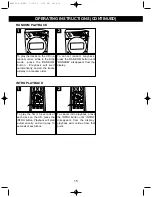
1

2

4

Press the STOP (

)/BAND

button to select AM or FM.

NOTE:

If you select the FM band,

be sure to extend the FM Wire
Antenna.

3

Press the TUNER  button;
“TUNER” will appear in the
display.

2

Adjust the PRESET EQ 

and

VOLUME  

❷ 

buttons as desired.

1

2

2

5

When you have finished listening,
press the POWER button to turn
the unit off.

6

Hints for Better Reception

FM - Make sure that the FM Wire Antenna is extended to its full length. You may have to vary the direction
of the antenna to find the strongest signal for each FM station.
AM - The AM ferrite bar antenna is located inside the unit. It may be necessary to turn the unit slightly so
that the internal antenna is pointing in the direction of the AM transmitter. You may have to experiment to
find the position that provides the strongest reception for each of your favorite AM stations. 

LISTENING TO THE RADIO
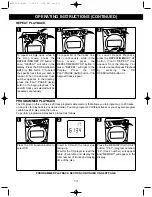
TUNING:
MANUAL TUNING: Repeatedly 

press the TUNING/CD Skip/Search 

or 

to manually advance the

frequency in the display up or down until the desired frequency appears.

AUTOMATIC TUNING: 

Press and hold the TUNING/CD Skip/Search 

or 

until the frequency in the

display starts to scan, and then release the button; the tuner will search and then stop on the next strong
station it finds. Repeat this procedure until the desired frequency appears in the display.

MX3905.O/M.QXD  2/20/03  7:06 AM  Page 9

Содержание MX3905

Страница 1: ...OME AUDIO SYSTEM WITH CD PLAYER AND AM FM STEREO RADIO MODEL MX3905 BEFORE OPERATING THIS PRODUCT PLEASE READ THESE INSTRUCTIONS COMPLETELY OPERATING INSTRUCTIONS MX3905 O M QXD 2 20 03 7 06 AM Page 2...

Страница 2: ...ection Lightning and power surges ARE NOT covered under warranty for this product LASER SAFETY This unit employs a laser Only qualified service personnel should attempt to service this device due to p...

Страница 3: ...antenna or cable system This will prevent damage to the product due to lightning and power line surges 14 POWER LINES An outside antenna system should not be located in the vicinity of overhead power...

Страница 4: ...outlet AC Plug AC Outlet SPEAKER CONNECTION 1 Place the speakers in convenient locations on either side of the unit Usually a distance of five to eight feet between speakers provides the best stereo e...

Страница 5: ...l has an effective operating range of approximately 15 feet and an angle of no more than 30 NOTE Bright sunlight may interfere with the operation of the remote control BATTERY PRECAUTIONS Follow these...

Страница 6: ...SET Button 6 STOP BAND Button 7 PLAY PAUSE Button 8 CD Function Button 9 TUNER Button 10 PRESET EQ Button 11 Speaker Speaker Light Terminals Rear of Unit 12 AC Cord Rear of Unit 13 FM Wire Antenna Rea...

Страница 7: ...Button 4 PLAY PAUSE Button 5 STOP BAND Button 6 TUNING DN UP Buttons 7 RANDOM Button 8 DISPLAY Button 9 INTRO Button 10 REP Repeat MEM Memory Up Button 11 SNOOZE Button 12 TIMER Button 13 POWER Button...

Страница 8: ...TTING THE CLOCK Press the TUNING CD Skip Search or button to set the current hour then press the MEMORY CLOCK SET button again the minute digits will blink If you selected 12H time display be sure to...

Страница 9: ...cycle through all the colors Press the COLOR MODE button when the desired color appears and that color will remain To begin the cycling of the colors press the COLOR MODE button again Press and hold t...

Страница 10: ...utton to turn the unit off 6 Hints for Better Reception FM Make sure that the FM Wire Antenna is extended to its full length You may have to vary the direction of the antenna to find the strongest sig...

Страница 11: ...or AM 1 2 2 Press the MEMORY CLOCK SET button again to set the station in the selected memory 5 Repeat steps 3 through 5 to program up to 10 stations in each band if desired In case the main power su...

Страница 12: ...ontinue until all the tracks on the disc have been played 1 2 2 6 To stop playback before the disc ends press the STOP BAND button The disc will stop and the display will show the total number of trac...

Страница 13: ...e normal CD playback 2 CD PAUSE CONTROL TO BEGIN PLAYBACK FROM A SPECIFIC TRACK During playback depress and hold either the CD Skip Search or button to move the player forward or backward within a tra...

Страница 14: ...AT will light in the display Press the CD PLAY PAUSE button to begin all tracks repeat 2 1 2 REPEAT PLAYBACK Press the CD Function button to select CD 1 Press the MEMORY CLOCK SET button P 01 program...

Страница 15: ...s and playing time on the disc If you press the MEMORY CLOCK SET button and then press the PLAY PAUSE button again playback will start on the first track you programmed and will continue until all the...

Страница 16: ...n until RANDOM disappears from the display 2 RANDOM PLAYBACK To play the first 10 seconds of each track on the CD press the INTRO button Playback will start automatically and will play 10 seconds of e...

Страница 17: ...CLOCK button again 1 3 2 2 SETTING THE TIMER Set the timer to turn the unit on to the Tuner or CD mode at a preset time as follows NOTE Please make sure the volume is set to the desired level to wake...

Страница 18: ...e compact disc wipe in straight lines from the center of the compact disc to the outer edge of the compact disc Never wipe in circular motions This unit is designed to play only compact discs bearing...

Страница 19: ...no sound TUNER button Press the TUNER button is not pressed to select Tuner Volume at minimum Increase volume Compact Disc Player CD Player will not play CD function is not selected Press the CD Funct...

Страница 20: ...ICS COM OR CONTACT CUSTOMER SERVICE AT 1 800 919 3647 PLEASE KEEP ALL PACKAGING MATERIAL FOR AT LEAST 90 DAYS IN CASE YOU NEED TO RETURN THIS PRODUCT TO YOUR PLACE OF PURCHASE OR MEMOREX FOR PARTS AND...

Страница 21: ...Memcorp Inc Weston FL Printed in Hong Kong Visit our website at www memorexelectronics com MX3905 O M QXD 2 20 03 7 06 AM Page 20...

Отзывы: