Memorex MVDR2100 Скачать руководство пользователя страница 7

6

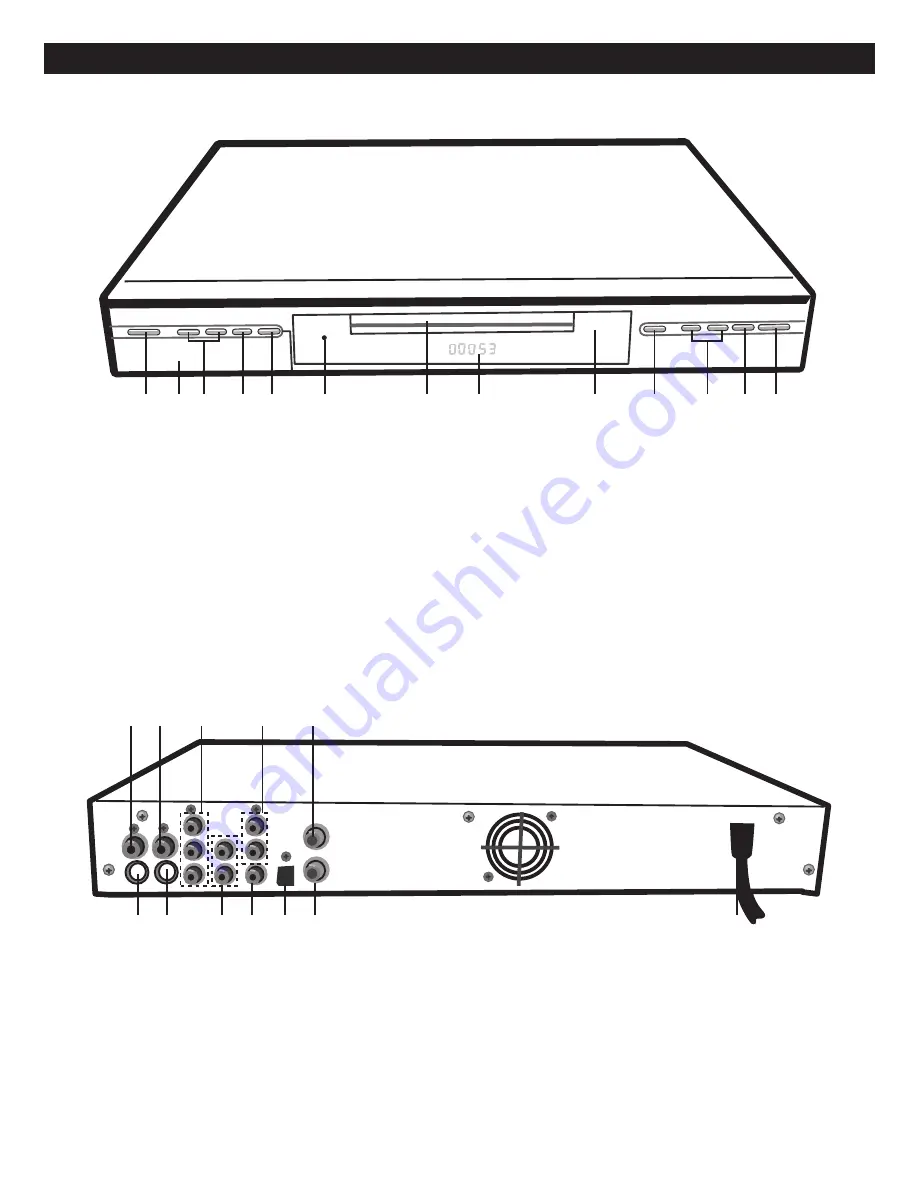
LOCATION OF CONTROLS

1.

ON/STANDBY Button

2.

DV IN Jack, S-Video IN Jack and A/V IN
Jacks (under door)

3.

CHANNEL Up/Down Buttons

4.

SOURCE Button

5.

RECORD Button

6.

STANDBY Indicator

7.

Disc Tray

8.

Display

9.

Remote Sensor

10. OPEN/CLOSE Button

11. SKIP

o

/

n

Button

12. STOP (

) Button

13. PLAY/PAUSE (

®p

) Button

FRONT

1

3

2

4 5

6

8

7

10

9

13

12

11

1.

Video IN Jack

2.

Video OUT Jack

3.

Component Video (Y, U, V) Output Jacks

4.

Stereo Audio Left/Right Input Jacks

5.

RF IN Jack

6.

S-Video IN Jack

7.

S-Video OUT Jack

8.

Stereo Audio Left/Right Output Jacks

9.

Coaxial Digital Audio Output Jack

10. Optical Digital Audio Output Jack

11. RF OUT Jack

12. AC Power Cord

REAR

12

6 7

8

10 11

9

2

3

4

5

1

Содержание MVDR2100

Страница 1: ...Before operating this product please read these instructions completely User s Guide DVD VIDEO RECORDER MVDR2100...

Страница 2: ...nu 22 Tuner Setup Menu 23 Clock Setup Menu 24 Setting the Rating Level 25 Changing the Password 25 TV Operation 26 DVD Basic Operation 27 Display Button DVD Mode 27 Playback of a DVD 28 Playback of a...

Страница 3: ...able protection against harmful interference in a residential installation This equipment generates uses and can radiate radio frequency energy and if not installed and used in accordance with the ins...

Страница 4: ...sofa rug or other similar surface This product should never be placed near or over a radiator or heat source This product should not be placed in a built in installation such as a bookcase or rack unl...

Страница 5: ...determine that the product is in proper operating condition 21 WALL OR CEILING MOUNTING The product should be mounted to a wall or ceiling only as recommended by the manufacturer 22 DAMAGE REQUIRING...

Страница 6: ...oth to clean the unit follow that product s instructions Warning Cleaning and adjustment of lenses and or other components of playback mechanism should be performed by a qualified service technician N...

Страница 7: ...tton 11 SKIP o n Button 12 STOP Button 13 PLAY PAUSE p Button FRONT 1 3 2 4 5 6 8 7 10 9 13 12 11 1 Video IN Jack 2 Video OUT Jack 3 Component Video Y U V Output Jacks 4 Stereo Audio Left Right Input...

Страница 8: ...Progressive Button 19 ANGLE Button 20 AUDIO Button 21 Number 0 9 Buttons 22 OPEN CLOSE Button 23 STANDBY ON OFF Button 24 REPEAT Button 25 TIMER Button 26 SKIP o Button 27 SKIP n Button 28 STOP Button...

Страница 9: ...alling the batteries as indicated next to the battery compartment Reversed batteries may cause damage to the device 3 Do not mix different types of batteries together e g Alkaline Rechargeable and Car...

Страница 10: ...is manual When connecting the DVD to the TV make sure the power is off and both units are unplugged before making any connections Connect the DVD recorder to your TV directly If you connect the DVD re...

Страница 11: ...refer to the owner s manual of the TV as well as this manual When connecting the DVD to the TV make sure the power is off and both units are unplugged before making any connections If your TV only ha...

Страница 12: ...e TV as well as this manual When connecting the DVD to the TV make sure the power is off and both units are unplugged before making any connections If your TV only has one audio input the use of a Y c...

Страница 13: ...e I P button on the remote control to switch between Progressive Scan and Interlace Scan or change the settings in the GENERAL setup menu NOTE CONSUMERS SHOULD NOTE THAT NOT ALL HIGH DEFINITION TELEVI...

Страница 14: ...blue screen option turn the option off on the TV for best results If you place the DVD recorder near a tuner the radio broadcast sound might be distorted In this case move the DVD recorder away from t...

Страница 15: ...nal unit only has one audio output the use of a Y connector may be necessary Visit your local electronics supply store You can also connect the unit to the front jacks for both of the above scenarios...

Страница 16: ...external unit as well as this manual When connecting the DVD make sure the power is off and both units are unplugged before making any connections After connecting plug the AC cord into an AC outlet t...

Страница 17: ...k 1 Track 2 Track 5 Track 6 Track 3 Track 4 IMPORTANT It is important that you read the manual that accompanies the DVD disc as there are features that are on the DVD recorder that cannot be used with...

Страница 18: ...gement Information This DVD recorder is designed and manufactured to respond to the Region Management Information that is recorded on a DVD disc If the Region number described on the DVD disc does not...

Страница 19: ...e Press the Navigation button repeatedly to return to the Setup icons and press the SETUP button to exit setup NOTE Access the Setup menu while in the stop mode otherwise you may not be able to adjust...

Страница 20: ...source SEP Default quality Record setup Language setup Language setup English OSD Language English Menu Language OFF Subtitle Language English Audio Language Start auto scan channel TUNER Air CH Skip...

Страница 21: ...e mm dd yy 12 15 25 Time hh mm ss PM AM PM Date and time setup 1 PLAY SETUP MENU Select PLAY SETUP using the Navigation buttons then select change the setup option as described on page 18 TV ASPECT RA...

Страница 22: ...essive Interlace OK Restore factroy settings General system setup Record setup ON Auto chapter marker R SV Default source SEP Default quality Record setup Start auto scan channel TUNER Air CH Skip 002...

Страница 23: ...18 OSD LANGUAGE MENU LANGUAGE Select the language the DVD will be played back in ORIGINAL original recorded language ENGLISH CHINESE DANISH GERMAN SPANISH FRENCH HINDI HUNGARIAN INDONESIA ITALIAN JAPA...

Страница 24: ...on buttons then select change the setup option as described on page 18 This unit is equipped with a channel memory feature which allows channels to skip up or down to the next channels set into memory...

Страница 25: ...buttons 1 then press the ENTER button 2 to select it Select AM or PM using the Navigation buttons 1 then press the ENTER button 2 to confirm TIME INPUT SUCCESS will appear at the top of the screen Gen...

Страница 26: ...aterial on a DVD It reads the ratings for programming then denies access to programming if the program s rating meets the limitations you select In this case the user will have to enter a password 1 K...

Страница 27: ...top left corner of the screen Select a channel using the Number buttons 3 followed by the ENTER button 4 1 4 2 3 4 Press the SOURCE button to select TV CH and a channel number will appear on the TV 2...

Страница 28: ...ct this option and enter the desired angle using the Number buttons You can also change the setting using the ANGLE button The first number is the current angle and the second number is the total angl...

Страница 29: ...sed twice the TV screen shows STOP and the unit will stop completely 1 2 4 PLAYBACK OF A DVD IMPORTANT NOTES INVALID will appear on the TV screen during operation if you try to access a function that...

Страница 30: ...NEXT or PREV then press the ENTER button 3 to turn the index screen to the Previous Next page of the index 3 1 2 2 2 2 3 Press the ON STANDBY button to turn on the unit the STANDBY indicator will go o...

Страница 31: ...n 3 is pressed again normal playback will resume at that point 1 2 3 1 SKIP SEARCH During playback press either the SLOW button 1 repeatedly to move the DVD forward in slow motion speeds of 1 2 1 4 or...

Страница 32: ...e DISPLAY button 4 to remove the control options from the screen 3 1 2 4 1 TITLE SEARCH Use this feature to directly go to a specific title CHAPTER SEARCH Use this feature to directly go to a specific...

Страница 33: ...atedly To cancel press the ENTER button 3 to highlight Playback mode select NORMAL using the Navigation buttons 2 then press the ENTER button 3 1 2 2 2 2 3 1 REPEAT PLAYBACK While playing back a DVD t...

Страница 34: ...tton This is not available on all discs 2 2 1 2 3 2 1 Press the TITLE button and the Title Menu of the disc will appear Use the Navigation buttons to select the desired option and then press the ENTER...

Страница 35: ...am box 1 2 1 2 To select a chapter select a title using the Navigation buttons 1 then press the ENTER button 2 the available chapters will then appear in the left box Select the desired chapter to rep...

Страница 36: ...display After loading two boxes will appear on the screen the left box will show all available folders on the MP3 CD 3 Select the desired folder using the Navigation buttons 1 then press the ENTER bu...

Страница 37: ...Frequently Asked Questions Please read before playing an MP3 CD What is an MP3 file An MP3 file is a computer format that makes a large music file into a smaller one which is more convenient to downlo...

Страница 38: ...e program box all tracks in the folder will be added to the right program box 1 1 2 2 To select a track inside the folder use Navigation buttons 1 to select the desired folder press the ENTER button 2...

Страница 39: ...button to close the disc tray LOAD will appear on the screen and the display After loading playback will start immediately For CD two boxes will appear on the screen the left box will show all availa...

Страница 40: ...NTER button 4 to playback the selected track If you cannot select the track of a VCD with the Number buttons 3 press the MENU button 5 to turn ON OFF the PBC then try again 4 1 3 5 2 1 SELECTING TRACK...

Страница 41: ...he program To select a track to program select a title using the Navigation buttons 1 then press the ADD CLEAR button 2 it will then be added to the right program box 1 1 2 2 To delete a track select...

Страница 42: ...track to program select a track using the Navigation buttons 1 then press the ADD CLEAR button 2 it will then be added to the right program box 1 1 2 2 To delete a single track select the right progr...

Страница 43: ...ow 2 2 2 2 1 3 3 To skip to the next previous page of the picture show press the SKIP n 1 or o 2 button 1 2 4 During playback press Navigation buttons 1 to rotate the picture The picture will rotate 9...

Страница 44: ...onfirm the change When finished press the DISPLAY button to remove the control options from the TV screen Append Mode Record as a new title Source Select the desired source F A V jacks R A V jacks etc...

Страница 45: ...ress the OPEN CLOSE button 1 to close the disc tray LOAD will appear on the screen and in the display Press the SOURCE button 2 repeatedly to select the desired recording source 3 1 2 Press the ON STA...

Страница 46: ...ll go out 1 Press the OPEN CLOSE button to open the disc tray OPEN will appear on the screen and in the display Insert a DVD R or DVD RW with the label side facing up on the disc tray To start recordi...

Страница 47: ...3 AM PM Select AM or PM for the desired start time END TIME Set the desired end time using the Number buttons 3 During input of the settings if the entry is incorrect the TV screen will show an ERROR...

Страница 48: ...r and the second number is the total chapters in the Playback title Press ENTER button to select this option and enter the desired chapter using the number buttons then press the ENTER button again Pl...

Страница 49: ...e Title option as shown on the previous page then select the T ICON using the Navigation buttons 1 Press the ENTER button 2 to select the current screen shot to be the index picture for using at the I...

Страница 50: ...to finalize a DVD Once finalized you cannot record or edit anymore but the DVD will be able to play on other DVD recorders Title Delete DVD RW ONLY Select this option then press the ENTER button to de...

Страница 51: ...lean the disc This is normal on some discs Select the correct TV type 16 9 Panscan or Letterbox which matches the TV Install fresh batteries Install batteries according to the diagram Aim the remote a...

Страница 52: ...the CD see page 49 Make compatible see page 49 POSSIBLE CAUSE Rating level set to block the DVD DVD not inserted or inserted upside down A non playback disc is inserted The disc is not placed in the g...

Страница 53: ...to the outer edge of the disc Never wipe in circular motions Discs should be stored in their cases after each use to avoid damage Do not expose discs to direct sunlight high humidity high temperature...

Страница 54: ...e sided single layer 8cm single sided single layer 8cm single sided dual layer 8cm double sided single layer COMPACT DISC VIDEO CD 12cm disc 8cm disc Video Output Level 1Vp p Audio Output Level 1Vrms...

Страница 55: ...Memcorp Inc Weston FL Printed in Hong Kong Visit our website at www memorexelectronics com...

Отзывы: