Memorex MVD-2037 O/M.QXD Скачать руководство пользователя страница 25

24

DVD BASIC OPERATION (CONTINUED)

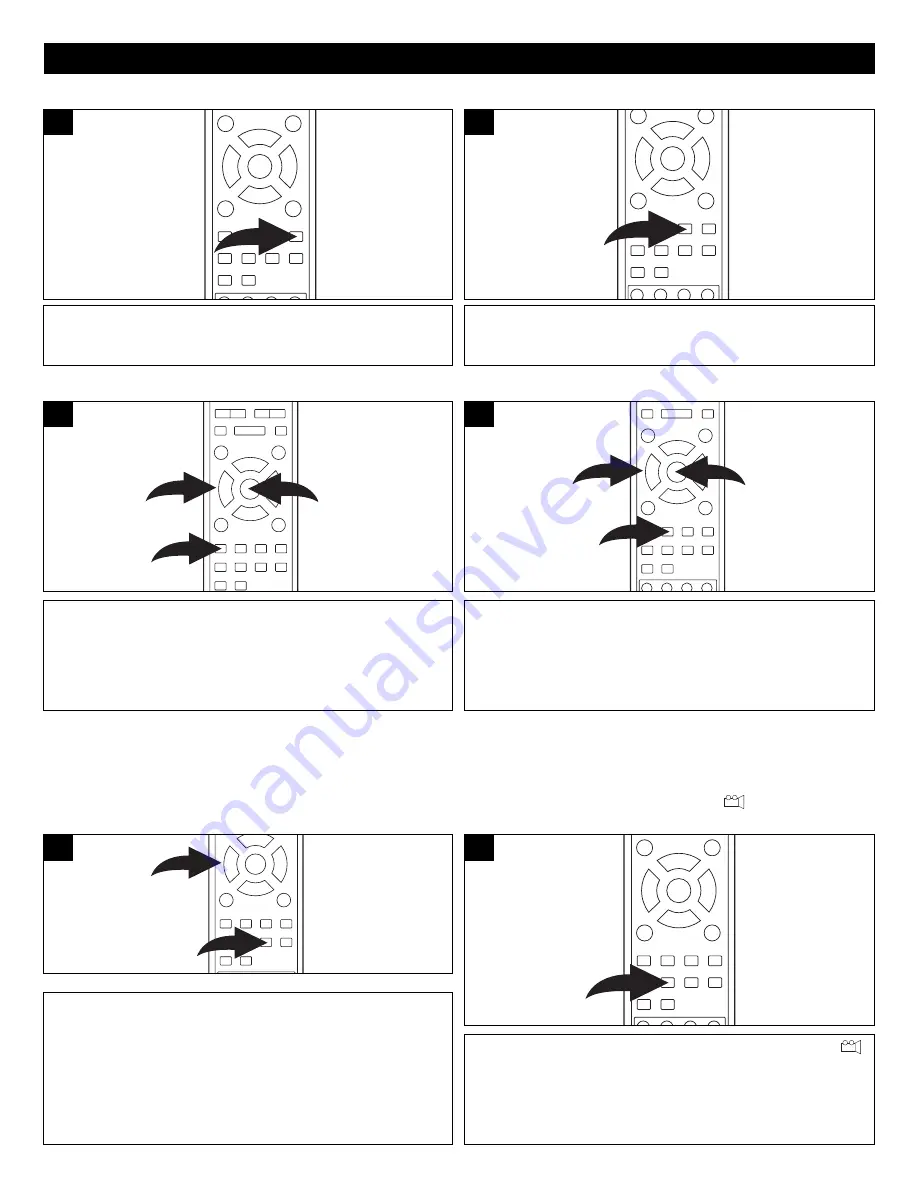
Press the AUDIO MENU button repeatedly to change the
audio language. This feature is not available on all discs.

1

Press the SUBTITLE MENU button repeatedly to select a
subtitle language, and to turn the subtitle menu on/off. This
feature is not available on all discs.

1

AUDIO MENU

SUBTITLE MENU

Press the DVD MENU button 

, and the Main Menu of the

disc will appear. Use the Navigation (

¥

,

Š

,

›

,

‚

) buttons 

to select the desired option, and then press the ENTER
button 

.

This is not available on all discs.

3

1

2

1

Press the TITLE MENU button 

, and the Title Menu of the

disc will appear. Use the Navigation (

¥

,

Š

,

›

,

‚

) buttons 

to select the desired option, and then press the ENTER
button 

.

This is not available on all discs.

3

1

2

1

DVD MENU

TITLE MENU

Press the ZOOM button 

❶ 

once during Normal, Slow or Still

playback modes, and the unit will zoom x2. Press once or
twice more and the unit will zoom x3/x4. Use the Navigation
(

¥

,

Š

,

›

,

‚

) buttons 

❷ 

to move the image on the TV screen.

This is not available on all discs. Press the ZOOM button 

once more to cancel the zoom function.

1

2

1

While in the Playback mode, press the ANGLE button; “

and the total number of angles will appear on the screen.
Repeatedly press the ANGLE button to select the desired
angle; the angle will change in one to two seconds.
This is not available on all discs.

1

ZOOM

The image on the screen can be magnified as follows:

ANGLE

Some discs may contain scenes which have been shot
simultaneously from a number of different camera angles.
This feature only works on discs with more than one camera
angle. The jacket will be marked with “

”.

Содержание MVD-2037 O/M.QXD

Страница 1: ...Before operating this product please read these instructions completely User s Guide DVD VCD MP3 PHOTO CD Player MVD2037...

Страница 2: ...tion 20 3D Sound 20 Audio Mode 20 Mute 20 Display 20 DVD Basic Operation 21 Playback of a DVD 21 Skip 22 Search 22 Slow R and Slow F 22 Pause Step 22 Title Chapter Search 23 Title Time Search 23 Repea...

Страница 3: ...able protection against harmful interference in a residential installation This equipment generates uses and can radiate radio frequency energy and if not installed and used in accordance with the ins...

Страница 4: ...placing the product on a bed sofa rug or other similar surface This product should never be placed near or over a radiator or heat source This product should not be placed in a built in installation s...

Страница 5: ...SAFETY CHECK Upon completion of any service or repairs to this product ask the service technician to perform safety checks to determine that the product is in proper operating condition 21 WALL OR CE...

Страница 6: ...he unit follow that product s instructions Warning Cleaning and adjustment of lenses and or other components of playback mechanism should be performed by a qualified service technician NOTES ON MOISTU...

Страница 7: ...USE Button 9 Display 10 STOP Button 11 PLAY Button 6 LOCATION OF CONTROLS FRONT 3 2 4 1 1 7 8 9 10 11 5 6 1 Stereo Audio Left Right Output Jacks 2 Video Output Jack 3 S Video Output Jack 4 Coaxial Dig...

Страница 8: ...n 16 DVD MENU Button 17 ANGLE Button 18 3D Button 19 PBC Button 20 SEARCH Button 21 Number 0 9 Buttons 22 OPEN CLOSE Button 23 STANDBY ON OFF Button 24 Repeat A B Button 25 PROGRAM Button 26 SEARCH Bu...

Страница 9: ...alling the batteries as indicated next to the battery compartment Reversed batteries may cause damage to the device 3 Do not mix different types of batteries together e g Alkaline Rechargeable and Car...

Страница 10: ...he VIDEO setting When connecting the DVD refer to the owner s manual of the TV as well as this manual When connecting the DVD to the TV make sure the power is off and both units are unplugged before m...

Страница 11: ...ou will not be able to see any picture at all To regain the picture you must shut the unit off and set the PROGRESSIVE SCAN switch to the OFF position Then turn the unit on and the picture will appear...

Страница 12: ...D player away from the tuner After connecting press the AUDIO MODE button to the desired audio setting Please refer to AUDIO MODE on page 20 Place the subwoofer front rear and center speakers in locat...

Страница 13: ...hat you read the manual that accompanies the DVD disc as there are features that are on the DVD player that cannot be used with certain DVDs There are also extra features on the DVD disc that are diff...

Страница 14: ...ration and is intended for home and other limited viewing uses only unless otherwise authorized by Macrovision Corporation Reverse engineering or disassembly is prohibited Region Management Informatio...

Страница 15: ...button to select it 4 Use the Navigation buttons to select the desired setting then press the ENTER button to make the change Press the Navigation button repeatedly to return to the Setup icons or pre...

Страница 16: ...g the Navigation buttons then select change the setup option as described on page 14 TV DISPLAY TV TYPE Select the color video type to fit your connector type S VIDEO Select when using S Video and Vid...

Страница 17: ...he image is paused for approximately one minute When this option is OFF the screen saver will not come on On Off Screen Saver General Setup Page Dolby TV Display PS TV Type NTSC Video Out Angle Mark O...

Страница 18: ...ill be played Preferred Audio Language Preference Page Dolby English French Spanish German Japanese Audio ENG Subtitle ENG Disc Menu ENG Parental Password Default 1 Select the language the Subtitle OS...

Страница 19: ...ENTER button again The desired rating will then be set and if DVDs with this new rating or above are played the user will require a password If an incorrect password is entered Old password error will...

Страница 20: ...gain If you input a wrong confirm password Confirm Password Error will show on the TV screen In this case you need to input the confirm password again Dolby Old Password New Password Confirm PWD OK Pl...

Страница 21: ...audio CD not DVD you can cycle between the audio modes as follows DISPLAY Each press of the DISPLAY button will display the elapsed time and remaining time of a playing disc Each press of the DISPLAY...

Страница 22: ...ears on the TV screen press the Navigation buttons to select the desired option item then press the ENTER button Please make sure to refer to the disc s jacket or case for additional information Resum...

Страница 23: ...back will resume at that point 1 3 2 1 SKIP Press the PAUSE STEP button once to pause the picture Repeatedly press the PAUSE STEP button to play the DVD one frame at a time Press the PLAY button to re...

Страница 24: ...itle and or time While in the Playback mode press the REPEAT button once CHAPTER will appear briefly on the TV screen and the currently playing Chapter will repeat continuously While in the Playback m...

Страница 25: ...is not available on all discs 3 1 2 1 DVD MENU TITLE MENU Press the ZOOM button once during Normal Slow or Still playback modes and the unit will zoom x2 Press once or twice more and the unit will zo...

Страница 26: ...th the label side facing up on the disc tray 2 Press the OPEN CLOSE button to close the disc tray CLOSE will appear on the screen and the display After loading the FOLDER TRACK menu will appear on the...

Страница 27: ...mat that makes a usually large music file into a smaller one which is more convenient to download and share Can I record my own MP3 CDs Yes but you need a CD recorder which is available from you local...

Страница 28: ...will start automatically 3 To stop playback press the Stop button PRESS PLAY TO CONTINUE will appear on the TV screen Because the unit will remember where you stopped simply press the Play button to r...

Страница 29: ...the REPEAT button until Off appears on the TV screen 2 1 1 FORWARD REVERSE REPEAT ONE ALL PLAY While playing back a CD this unit can repeatedly play back a specific section While in the Playback mode...

Страница 30: ...is unit has a 20 track programmable memory that allows you to program up to 20 tracks on any disc for playback in any desired order You may program 20 different tracks or you may also program certain...

Страница 31: ...se the disc tray CLOSE will appear on the TV screen After loading the picture will automatically show on the TV screen Press the Skip or button to select a picture 2 2 1 3 After 12 pictures press the...

Страница 32: ...c This is normal on some discs Select the correct TV type PS LB WIDE which matches the TV you are using Install fresh batteries Install batteries according to the diagram Aim the remote at the sensor...

Страница 33: ...ure should reappear POSSIBLE CAUSE Rating level set to block the DVD DVD not inserted or inserted upside down A non playback disc is inserted The disc is not placed in the guide The disc is dirty Some...

Страница 34: ...to the outer edge of the disc Never wipe in circular motions Discs should be stored in their cases after each use to avoid damage Do not expose discs to direct sunlight high humidity high temperature...

Страница 35: ...layer 12cm single sided dual layer 12cm double sided single layer 8cm single sided single layer 8cm single sided dual layer 8cm double sided single layer COMPACT DISC VIDEO CD 12cm disc 8cm disc Video...

Страница 36: ...Memcorp Inc Weston FL Printed in Hong Kong Visit our website at www memorexelectronics com...

Отзывы: