background image

12

CONNECTION (CONTINUED)

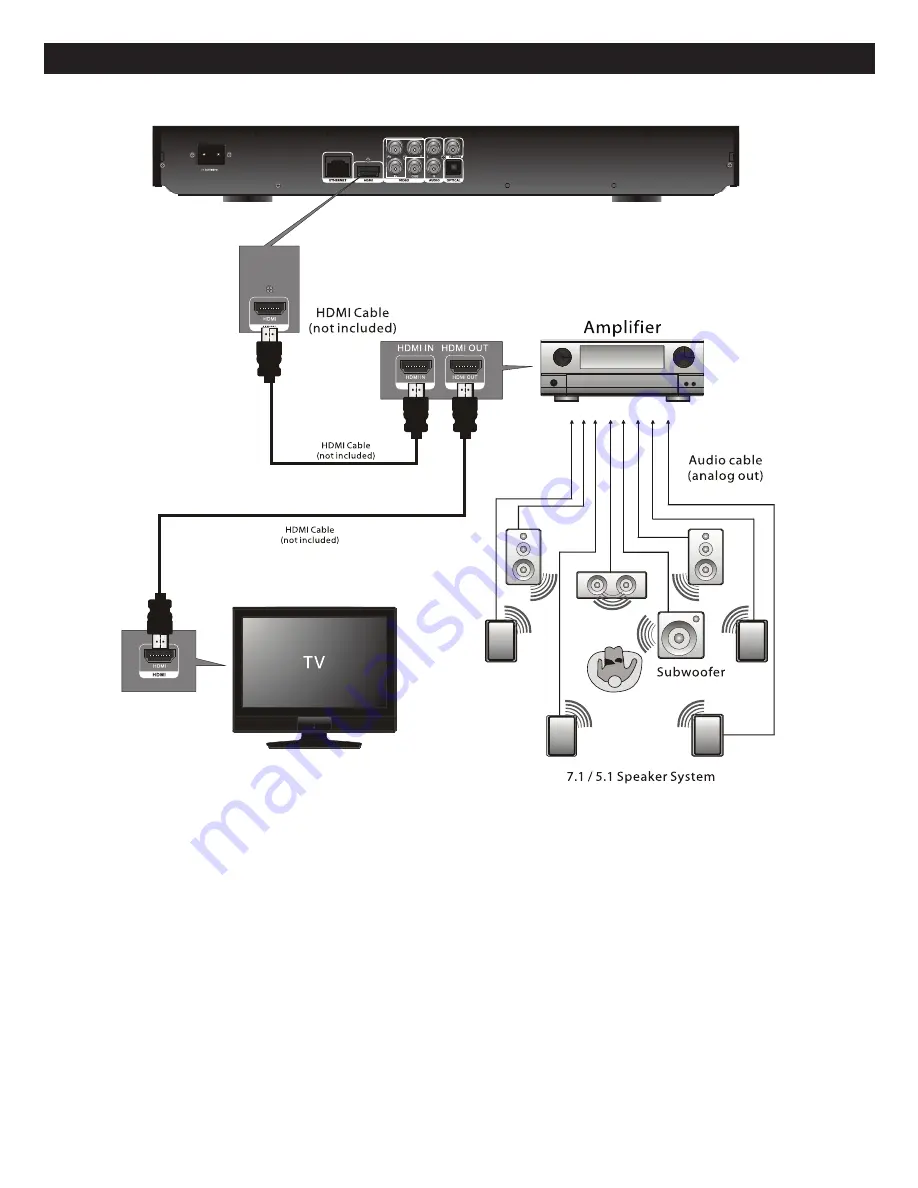
CONNECTING THE PLAYER TO A TV AND RECEIVER USING THE HDMI OUTPUT JACKS

NOTES:

• If your TV has an HDMI input, connect the player with the HDMI cable for best results, otherwise use the Component or

Video OUT jack on the player. 

• Set the TV’s TV/VIDEO button or switch to the VIDEO setting.
• When connecting the Player, refer to the owner’s manual of the TV and receiver, as well as this manual.
• When connecting the Player to the TV and receiver, make sure the power is off and both units are unplugged before making

any connections.

When using HDMI as your source, setup the HD resolution in the Video menu as described on page 21 and the Digital Output in
the Audio menu as described on page 22.

Depending on your TV, some HDMI resolutions may not work.

Содержание MVBD2520

Страница 1: ...MVBD2520 Blu Ray Player User Manual ...

Страница 2: ...scs 17 Setup Menu 19 General Setup Menu 19 Video Setup Menu 20 Audio Setup Menu 22 Language Setup Menu 23 Parental Control Options 24 Network Setup Menu 27 Basic Operation General 29 HDMI Reset 29 Color Buttons 29 Dimmer 29 BD DVD Operation 30 Playback of a Blu ray Disc or DVD 30 Skip 31 Search 31 Pause Step 31 Slow Motion 31 Disc Menu Button 32 Audio 32 Time Search 32 SKIP Button 33 Display Info ...

Страница 3: ...e interference by one or more of the following measures Reorient or relocate the receiving antenna Increase the separation between the equipment and receiver Connect the equipment into an outlet on a circuit different from that to which the receiver is connected Consult the dealer or an experienced radio TV technician for help FCC CAUTION To assure continued compliance follow the attached installa...

Страница 4: ...particularly at plugs convenience receptacles and the point where they exit from the apparatus 11 Only use attachments accessories specified by the manufacturer 12 Use only with the cart stand tripod bracket or table specified by the manufacturer or sold with the apparatus When a cart is used use caution when moving the cart apparatus combination to avoid injury from tip over 13 Unplug this appara...

Страница 5: ... original cinema image BD J application The BD ROM format supports Java for interactive functions BD J offers content providers almost unlimited functionality when creating interactive BD ROM titles Java and all Java based trademarks and logos are trademarks or registered trademarks of Sun Microsystems Inc in the U S and other countries BD Live Some BD ROM discs labelled BD Live contain interactiv...

Страница 6: ... unit follow that product s instructions Warning Cleaning and adjustment of lenses and or other components of playback mechanism should be performed by a qualified service technician NOTES ON MOISTURE CONDENSATION Moisture condensation damages the player Please read the following carefully Moisture condensation occurs for example when you pour a cold drink into a glass on a warm day Drops of water...

Страница 7: ...7 Stop X Button 8 Skip n Button 9 Play Button 10 USB Card Jack Inside Compartment 6 LOCATION OF CONTROLS FRONT 2 1 3 4 7 6 9 8 5 10 1 AC Power Jack 2 Ethernet Jack 3 HDMI Jack 4 Component Video Y Pb Pr Output Jacks 5 CVBS Composite Video Output Jack 6 Stereo Audio Left Right Output Jacks 7 OPTICAL Output Jack 8 COAXIAL Output Jack REAR ...

Страница 8: ...ISPLAY INFO Button 19 SEARCH Button 20 CANCEL Button 21 Blue Button 22 Yellow Button 23 DISC MENU Button 24 ENTER Button 25 POPUP MENU Button 26 PAUSE p Button 27 Skip n Button 28 SEARCH FORWARD Button 29 PIP Picture In Picture Button 30 USB SD Button 31 ZOOM Button 32 Repeat A B Button REMOTE CONTROL PART NO 52RE1 211001 00R BATTERY COVER PART NO 12CA7 217A03 00R A V RCA CABLE PART NO 13WE1 31120...

Страница 9: ...alling the batteries as indicated in the Battery Compartment A reversed battery may cause damage to the device 3 Do not mix different types of batteries together e g Alkaline Rechargeable and Carbon zinc or old batteries with fresh ones 4 If the device is not to be used for a long period of time remove the batteries to prevent damage or injury from possible battery leakage 5 Do not try to recharge...

Страница 10: ...V as well as this manual When connecting the Player to the TV make sure the power is off and both units are unplugged before making any connections If your TV only has one audio input the use of a Y connector may be necessary Visit your local electronics supply store Connect the player to your TV directly If you connect the player through a VCR the playback picture will be distorted because video ...

Страница 11: ...tly If you connect the player through a VCR the playback picture will be distorted because video discs are copy protected If using a TV with a blue screen option turn the option off on the TV for best results If the TV display shows No Signal or is blank after connecting the Y Pb and Pr use the Video Out connection as shown on the previous page PROGRESSIVE Y Pb Pr VIDEO OUTPUT Use these jacks to c...

Страница 12: ... units are unplugged before making any connections Connect the player to your TV directly If you connect the player through a VCR the playback picture will be distorted because video discs are copy protected When using HDMI as your source setup the HD resolution in the Video menu as described on page 21 and the Digital Output in the Audio menu as described on page 22 When you connect the HDMI cabl...

Страница 13: ...witch to the VIDEO setting When connecting the Player refer to the owner s manual of the TV and receiver as well as this manual When connecting the Player to the TV and receiver make sure the power is off and both units are unplugged before making any connections When using HDMI as your source setup the HD resolution in the Video menu as described on page 21 and the Digital Output in the Audio men...

Страница 14: ...its are unplugged before making any connections Connect the player to your TV directly If you connect the player through a VCR the playback picture will be distorted because video discs are copy protected When using HDMI as your source setup the HD resolution in the Video menu as described on page 21 When you connect the HDMI cable to a TV for the first time the HDMI output resolution will be auto...

Страница 15: ...nd all units are unplugged before making any connections Connect the player to your TV directly If you connect the player through a VCR the playback picture will be distorted because video discs are copy protected If you place the player near a tuner the radio broadcast sound might be distorted In this case move the player away from the tuner When using this connection Blu ray Discs with an LPCM a...

Страница 16: ...ctive media and games that are associated with the movie title 1 Connect the LAN 100 terminal of the player to your internet source from the broadband router directly Refer to the instructions that came with the router 2 Make the appropriate setting see Network Setting section on page 27 NOTES For details on the network LAN refer to the operating instructions supplied with the modem or router See ...

Страница 17: ...ry from disc to disc Q2 Do all Blu ray Discs have this feature A2 BD Live is still relatively new so make sure that the disc has the BD Live marking on the disc packaging Q3 How do I access BD Live A3 With a BD Live enabled disc inserted and this unit connected to the internet simply select the BD Live option at the Main Title screen of the disc Q4 Will all discs have the same BD Live contents A4 ...

Страница 18: ...t every disc will playback AUDIO CD Data on an audio CD is divided into sections called tracks each of which is given a track number KODAK PICTURE CD Data on a Kodak picture CD is usually not divided into separate folders and should appear in the root directory The region BD ROM codes for this player are listed on the back of the player See the following page for information regarding region BD RO...

Страница 19: ...ected and any recordings made from these discs will be distorted This product incorporates copyright protection technology that is protected by method claims of certain U S patents and other intellectual property rights owned by Macrovision Corporation and other rights owners Use of this copyright protection technology must be authorized by Macrovision Corporation and is intended for home and othe...

Страница 20: ...he Navigation π buttons 1 then press the ENTER button 2 Select AUTO and the Status icons will appear when used or select OFF to deactivate OSD Status messages using the Navigation π buttons 1 and press the ENTER button 2 again 2 1 1 BD CLICK SOUND STATUS MESSAGES GENERAL VIDEO AUDIO LANGUAGE PARENTAL NETWORK YES NO RESTORE SETTINGS BD CLICK SOUND STATUS MESSAGES SIDE PANEL BRIGHTNESS GENERAL VIDEO...

Страница 21: ...ght edges are cut off 4 3 LETTERBOX Select when the unit is connected to a conventional TV Wide screen images are shown on the screen with a black band at the top and or bottom 16 9 Select when a 16 9 wide TV is connected The 4 3 picture is displayed with an original 4 3 aspect ratio with black bars appearing at the left and right sides 16 9 FULL Select when a 16 9 wide TV is connected The 4 3 pic...

Страница 22: ...avigation π buttons 1 then press the ENTER button 2 the TV SYSTEM options will appear Select one of the options described below using the Navigation π buttons 1 then press the ENTER button 2 NTSC Select when using a NTSC TV PAL Select when using a PAL TV IMPORTANT In the USA the standard is NTSC 2 1 1 TV SYSTEM GENERAL VIDEO AUDIO LANGUAGE PARENTAL NETWORK AUTO FIELD FRAME STILL MODE SEAMLESS PLAY...

Страница 23: ...udio source using the Navigation π buttons 1 and press the ENTER button 2 again 2 1 1 PCM DOWN CONVERSION DIGITAL AUDIO OUTPUT GENERAL VIDEO AUDIO LANGUAGE PARENTAL NETWORK ON OFF DYNAMIC RANGE PCM DOWN CONVERSION DIGITAL AUDIO OUTPUT SPEAKER SETTING GENERAL VIDEO AUDIO LANGUAGE PARENTAL NETWORK ON OFF DYNAMIC RANGE PCM DOWN CONVERSION DIGITAL AUDIO OUTPUT SPEAKER SETTING GENERAL VIDEO AUDIO LANGU...

Страница 24: ...age options will appear Select the desired language using the Navigation π buttons 1 then press the ENTER button 2 The disc must be recorded in the selected language otherwise the default language of the disc will be shown 2 1 1 SUBTITLE LANGUAGE MENU LANGUAGE GENERAL VIDEO AUDIO LANGUAGE PARENTAL NETWORK JAPANESE ENGLISH ORIGINAL OTHER AUDIO LANGUAGE SUBTITLE LANGUAGE MENU LANGUAGE ON SCREEN LANG...

Страница 25: ...of all movies 1 KIDSAFE Suitable for all children 2 G General Audiences 3 PG Parental Guidance 4 PG 13 Parental Guidance for children under 13 years old 5 PGR Under 17 years old Parental Guidance suggested 6 R Under 17 years old Parental Guidance strongly suggested 7 NC17 17 years old and above 8 ADULT Adult only 2 1 3 2 PARENTAL CONTROL OPTIONS SETTING DVD VIDEO RATINGS If you select Unlock Playe...

Страница 26: ...d select Change Level and press the ENTER button 2 Select the desired rating level using the Navigation π buttons 1 2 1 3 2 SETTING BD VIDEO AGE LIMIT If the level was already set to No Limit press the Navigation π buttons 1 to change the level directly and press the Enter button 2 The Password screen will appear Enter the four digit password as above When done press the ENTER button 2 2 1 3 You c...

Страница 27: ...GS menu it will again prompt you to enter a password Enter it using the Number 0 9 buttons 1 Then press the ENTER button 2 the Parental sub menu will appear NOTE You can change the Password in either DVD rating or BD rating 2 1 2 SETTING PARENTAL PASSWORD Select CHANGE PASSWORD using the Navigation π buttons 1 then press the ENTER button 2 the Change password screen will appear 2 1 3 Enter the des...

Страница 28: ...uttons 1 then press the ENTER button 2 to manually set the Primary and Secondary DNS IMPORTANT It is recommended to leave this option ON unless you are knowledgeable in network settings 2 1 1 Select the Network menu as shown above Select NETWORK using the Navigation π buttons 1 then press the ENTER button 2 Select ACCESS SETTING using the Navigation π buttons 1 then press the ENTER button 2 Select...

Страница 29: ...s only or PROHIBIT to deny all access and then press the ENTER button 2 to set 2 1 1 PROXY SERVER SETTINGS BD LIVE ACCESS GENERAL VIDEO AUDIO LANGUAGE PARENTAL NETWORK IP ADDRESS DNS SETTINGS ACCESS SETTING PROXY SERVER SETTINGS BD LIVE ACCESS INITIALIZE PROXYADDRESS PROXYPORTNUMBER 0 GENERAL VIDEO AUDIO LANGUAGE PARENTAL NETWORK IP ADDRESS DNS SETTINGS ACCESS SETTING PROXY SERVER SETTINGS BD LIVE...

Страница 30: ...de facing up align it with the guides and place it in its proper position It is important that you read the manual that accompanies the disc as there are features that are on this player that cannot be used with certain discs There are also extra features that are different for each disc so they are not explained in this owner s manual When connected via the HDMI cable press the HDMI reset button ...

Страница 31: ...n 1 Because the unit will remember where you stopped simply press the PLAY button 2 to resume playback where you left off resuming playback If the STOP X button 1 is pressed again the unit will enter the Stop mode 1 2 4 NOTES If the player is not in BD DVD mode press the USB SD button repeatedly to select BD mode to playback the disc If a Menu appears on the TV screen press the Navigation π button...

Страница 32: ...nd x32 Resume normal playback by pressing the Play button 3 2 1 3 1 SKIP N SKIP o SEARCH Press the PAUSE p button 1 to pause the picture Repeatedly press the Navigation button 2 to move the frame forwards one frame at a time Press the PAUSE p button 1 again or the PLAY button 3 to resume normal playback 3 1 2 1 Press the PAUSE p button 1 to pause the picture Press the Search FWD 2 button to move t...

Страница 33: ... the AUDIO button is pressed to change the audio language This feature is not available on all discs 1 2 1 DISC MENU BUTTON AUDIO Press the SEARCH button 1 once the Time Search will appear Select the time you would like to advance forward or backwards in minutes using the Navigation π buttons 2 then press the ENTER button 3 the disc will then advance go back the number of minutes selected 3 1 2 2 ...

Страница 34: ...s again to disable 1 PIP PICTURE IN PICTURE Some BD discs have Picture in Picture capability SKIP BUTTON Press the SKIP button to advance the disc 30 seconds 1 DISPLAY INFO BUTTON Press the DISPLAY INFO button to view the playing title chapter elapsed time remaining time disc type and Play status Press again to remove the info from the screen 1 ...

Страница 35: ...e SUBTITLE STYLE When available select the desired subtitle style and formatting ANGLE When the disc has more than one angle recorded select the desired angle PLAYBACK REPEAT Select to repeat the current TITLE CHAPTER or turn Repeat OFF VIDEO PICTURE Select the desired picture setting NORMAL SOFT Soft picture smoother video FINE Sharper details CINEMA Mellows movies enhances details in dark scenes...

Страница 36: ...to fit the screen and remove the black bars ZOOM When viewing a video with black bars at the top and bottom select ZOOM to clear the black bars and zoom in the video TOP MENU Select to return to the disc s main Title screen Some discs cannot return to the Title screen POP UP MENU Select and the Pop Up Menu will appear which will vary from disc to disc but usually includes a button for the Main Men...

Страница 37: ... the disc tray OPEN will appear on the screen Insert a disc with the label side facing up on the disc tray Press the PAUSE button 1 to pause playback Press the PAUSE button 1 again or the PLAY button 2 to resume playback 2 1 4 PLAYBACK OF A CD 2 1 2 To stop playback press the STOP X button 1 Because the unit will remember where you stopped simply press the PLAY button 2 to resume playback where yo...

Страница 38: ... to be played 2 1 1 SELECTING TRACKS USING THE NUMBER BUTTONS SELECTING TRACKS USING THE SKIP O OR N BUTTON During playback press either the Search FWD 1 or Search REV 2 button to move the disc forward or backward at double x2 speed to locate a specific section Repeatedly press these buttons and the speed will increase to x4 x8 x16 and x32 Resume normal playback by pressing the Play button 3 2 1 3...

Страница 39: ...ry using the Navigation π buttons 2 then press the ENTER button 3 the options will appear Select the desired option using the Navigation π buttons 2 then press the ENTER button 3 Once a category has been selected the Navigation buttons 2 may also be used to advance to the next column or return to the previous column of options While the Sub menu is dependant on the disc used some of the options ar...

Страница 40: ...r SD Card with data files and press the USB SD button 1 Select USB or SD using the Navigation π buttons 2 and then press the ENTER button 3 the Folder File menu will appear 3 1 2 2 2 PLAYBACK OF A DATA PICTURE AUDIO DISC USB SD CARD 2 1 The list of files on the disc will appear If the disc has folders then a list of folders will appear Use the Navigation π buttons 1 to select the desired file or f...

Страница 41: ... FOLDER MENU simple press the DISC MENU button 3 After performing the four steps on page 39 select an MP3 WMA file using the Navigation π buttons 1 If the media contains more than one page press the SKIP N 2 o 3 button to cycle through the pages 3 2 1 1 1 After an MP3 WMA file is selected press the ENTER button The selected file will start playing 2 MP3 WMA DISPLAY INFO BUTTON Press the DISPLAY IN...

Страница 42: ...ired Interval Time between photos and or turn Repeat mode On or Off Press the RETURN button 4 to return to the file folder menu 3 After performing the four steps on page 39 select a JPEG file using the Navigation π buttons 1 If the media contains more than one page press the SKIP N 2 o 3 button to cycle through the pages 3 2 1 1 1 CONTENTS INFORMATION Press the POPUP MENU button 1 the Pop Up menu ...

Страница 43: ...BD Live Data or CANCEL to cancel the request 3 NOTE You can erase the BD Live data on the SD CARD only FIRMWARE UPDATING THE FIRMWARE The Firmware can be updated with a CD or DVD only Follow these steps to update the Firmware 1 To obtain the latest version of the Firmware please visit our website at www memorex com 2 Copy the Firmware to a CD or DVD 3 Insert the disc and close the disc compartment...

Страница 44: ...n some discs Select the correct TV type PS LB WIDE which matches the TV you are using Install fresh batteries Install batteries according to the diagram Aim the remote at the sensor Operate within 20 ft or reduce the light in the room Remove the obstacle Remove the disc from the disc tray as there cannot be a disc inserted when setting the preferences POSSIBLE CAUSE AC cord unplugged Condensation ...

Страница 45: ...re not available on all discs If the audio or subtitle language does not appear on the disc then the initial setting will not be seen heard Subtitles appear only when the discs contain them Subtitles not turned on Angles may not be recorded on the disc see disc jacket case or they may only be recorded on certain scenes Some TVs do not support 1080i output FOR ADDITIONAL SET UP OR OPERATING ASSISTA...

Страница 46: ...sc to the outer edge of the disc Never wipe in circular motions Discs should be stored in their cases after each use to avoid damage Do not expose discs to direct sunlight high humidity high temperatures or dust etc Prolonged exposure or extreme temperatures can warp the disc Do not stick or write anything on either side of the disc Sharp writing instruments or the ink may damage the surface Clean...

Страница 47: ...Dolby Digital Dolby Digital Plus Dolby True HD Linear PCM Video Output Composite 75Ω Load 1 channel 1 0 Vp p Blu ray 480i DVD 480i Component 75Ω Load Y 1 0Vp p Pr 0 70Vp p Pb 0 70Vp p Blu ray 1080i DVD 1080i Audio Video Output HDMI 1080p 1080p24 1080i 720p 480p 480i PCM Multichannel Audio Bitstream Audio PCM Audio Audio Output Digital Audio Output Optical Coaxial Frequency Response 48kHz Sampling ...

Отзывы: