background image

35

DATA CD/USB OPERATION

1

2

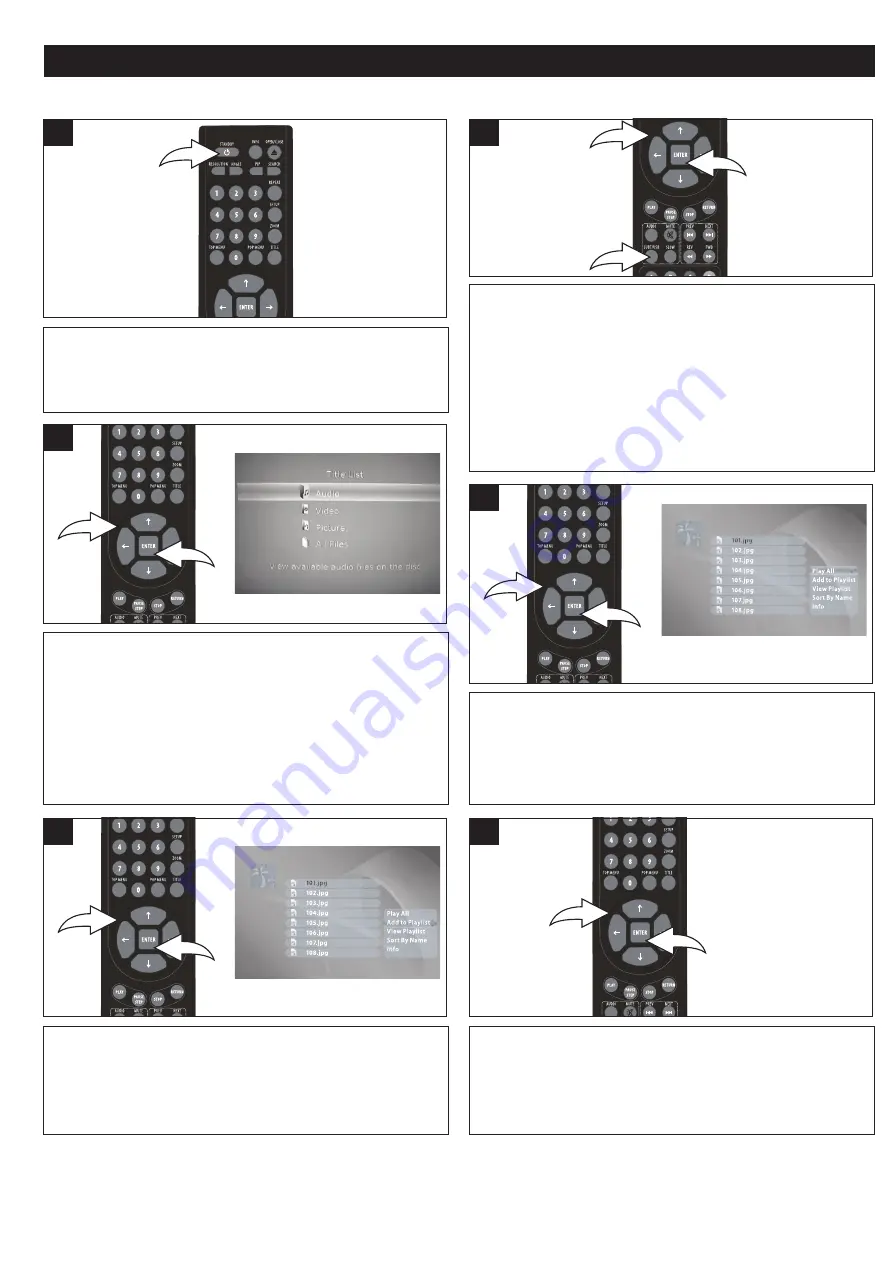
The list of files on the disc will appear. (If the disc has

folders, then a list of folders will appear.) Use the Navigation

(

π

,

) buttons 

to select the desired file or folder and then

press the ENTER button 

2

to start playback or enter the

folder. Use Navigation (

π

) button 

1

to go to the top file and

press the ENTER button 

to go to the previous folder. To

open the Title List menu with the desired MP3/WMA, press

the Navigation 

®

button 

1

.

3

Press the POWER/STANDBY button to turn on the unit.

The Power indicator light will go on.

1

While the disc is in Stop mode (press the Stop button

twice) or no disc, insert the USB device with data files and

press the SUBTITLE/USB button 

to select USB, then

select the desired USB device. Or insert a disc with data

files. Data files can be movies, audio files or pictures. See

the specifications for details on the file formats allowed.

After loading, the Title List screen of the disc will appear.

Use the Navigation (

π

,

) buttons 

to select a format and

then press the ENTER button 

3

.

2

1

3

PLAYBACK OF A DATA (PICTURE, AUDIO, VIDEO)  CD/USB

2

PLAY ALL: 

Select PLAY ALL from the Title List menu using

the Navigation (

π

,

) buttons 

1

, then press the ENTER

button 

2

; the player will then play all of the files on the disc.

1

2

4

1

2

ADD TO PLAYLIST: 

Select ADD TO PLAYLIST from the

Title List menu using the Navigation (

π

,

) buttons 

1

, then

press the ENTER button 

2

; the file will be added to the

playlist.

5

VIEW PLAYLIST: 

Select VIEW PLAYLIST from the Title

List menu using the Navigation (

π

,

) buttons 

1

, then

press the ENTER button 

2

; the playlist will appear. You can

then press the ENTER button 

2

again to start playback of

your playlist.

1

2

6

All manuals and user guides at all-guides.com

Содержание MVBD2510 - Blu-Ray Disc Player

Страница 1: ...Setup Menu 17 General Setup Menu 17 Video Setup Menu 18 Audio Setup Menu 19 Language Setup Menu 21 Setting the Parental Control Options 22 Basic Operation 24 Mute 24 Color Buttons 24 Video Resolution...

Страница 2: ...cause harmful interference to radio or television reception which can be determined by turning the equipment off and on the user is encouraged to try to correct the interference by one or more of the...

Страница 3: ...nvenience receptacles and the point where they exit from the apparatus 11 Only use attachments accessories specified by the manufacturer 12 Use only with the cart stand tripod bracket or table specifi...

Страница 4: ...rks of Sun Microsystems Inc in the U S and other countries Support of uncompressed multi channel Linear PCM In combination with a compatible AV amplifier the player can output up to 8ch Linear PCM sur...

Страница 5: ...oduct s instructions Warning Cleaning and adjustment of lenses and or other components of playback mechanism should be performed by a qualified service technician NOTES ON MOISTURE CONDENSATION Moistu...

Страница 6: ...Resolution Indicators 11 USB Jack 6 LOCATION OF CONTROLS FRONT 2 1 3 4 5 6 7 8 9 10 11 1 HDMI Jack 2 Video Output Jack 3 S Video Output Jack 4 Component Video Y PB PR Output Jacks 5 COAXIAL Output Jac...

Страница 7: ...on 20 SETUP Button 21 ZOOM Button 22 TITLE Button 23 POP MENU Button 24 ENTER Button 25 RETURN Button 26 STOP Button 27 Skip NEXT n n Button 28 Skip PREVIOUS o o Button 29 SEARCH FORWARD Button 30 SEA...

Страница 8: ...e batteries as indicated in the Battery Compartment A reversed battery may cause damage to the device 3 Do not mix different types of batteries together e g Alkaline Rechargeable and Carbon zinc or ol...

Страница 9: ...h units are unplugged before making any connections If your TV only has one audio input the use of a Y connector may be necessary Visit your local electronics supply store Connect the player to your T...

Страница 10: ...jacks to connect to a TV with progressive video input jacks Progressive scan is a video scanning system that displays all lines in a frame in one pass as opposed to the traditional system interlaced s...

Страница 11: ...d before making any connections Connect the player to your TV directly If you connect the player through a VCR the playback picture will be distorted because video discs are copy protected When using...

Страница 12: ...ct the player to your TV directly If you connect the player through a VCR the playback picture will be distorted because video discs are copy protected When using HDMI as your source setup the HD reso...

Страница 13: ...When connecting make sure the power is off and all units are unplugged before making any connections Connect the player to your TV directly If you connect the player through a VCR the playback pictur...

Страница 14: ...s manuals for the TV and the audio system as well as this manual When connecting make sure the power is off and all units are unplugged before making any connections Connect the player to your TV dir...

Страница 15: ...ck number KODAK PICTURE CD Data on a Kodak picture CD is usually not divided into separate folders and should appear in the root directory The region BD ROM codes for this player are listed on the bac...

Страница 16: ...hese discs will be distorted This product incorporates copyright protection technology that is protected by method claims of certain U S patents and other intellectual property rights owned by Macrovi...

Страница 17: ...ation button 1 CD ROM will appear Press the ENTER button 2 then select YES using the Navigation buttons 1 and press the ENTER button 2 again Insert the CD and the updated firmware will install 1 2 1 G...

Страница 18: ...on TV ASPECT Use this option to set the desired resolution when connected to the component video output or HDMI output The true output resolution depends on the connection used and the TV s resolution...

Страница 19: ...TSTREAM Outputs the original bit stream directly from the S PDIF output jacks HDMI AUDIO Select this when your equipment is connected via HDMI cable Select as follows PCM Decodes using the internal de...

Страница 20: ...n or OFF to turn off this option using the Navigation buttons 1 then press the ENTER button 2 NOTE This option is effective only when the soundtrack is encoded as Dolby Digital 1 2 1 PCM DOWN SAMPLING...

Страница 21: ...utton OSD On Screen Display AUDIO Use this option to select the language the Subtitle will be in Select the Language menu as shown above Select Audio using the Navigation buttons 1 then press the Navi...

Страница 22: ...ed rating level for disc from 1 8 with 1 allowing most movies and 8 restricting the most Select OFF to allow all movies For example if you select 6 discs that are level 7 or 8 cannot play When done pr...

Страница 23: ...n button 2 2 1 1 Using the Navigation buttons 1 select Change Password and then press the Navigation button 1 Are you sure will appear Press the ENTER button 2 1 2 2 CHANGING THE PASSWORD Enter the ex...

Страница 24: ...se buttons are used as shortcuts for some on screen items when viewing Blu ray discs can also be used for BD s Java interactive operations 1 COLOR BUTTONS A B C D IMPORTANT NOTES After plugging in the...

Страница 25: ...disc tray To stop playback press the STOP button 1 Press Stop again to confirm Press Play to resume will appear on the TV screen Because the unit will remember where you stopped simply press the PLAY...

Страница 26: ...and resume normal playback You can also resume normal playback by pressing the PLAY button 3 2 1 3 1 SKIP SEARCH Press the PAUSE STEP button 1 to pause the picture Repeatedly press the PAUSE STEP but...

Страница 27: ...LE MENU button to go to the title menu Depending on the disc the Title Menu may not be available 1 TOP MENU BUTTON TITLE MENU BUTTON DB DVD Press the POP MENU button 1 to display the pop menu while th...

Страница 28: ...RCH button 1 once the Time Search will appear Using the Number buttons 2 enter the hours then press the Navigation button 3 Using the Number buttons 2 enter the minutes two digits then press the Navig...

Страница 29: ...n to select the desired angle the angle will change in one to two seconds This is not available on all discs 1 ZOOM The image on the screen can be magnified as follows ANGLE Some discs may contain sce...

Страница 30: ...list of folders will appear Use the Navigation buttons 1 to select the desired MP3 WMA or folder and then press the ENTER button 2 to start playback or enter the folder Use Navigation button 1 to go...

Страница 31: ...NFO from the Title List menu using the Navigation buttons 1 then press the ENTER button 2 the information of the selected file will appear 1 2 9 8 NOTES Press the RETURN button to return to the Title...

Страница 32: ...to download and share Can I record my own MP3 CDs Yes but you need a CD recorder which is available from your local computer store Where can I find MP3 files MP3 files are available on the Internet Ca...

Страница 33: ...ator light will go on 1 Press the OPEN CLOSE button to open the disc tray OPEN will appear on the screen Insert a music CD with the label side facing up on the disc tray Use the Navigation buttons 1 t...

Страница 34: ...Each press of the SEARCH 1 or 2 button will increase the search as follows 1st press x 2 2nd press x 4 3rd press x 16 4th press Resume Normal Playback 2 1 1 To repeat play a track simply select the tr...

Страница 35: ...a disc with data files Data files can be movies audio files or pictures See the specifications for details on the file formats allowed After loading the Title List screen of the disc will appear Use t...

Страница 36: ...on buttons 1 then press the ENTER button 2 the information of the selected file will appear 1 2 8 NOTES Press the RETURN button to return to the Title List screen The Skip Search Pause Repeat and Zoom...

Страница 37: ...cs Select the correct TV type PS LB WIDE which matches the TV you are using Install fresh batteries Install batteries according to the diagram Aim the remote at the sensor Operate within 20 ft or redu...

Страница 38: ...lows a different camera angle POSSIBLE CAUSE Disc not inserted or inserted upside down A non playback disc is inserted The disc is not placed in the guide The disc is dirty Some features and functions...

Страница 39: ...the disc Never wipe in circular motions Discs should be stored in their cases after each use to avoid damage Do not expose discs to direct sunlight high humidity high temperatures or dust etc Prolonge...

Страница 40: ...0 70Vp p Pb 0 70Vp p Blu ray 1080i 720p 480p 480i DVD 480i 480p S Video 75 Load Luminance Signal 1 0Vp p 75 Load Chrominance Signal 0 3Vp p Blu ray 480i DVD 480i Audio Video Output HDMI 1080p 1080p24...

Отзывы: