background image

8

PICTURE  

CH  SETUP

MENU 

LANGUAGE   
V-CHIP  SET

AUDIO

〈 

+ / – / ENTER / MENU 


AUTO  CH  MEMORY

TV

ADD / DELETE   

CATV

〈 

+ / – / ENTER / MENU 


PICTURE  

CH  SETUP

MENU 

LANGUAGE   
V-CHIP  SET

AUDIO

〈 

+ / – / ENTER / MENU 


AUTO  CH  MEMORY

TV

ADD / DELETE   

CATV

〈 

+ / – / ENTER / MENU 


PICTURE  

CH  SETUP

MENU 

LANGUAGE   
V-CHIP  SET

AUDIO

〈 

+ / – / ENTER / MENU 


AUTO  CH  MEMORY

TV

ADD / DELETE   

CATV

〈 

+ / – / ENTER / MENU 


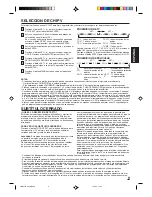
PARA MEMORIZAR CANALES

Este televisor está equipado con una función de
memorización de canales que permite avanzar o retroceder
al siguiente canal almacenado en la memoria, pasando por
alto los canales no deseados.
Antes de seleccionar canales, éstos deberán estar
programados en la memoria del televisor. Además de los
canales normales de VHF y UHF, este televisor puede recibir
hasta 113 canales de TV cable. Para usar el televisor con
una antena, coloque la opción de menú de TV/CATV al modo
de TV. Cuando sale de fábrica, la opción de menú TV/CATV
está en el modo CATV.

CANALES CATV

SELECCION DE TV/CATV

Presione el botón MENU.

Presione el botón SET + ó – hasta
que el indicador "CH SETUP"
empiece a parpadear seguidamente,
y a continuación presione el botón
ENTER.

Presione el botón SET + ó – hasta que
el indicador "TV/CATV" empiece a
parpadear seguidamente.

Presione el botón ENTER para
seleccionar el modo TV o CATV. La
flecha indica el modo seleccionado.

Presione el botón MENU dos veces
para volver a la imagen normal de
TV.

El cuadro abajo muestra el sistema típico de la localización
de los canales por cable.

14

A

15

B

16

C

17

D

18

E

19

F

20

G

21

H

22

I

32

S

33

T

34

U

35

V

36

W

37

AA

38

BB

39

CC

40

DD

23

J

24

K

25

L

26

M

27

N

28

O

29

P

30

Q

31

R

50

NN

51

OO

52

PP

53

QQ

54

RR

55

SS

56
TT

57

UU

58

VV

41

EE

42
FF

43

GG

44

HH

45

II

46
JJ

47

KK

48
LL

49

MM

68

III

69

JJJ

70

KKK

71

LLL

72

MMM

73

NNN

74

OOO

75

PPP

76

QQQ

59

WW

60

AAA

61

BBB

62

CCC

63

DDD

64

EEE

65

FFF

66

GGG

67

HHH

86
86

87
87

88
88

89
89

90
90

91
91

92
92

93
93

94
94

77

RRR

78

SSS

79

TTT

80

UUU

81

VVV

82

WWW

83

XXX

84

YYY

85

ZZZ

104
104

105
105

106
106

107
107

108
108

109
109

110
110

111
111

112
112

95

A-5

96

A-4

97

A-3

98

A-2

99

A-1

100
100

101
101

102
102

103
103

122
122

123
123

124
124

125
125

01
5A

113
113

114
114

115
115

116
116

117
117

118
118

119
119

120
120

121
121

Números en este TV
Canal de CATV correspondientes

NOTA:

Póngase en contacto con la compañía de cable
para determinar el tipo de sistema de cable
usado en su área.

MEMORIA AUTOMATICA DE CANAL

Presione el botón MENU.

Presione el botón SET + ó – hasta que
el indicador "CH SETUP" empiece a
parpadear seguidamente, y a
continuación presione el botón ENTER.

Presione el botón SET + ó – hasta que
el indicador "AUTO CH MEMORY"
empiece a parpadear seguidamente, y
a continuación presione el botón EN-
TER. El TV comenzará a memorizar
todos los canales disponibles en su
área.

Presione el botón MENU dos veces
para volver a la imagen normal de TV.

PARA AÑADIR/BORRAR CANALES

Presione el botón MENU.

Presione el botón SET + ó – hasta
que el indicador "CH SETUP"
empiece a parpadear seguidamente,
y a continuación presione el botón
ENTER.

Presione el botón SET + ó – hasta que
el indicador "ADD/DELETE" empiece a
parpadear seguidamente, y a
continuación presione el botón
ENTER.

Seleccione los canales deseados a
agregar o borrado mediante los
botones de Selección Directa de
Canal (10 teclas, 0-9), el botón CH
Subir/Bajar o el botón SET + ó –.

1

2

3

4

5

1

2

3

4

5

Presione el botón ENTER para seleccionar ADD o
DELETE. Si un canal no memorizado se ha
seleccionado (paso 4), el indicador de canal será en
rojo. Presione el botón ENTER si usted desea añadir el
canal no memorizado. Cuando un canal se añadido, el
indicador de canal cambiará de rojo a verde y el canal
será memorizado.
Si un canal memorizado se ha seleccionado (paso 4), el
indicador de canal será en verde.

Presione el botón ENTER si usted
desea borrar el canal de la memoria.
Cuando el canal se borrado, el
indicador de canal cambiará de
verde a rojo.
Repita los pasos 4 y 5 para ser
añadido o borrado cada canal.

Presione el botón MENU tres veces después de añadir
o borrar todos los canales deseados, para volver a la
imagen normal de TV.

6

ADD

CH 012

0-9 / + / – / ENTER / MENU 


1
2

3

4

  3R20521A-S/P08-BACK

27/4/04, 14:05

8

Содержание MT2274

Страница 1: ...ion is set to the CATV Cable Television mode If not using CATV Cable TV set this menu option to the TV mode Al modo de CATV Televisión por cable Si no utiliza CATV ajuste esta opción de menú al modo de TV ENGLISH ESPAÑOL ATTENTION ATENCION If you purchase a universal remote control from your local retailer please contact the remote manufacturer for the required programming code Si usted a comprado...

Страница 2: ...gs should never be blocked by placing the unit on a bed sofa rug or other similar surface This unit should never be placed near or over a radiator or heat source This unit should not be placed in a built in installation such as a bookcase or rack unless proper ventilation is provided or the manufacturer s instructions have been adhered to 10 POWER SOURCE This unit should be operated only from the ...

Страница 3: ...the unit c If the unit has been exposed to rain or water d If the unit does not operate normally by following the operating instructions Adjust only those controls that are covered by the operating instructions as an improper adjustment of other controls may result in damage and will often require extensive work by a qualified technician to restore the unit to its normal operation e If the unit ha...

Страница 4: ...impaired viewers Stereo SAP Reception This TV is designed to receive stereo and second audio program SAP broadcasts where available 5 FRONT AUDIO L R VIDEO IN Jacks AUX2 Audio and video signal cables from an external source can be connected here 6 VHF UHF IN ANT Jack Connect a VHF UHF antenna or CATV cable to this jack 7 S VIDEO IN Jack S Video signal cable from an external source can be connected...

Страница 5: ...tween Channel 1 and Channel 2 in the Closed Caption mode 16 TV CAP TEXT Button Press this button to switch between normal TV and the two Closed Caption modes captions and 1 2 of full screen text Closed Captioning will display text on screen for hearing impaired viewers REMOTE CONTROL 1 Open the battery compartment cover 2 Install two AAA batteries not supplied HOW TO INSTALL BATTERIES Before using...

Страница 6: ...through the audio video in jacks use the TV AV button to make your selection Press the TV AV button repeatedly to select the desired mode AUX1 or AUX2 will display on the screen for 4 seconds AUDIO VIDEO JACK CONNECTIONS The exact arrangement you use to interconnect various video and audio components to the TV is dependent on the model and features of each component Check the Owner s Manual provid...

Страница 7: ... On screen language selection step 3 will automatically appear on the screen when you press the MENU button initially Select the language you prefer first then proceed with the other menu options NOTE If Spanish or French is chosen the Closed Caption indicators will be in the selected language but the Closed Caption text will not be affected by the language selection Press the SET or button to sel...

Страница 8: ...system used in your area AUTOMATIC CHANNEL MEMORY Press the MENU button Press the SET or button until the indicator next to CH SETUP begins to flash then press the ENTER button Press the SET or button until the indicator next to AUTO CH MEMORY begins to flash then press the ENTER button The TV will begin memorizing all the channels available in your area Channel numbers will remain red until auto ...

Страница 9: ...re with the picture usually on the bottom of the screen News programs will usually show three line Closed Captions which scroll onto the screen Most other shows provide two or three lined Captions placed near the character who is speaking so the viewer can follow the dialogue Words in italics or underlined describe titles words in foreign languages or words requiring emphasis Words that are sung u...

Страница 10: ...OTE If connecting this TV with a VCR and or Cable box to receive stereo sound you must use audio video cables for all connections You must also verify that your VCR and or Cable box are stereo units MONO SAP BROADCASTING SAP SOUND MAIN SOUND MONO MAIN SAP SOUND MONO MAIN SOUND STEREO STEREO SAP BROADCASTING MAIN SAP SOUND MONO MAIN SOUND MONO SAP SOUND BRIGHTNESS CONTRAST COLOR TINT SHARPNESS incr...

Страница 11: ...n the Remote and the TV Make sure the power cord is plugged in Make sure TV CATV menu option is in the appropriate mode If using antenna check UHF antenna connections No broadcast on station tuned Sleep Timer is set Power interrupted TV shuts off TV station experiencing problems or program tuned is not closed captioned Try another channel Check CATV connection or VHF UHF antenna reposition or rota...

Страница 12: ...en un funcionamiento fiable de la unidad protegiendo contra calentamiento excesivo Estas aberturas no deberán ser bloqueadas ni cubiertas Para evitar bloquear las aberturas nunca sitúe la unidad encima de una cama sofá alfombra u otra superficie similar Tampoco instale la unidad cerca o encima de un radiador o calefactor La unidad no deberá ser instalado en un mueble empotrado como ser una repisa ...

Страница 13: ...uesta a la lluvia o al agua d Cuando a pesar de haber seguido las instrucciones de operación la unidad no funcione normalmente Ajuste solamente los controles indicados en el manual de instrucciones el ajuste incorrecto de otros controles podrá causar daños a la unidad la que por lo general requerirá de un prolongado trabajo de reparación por un técnico calificado para que sus condiciones normales ...

Страница 14: ...a personas con problemas de audición Recepción estéreo SAP Este TV fue diseñado para recibir programas de estéreo y de audio por sonido SAP 5 Tomas FRONT AUDIO L R VIDEO IN AUX2 Aquí pueden conectar desde una fuente externa los cables de señales de audio y video 6 Conector de entrada de ANTENA VHF UHF Conecte una antena VHF UHF o un TV cable a este conector 7 Toma S VIDEO IN Aquí puede conectar el...

Страница 15: ...la pantalla Para desactivar la función de silenciamiento vuelva a presionar el botón de silenciamiento reposición MUTE o presione el botón de aumento o disminución de volumen VOL o Botones selectores de canal en Presione el botón de ascenso para cambiar a un canal más alto almacenado en la memoria Presione el botón de descenso para cambiar a un canal más bajo Botón ENTER Presiónelo para introducir...

Страница 16: ...egundos CONEXIONES DE TOMA AUDIO VIDEO La instalación exacta a utilizar para hacer las conexiones de los distintos componentes de video y audio en el TV depende del modelo y funciones de cada componente Confirme en el manual de instrucciones de cada componente para la posición de las entradas y salidas de video y de audio Los diagramas de conexión a continuación son sugerencias Puede ser necesario...

Страница 17: ...ENTER 1 2 3 4 Presione el botón MENU Presione el botón SET ó para seleccionar el modo LANGUAGE y después presione el botón ENTER Presione el botón MENU otra vez para volver a la imagen normal de TV Antes de hacer funcionar su TV presione el botón TV en la parte inferior del remoto para controlar el TV utilizando el remoto 2 1 3 4 Botones de selección directa de canal 0 9 Utilice estos botones para...

Страница 18: ...7 107 108 108 109 109 110 110 111 111 112 112 95 A 5 96 A 4 97 A 3 98 A 2 99 A 1 100 100 101 101 102 102 103 103 122 122 123 123 124 124 125 125 01 5A 113 113 114 114 115 115 116 116 117 117 118 118 119 119 120 120 121 121 Números en este TV Canal de CATV correspondientes NOTA Póngase en contacto con la compañía de cable para determinar el tipo de sistema de cable usado en su área MEMORIA AUTOMATI...

Страница 19: ...o del programa aparecerá en pantalla solo en aquellas áreas donde exista este tipo de servicio Si no se recibe la señal de emisión de texto no aparecerán leyendas pero el televisor permanecerá en el modo de recepción de texto Ocasionalmente podrán aparecer faltas de ortografía o caracteres extraños durante la recepción de texto Esto es normal en este modo especialmente con los programas en vivo Es...

Страница 20: ...ansmisiones en Programa de audio sonido PARA SELECCIONAR SONIDO DESEADO Presione el botón AUDIO SELECT para seleccionar el sonido deseado TRANSMISION MONOAURAL SAP SONIDO SEPARADO SONIDO PRINCIPAL MONOAURAL SONIDO PRINCIPAL ESTEREO SONIDO PRINCIPAL SEPARADO MONOAURAL TRANSMISION ESTEREO SAP SONIDO PRINCIPAL MONOAURAL SONIDO PRINCIPAL SEPARADO MONOAURAL SONIDO SEPARADO PROGRAMA DE AUDIO SONIDO SAP ...

Страница 21: ... señal codificada Reoriente la antena La imagen presenta oscilación o desplazamiento Revise todas las conexiones del sistema CATV Ajuste la opción de menú de TV CATV al modo CATV La estación o el servicio de TV cable están con problemas pruebe con otra estación La recepción CATV no es posible Revise las conexiones de la antena y reoriente la antena Determine si hay posibles fuentes de interferenci...

Страница 22: ...90 days and until two 2 years from the date of purchase Sears will replace the Picture Tube if it is defective You pay for labor This warranty applies only if this product is used for private household purposes This warranty gives you specific legal rights and you may also have other rights which vary from state to state Sears Roebuck and Co Dept 817WA Hoffman Estates IL 60179 Please keep all pack...

Страница 23: ...ESPAÑOL 13 MEMO 3R20521A S P08 BACK 27 4 04 14 05 13 ...

Страница 24: ...e vacuums lawn equipment and electronics call or go on line for the location of your nearest Sears Parts Repair Center 1 800 488 1222 Call anytime day or night U S A only www sears com To purchase a protection agreement U S A or maintenance agreement Canada on a product serviced by Sears 1 800 827 6655 U S A 1 800 361 6665 Canada Para pedir servicio de reparación a domicilio y para ordenar piezas ...

Отзывы: