background image

5

ENGLISH

MENU

VOL

SLEEP

MUTING

QUICK VIEW

CALL

VOL

ENTER

CH

CH

1

2

3

4

5

6

7

0

8

9

-    

SET   

+

CH.1/2

TV

AUDIO

SELECT

RESET

POWER

CAP/TEXT

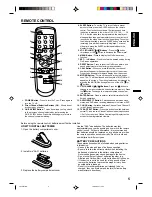
REMOTE CONTROL

1. Open the battery compartment cover.

2. Install two "AAA" batteries.

HOW TO INSTALL BATTERIES

Before using the remote control, batteries must first be installed.

3. Replace the battery compartment cover.

BATTERY PRECAUTIONS

These precautions should be followed when using batteries
in this device:
• Use only the size and type of batteries specified.
• Be sure to follow the correct polarity when installing the

batteries as indicated in the battery compartment.
Reversed batteries may cause damage to the device.

• Do not mix different types of batteries together (e.g.

Alkaline and Carbon-zinc) or old batteries with fresh ones.

• If the device is not to be used for a long period of time,

remove the batteries to prevent damage or injury from
possible battery leakage.

• Do not try to recharge batteries not intended to be re-

charged; they can overheat and rupture (Follow battery
manufacturer's directions).

Use two "AAA" size batteries. The batteries may last
approximately one year depending on how much the remote
control is used. For best performance, it is recommended
that batteries should be replaced on a yearly basis, or when
the remote operation becomes erratic. Do not mix old and
new batteries or different types.

4. SLEEP Button - To set the TV to turn off after a preset

amount of time, press the SLEEP button on the remote
control. The clock will count down 10 minutes each time
the button is pressed in the  order of 120, 110, 100, ······ 20,
10, 0. After the sleep time is programmed, the display will
disappear then reappear momentarily every ten minutes to
remind you the sleep timer function is operating. To confirm
the sleep time setting, press the SLEEP button once and the
remaining time will be momentarily displayed. To cancel
sleep time, press the SLEEP button repeatedly until the
display turns to 0.

5. VOL (VOLUME)      /      Buttons - Press the      button

to increase, or the      button to decrease the volume level.

6. MENU Button - Press to display the On-Screen menu

function.

7. SET – / + Buttons - Press to select the desired setting during

On-Screen operations.

8. RESET Button - Press to reset the On-Screen picture and

sound adjustments to their factory preset positions.

9. CALL Button - When you press this button, the channel

number will appear in the upper right corner of the screen.
Press the button again to remove display from the screen.

10. MUTING Button - To turn off the sound, press this button

once. The TV will be silenced and the symbol "MUTING" will
appear on the screen. The muting feature can be released by
pressing the MUTING button again or one of the VOL       or
      buttons.

11. CH (CHANNEL)       /       Buttons - Press the       button to

change to a higher numbered channel set into memory. Press
the       button to change to a lower numbered channel set
into memory.

12. ENTER Button - Press to enter or select information for On-

Screen operations.

13

. AUDIO SELECT Button - Switches sound between mono,

stereo, and SAP when receiving broadcasts in stereo or SAP.

14. CH.1/2 Button - Switches between Channel 1 and Channel 2

in the Closed Caption mode.

15. TV/CAP/TEXT Button - Press this button to switch between

normal TV and the two Closed Caption modes (captions and
1/2 of full screen text). Closed Captioning will display text on
screen for hearing impaired viewers.

1. POWER Button - Press to turn the TV on. Press again to

turn the TV off.

2. Direct Channel Selection Buttons (0-9) - Allows direct

access to any channel.

3. QUICK VIEW Button - This button allows you to go back

to the previous channel selected by just pressing the
QUICK VIEW button. Press this button again to return to
the channel you were watching.

1

2

3

5

6

7

8

9

10

11

12

14

4

13

15

 3K00701B-E

18/08/2001, 14:54

5

Содержание MT2252 SERIES A

Страница 1: ...om your local retailer please contact the remote manufacturer for the required programming code Si usted a comprado un control de remoto universal por favor comunicace con el fabricante para el codico de programaccion requerido When shipped from the factory the TV CATV menu option is set to the CATV Cable Television mode If not using CATV set this menu option to TV mode Al salir la unidad de fábri...

Страница 2: ...tilation to ensure reliable operation of the unit and to protect it from overheating These openings must not be blocked or covered The openings should never be blocked by placing the unit on a bed sofa rug or other similar surface This unit should never be placed near or over a radiator or heat source This unit should not be placed in a built in installation such as a bookcase or rack unless prope...

Страница 3: ...e unit c If the unit has been exposed to rain or water d If the unit does not operate normally by following the operating instructions Adjust only those controls that are covered by the operating instructions as an improper adjustment of other controls may result in damage and will often require extensive work by a qualified technician to restore the unit to its normal operation e If the unit has ...

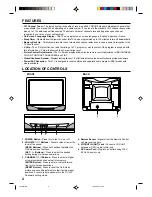
Страница 4: ...l adjustment of BRIGHTNESS COLOR CONTRAST SHARPNESS and TINT Closed Captioned Decoder Displays text captions or 1 2 of full screen text on the screen for hearing impaired viewers Stereo SAP Reception This TV is designed to receive stereo and separate audio program SAP broadcasts where available 4 Remote Sensor Signals from the Remote Control unit are received here 5 VHF UHF IN ANT Jack Connect a V...

Страница 5: ...ss the SLEEP button once and the remaining time will be momentarily displayed To cancel sleep time press the SLEEP buttonrepeatedly until the display turns to 0 5 VOL VOLUME Buttons Press the button to increase or the button to decrease the volume level 6 MENU Button Press to display the On Screen menu function 7 SET Buttons Press to select the desired setting during On Screen operations 8 RESET B...

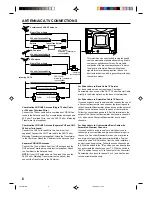
Страница 6: ...Descrambler box to select channels For Subscribers to Unscrambled Basic Cable with Scrambled Premium Channels If you subscribe to a cable service in which basic cable channels are unscrambled and premium channels require the use of a Converter Descrambler box you may wish to use a two set signal splitter sometimes called a two set coupler and an A B Switch box from the cable installer or an electr...

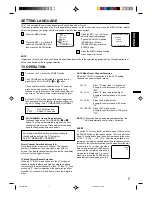
Страница 7: ... 120 press 120 1 2 3 4 CH CHANNEL Up and Down buttons Press and release the CH CHANNEL or button The channel automatically stops at the next channel set into memory Press and hold the button down to change channels more quickly For proper operation before selecting channels they should be set into the TV s memory See TO MEMORIZE CHANNELS SETTING LANGUAGE This TV can display the on screen language ...

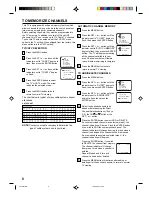
Страница 8: ...able system used in your area AUTOMATIC CHANNEL MEMORY Press the MENU button Press the SET or button until the indicator next to CH SET begins to flash then press the ENTER button Press the SET or button until the indicator next to AUTO CH MEMORY begins to flash then press the ENTER button The TV will begin memorizing all the channels available in your area Channel numbers will remain red until au...

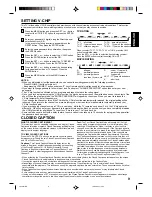
Страница 9: ...hedule or other information After selecting a Closed Caption Mode it will stay in effect until it is changed even if the channel is changed If the Captions signal is lost due to a commercial or a break in the signal the Captions will reappear when the signal is received again If the channels are changed the Captions will be delayed approximately 10 seconds The Captions will appear in places on the...

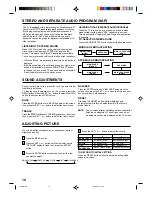
Страница 10: ...until BASS appears on the screen then press the SET or button to adjust the bass sound TREBLE Press the ENTER button until TREBLE appears on the screen then press the SET or button to adjust the treble sound The TV is equipped with a feature known as Multi channel TV Sound or MTS MTS broadcasts greatly enhance TV viewing by bringing you programs with high fidelity stereo sound MTS also provides an...

Страница 11: ...annel 13 No CATV reception Batteries are weak dead or inserted incorrectly Remote is out of range move closer to TV within 15 feet Make sure Remote is aimed at sensor Confirm there are no obstructions between the Remote and the TV Make sure the power cord is plugged in Make sure TV CATV menu option is in the appropriate mode If using antenna check UHF antenna connections No broadcast on station tu...

Страница 12: ...12 MEMO 3K00701B E 18 08 2001 14 54 12 ...

Страница 13: ...13 ENGLISH MEMO 3K00701B E 18 08 2001 14 54 13 ...

Отзывы: