background image

Daylight saving time is automatically set by specially 
broadcasted signals.
This menu item allows you to disable the automatic 
setting of daylight saving time. This is useful if you live 
in an area or state where daylight saving is not applied, 
but you receive channels from other areas where daylight 
saving signals are broadcasted.

DTV Setup menu


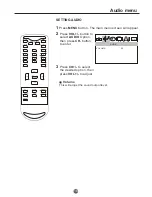
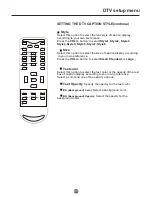
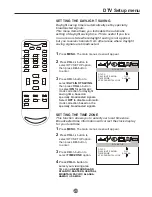
SETTING THE DAYLIGHT SAVING 

1


Press 

MENU.

 The main menu screen will appear.

Press 

VOL+/- 

button to  

    select DTV SETUP option, 
    then press 

CH-

 button

    to enter.

Press 

CH+/-

 button to 

    select 

DAYLIGHT SAVING,


    then press 

VOL+/- 

button 

    to 

select 

ON 

for automatic 

    clock correction for daylight 
    saving time, based on 
    specially broadcasted signals.
    Select 

OFF 

to disable automatic 

    clock correction based on the 
    specially broadcasted signals.

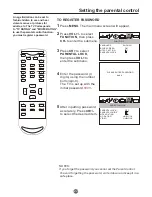
SETTING THE TIME ZONE

This function allows you to select your local time zone. 
Broadcasted time information will correct the clock display 
for your local time.

Press 

VOL+/-


button to 

    select your viewing area 
    time zone: 

NEWFOUNDLAND


ATLANTIC

EASTERN

CENTRAL


MOUNTAIN

PACIFIC

ALASKA


HAWAII

, or 

SAMOA

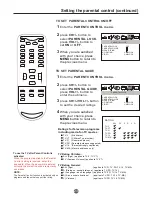
1


Press 

MENU.

 The main menu screen will appear.

Press 

VOL+/-

 button to  

    select DTV SETUP option, 
    then press 

CH-

 button

    to enter.

Press 

CH+/- 

button to 

    select 

TIME ZONE

 option. 


29

0101

DTVCC
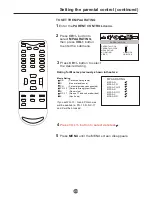
DAYLIGHT SAVING             OFF
TIME ZONE                       ALASKA
ATSC PARENTAL LOCK

DTV SETUP

0101

DTVCC
DAYLIGHT SAVING             OFF
TIME ZONE                       ALASKA
ATSC PARENTAL LOCK

DTV SETUP

MUTE

Q.VIEW

INFO

INPUT

TV/DTV

SAP

P.MODE

OK

-

MENU

CH-

CH+

VOL

-

VOL

+

CC

SLEEP

S.MODE

GUIDE

ARC

CH.LIST

EXIT

1

2

3

4

5

6

7

8

9


0

Содержание MT2025D - 20" CRT TV

Страница 1: ...lease read this manual thoroughly MTD2025D OWNER S MANUAL OWNER S MANUAL 20 INCH ANALOG DIGITAL TELEVISION MUTE Q VIEW INFO INPUT TV DTV SAP P MODE OK MENU CH CH VOL VOL CC SLEEP S MODE GUIDE EXIT ARC CH LIST 1 2 3 4 5 6 7 8 9 0 ...

Страница 2: ...cause harmful interference to radio communications However there is no guarantee that interference will not occur in a particular installation If this equipment does cause harmful interference to radio or television reception which can be determined by turning the equipment off and on the user is encouraged to try to correct the interference by one or more of the following measures Reorient or rel...

Страница 3: ... power company For units intended to operate from battery power or other sources refer to the operating instructions 14 GROUNDING OR POLARIZATION IMPORTANT SAFEGUARDS S3126A PORTABLE CART WARNING symbol provided by RETAC 2 Caution Use of controls or adjustments or performance of procedures other than those specified herein may result in hazardous radiation exposure Product complies with radiation ...

Страница 4: ...servicing to qualified service personnel 25 DAMAGE REQUIRING SERVICE Unplug this unit from the wall outlet and refer servicing to qualified service personnel under the following conditions a When the power supply cord or plug is damaged b If liquid has been spilled or objects have fallen into the unit c If the unit has been exposed to rain or water d If the unit does not operate normally by follow...

Страница 5: ... NEC that provides guidelines for proper grounding and in particular specifies that the cable ground shall be con nected to the grounding system of the building as close to the point of cable entry as practical TO USE AC POWER SOURCE Use the AC polarized line cord provided for operation on AC Insert the AC cord plug into a standard 120V 60Hz polarized AC outlet NOTES Never connect the AC line cord...

Страница 6: ...our unit TV operation 15 Closed caption 19 Memorizing channels 17 Setting the Parentalal control 20 Setting the on timer 24 Setting the off timer 25 Picture control adjustment 26 Sound control adjustment 27 TV operation Reception disturbances 54 Problems and troubleshooting 55 Problems and troubleshooting Video head cleaning 56 Specifications 57 Warranty 58 Additional information 5 Setting OSD dis...

Страница 7: ...Parts and functions Front Rear AUDIO IN L R jacks VIDEO IN jack AUDIO OUT L R jacks RF IN VHF UHF jack VIDEO OUT jack 6 OUT IN VIDEO L AUDIO R S VIDEO IN jack ...

Страница 8: ...es 4 If the device is not to be used for a long period of time remove the batteries to prevent damage or injury from possible battery leakage 5 Do not try to recharge batteries not intended to be recharged they can overheat and rupture Follow battery Manufacturer s directions MUTE Q VIEW INFO INPUT TV DTV SAP P MODE OK MENU CH CH VOL VOL CC SLEEP S MODE GUIDE ARC CH LIST EXIT 1 2 3 4 5 6 7 8 9 0 1...

Страница 9: ... antennas 75 ohm VHF cable and 300 ohm UHF twin lead wires RF IN jack RF IN jack RF IN jack Combiner RF IN jack Combiner Connect the 75 ohm cable from the combination VHF UHF antenna to the RF IN jack If your combination VHF UHF antenna has a 300 ohm twin lead wire the use of the 300 75 ohm matching transformer may be necessary not sup plied Connect the UHF 300 ohm twin lead wire to the combiner n...

Страница 10: ...RS TO UNSCRAMBLED BASIC CABLE TV SERVICE WITH SCRAMBLED PREMIUM CHANNELS Incoming 75 ohm cable TV cable 75 ohm cable to unit RF IN jack RF IN jack A Splitter B Incoming 75 ohm cable TV cable A B switch 75 ohm cable to unit Converter descrambler RF IN jack Converter descrambler This unit has an extended tuning range and can tune most cable channels without using a Cable TV Converter box Some cable ...

Страница 11: ...shown To connect the TV to a Video Game The TV can also be used as a display device for many video games However due to the wide variety of formats they have not all been included in the suggested connection diagram Y oul need to consult each component s Owner s Manual for additional information Audio Video cord not supplied To Audio Video OUT Camcorder To Audio Video OUT Audio Video cord not supp...

Страница 12: ...ress MENU until the MENU screen disappears SETTING THE LANGUAGE 0101 LANGUAGE ENGLISH BLUE SCREEN ON NTSC CAPTION C1 PARENTALLOCK FUNCTION SETTING THE BLUE SCREEN 1 Press MENU and then press VOL button to select FUNCTION menu then press CH button to enter 2 Press CH button to select the BLUE SCREEN option then press VOL to select OFF or ON 3 Press MENU until the MENU screen disappears 0101 LANGUAG...

Страница 13: ... then press CH button to enter 2 Press CH button to select the RECEPTION option 3 Press VOL button to select AIR CABLE 0101 SKIP OFF RECEPTION ATV AIR AUTO SCAN COLOR SYSTEM AUTO CHANNEL When scanning is completed the memorized smallest channel will be displayed When you press MENU button while scanning the scanning is interrupted and the memorized smallest channel is displayed When you press VOL ...

Страница 14: ... skipped channel 1 Use Direct digit Choosing button to select the number of the channel to be recovered 2 Do the above steps again 3 Press VOL button to set SKIP as Off 1 Press MENU and then press VOL button to select CHANNEL menu then press CH button to enter 2 Press CH button to select the COLOR SYSTEM option then press VOL button to select AUTO or NTSC 0101 SKIP OFF RECEPTION ATV AIR AUTO SCAN ...

Страница 15: ...press 2 10 69 Press the 2 digits inorder If you select the channel morethan 69 the channel will not be change it is no available 1 Using CH button Using CH button on the remote control change the channel Same operation is available with CH button on the front panel of the main unit NOTE In the DTV broadcasting one channel sometimes broadcasts multiple programs depending on the air time In this cas...

Страница 16: ...tically after a few second To release the MUTE status press MUTE button again or press VOL button SWITCHING AUDIO This section describes how to switch the audio language in the digital mode Switch the audio language When you press SAP button on the remote control the currently selected language and the number of received languages will be displayed on the screen Every time you press SAP button on ...

Страница 17: ...played 1 Display the detailed information for the channel Every time you press INFO button the display mode will be switched as below The following information is displayed in the INFO mode 1 Program air time 2 Channel number 3 Closed caption 4 Channel title 5 Audio language 6 Program content NOTES When the program guide is displayed in more than 6 lines use VOL button and scroll for reading No de...

Страница 18: ...ight parts in the picture but keep the dark parts unchanged Brightness This will adjust the light output of the complete picture which will mainly affect the darker areas of the picture Color This will adjust the saturation level of the colors to suit your personal preference Sharpness This will adjust the sharpness of fine details in the picture Tint Allows you to select the color mix Tint of the...

Страница 19: ...on then press CH button to enter 3 Press CH to select the desired option then press VOL to adjust SETTING AUDIO 18 0101 VOLUME 20 AUDIO Volume This will adjust the sound output level MUTE Q VIEW INFO INPUT TV DTV SAP P MODE OK MENU CH CH VOL VOL CC SLEEP S MODE GUIDE ARC CH LIST EXIT 1 2 3 4 5 6 7 8 9 0 ...

Страница 20: ...s MENU The main menu screen will appear 2 Press VOL button to select TIME option then press CH button to enter the submenu 3 Press CH button to select TIME then press CH button to select AM press VOL button to set the value 4 Press MENU until the MENU screen disappears 19 0101 TIME AM TIMER OFF AM TIMER ON AM TIME MUTE Q VIEW INFO INPUT TV DTV SAP P MODE OK MENU CH CH VOL VOL CC SLEEP S MODE GUIDE...

Страница 21: ...M TIMER ON AM TIME 2 Press VOL button to select TIME option then press CH button to enter the submenu 3 Press CH button to select TIME ON then press CH button to select AM press VOL button to set the value 4 Press MENU until the MENU screen disappears 2 Press VOL button to select TIME option then press CH button to enter the submenu 3 Press CH button to select TIME OFF then press CH button to sele...

Страница 22: ...ss MENU button to return to the previous menu Press CH button to enter then p OFF C1 C4 C MUTE TEXT1 TEXT2 This allows you to configure the way you choose to view the captioning CAPTION The term for the words that scroll across the bottom of the TV screen usually the audio portion of the program provided for the hearing impaired TEXT The term for the words that appear in a large black frame and al...

Страница 23: ...NTAL LOCK then press VOL to enter the submenu 4 Enter the password 4 digits using the number buttons 0 9 The TV is set up with the initial password 0000 5 After inputting password accurately Press CH to select the desired item 22 To avoid forgetting the password write it down and keep it in a safe place to TV RATING and MOVIE RATING 0101 LANGUAGE ENGLISH BLUE SCREEN ON NTSC CAPTION C1 PARENTALLOCK...

Страница 24: ...ATING NO RATING UNBLOCK VIDEO UNBLOCK CHANGE PASSWORD PARENTALLOCK 1 Press MENU The main menu screen will appear 2 Press VOL to select FUNCTION then press CH to enter the submenu 3 Press CH to select PARENTAL LOCK then press VOL to enter the submenu 4 Enter the password 4 digits using the number buttons 0 9 4 Press CH to select CHANGE PASSWORD then press VOL to enter the submenu ENTER ANEW PASSWOR...

Страница 25: ... audience only TV Rating Children ALL Age applies to TV Y TV Y7 FV Fantasy Violence applies to TV Y7 TV Rating General ALL Age applies to TV G TV PG TV 14 TV MA D Dialogue sexual dialogue applies to TV PG TV 14 L Language adult language applies toTV PG TV 14 TV MA S Sex sexual situations applies toTV PG TV 14 TV MA V Violence appliesto TV PG TV 14 TV MA TO SET PARENTAL GUIDE RATING ALL FV V S L D ...

Страница 26: ...usly shown in theaters Movie Rating NR Permits all programs G General audience PG Parental guidance suggested PG 13 Parents strongly cautioned R Restricted NC 17 No one 17 and under admitted X Adult only If you set PG 13 G and PG movies will be available PG 13 R NC 17 and X will be blocked 4 Press VOL button to select delete or 0101 PARENTALLOCK OFF PARENTALGUIDE MPAA RA TING NO RATING UNBLOCK VID...

Страница 27: ...dcasting with closed captions look in your TV guide for the closed captions symbol CC When selecting closed captions the captioning will be delayed approximately 10 seconds If no caption signal is received no captions will appear but the television will remain in the caption mode Misspellings or unusual characters may occasionally appear during closed captioning This is normal with closed captioni...

Страница 28: ...allows you to configure the way you choose to view the digital captioning Select one of the digital service channels made available by the caption provider There are 6 standard services Service 1 is designated as the Primary Caption Service This service contains the verbatim or near verbatim captions for the primary language being spoken in the accompanying program audio Service 2 is designated as...

Страница 29: ... 2 Press VOL button to enter the submenu 0101 CAPTION MODE USER SETTING BROADCAST DTV CAPTION STYLE DTV SETUP The DTV caption style function lets you change the caption size and font style When USER SETTING is set to CUSTOM you can set the following items 27 DTV setup menu 0101 STYLE STYLE2 SIZE LARGE TEXT COLOR WHITE TEXT OPACITY SOLID EDGE TYPE NONE DTV SETUP 3 Press CH button to select the desi...

Страница 30: ... VOL button to select Small Standard or Large Text color Select this option to select the text color or the opacity of the text box of caption display according to your own preference Select a color and one of the opacity options Text Opacity Specify the opacity for the text color BG Background Color Select a background color BG Background Opacity Select the opacity for the background color 28 DTV...

Страница 31: ...broadcasted signals Select OFF to disable automatic clock correction based on the specially broadcasted signals SETTING THE TIME ZONE This function allows you to select your local time zone Broadcasted time information will correct the clock display for your local time 4 Press VOL button to select your viewing area time zone NEWFOUNDLAND ATLANTIC EASTERN CENTRAL MOUNTAIN PACIFIC ALASKA HAWAII or S...

Страница 32: ...ssword 0000 and enter next submenu ENTER CODE 0101 VERSION RRT 0 DIMENSION CLEAR RRT DTV SETUP Version V chip broadcast source version Dimension Use when viewing non TV broadcast programming Clear RRT CLEAR Rating Table RRT information This will clear V Chip ratings table version 30 DTV setup menu 0101 DTVCC DAYLIGHT SAVING OFF TIME ZONE ALASKA ATSC PARENTAL LOCK DTV SETUP MUTE Q VIEW INFO INPUT T...

Страница 33: ...oving picture 480i 4 3 04 00 05 00 Moving picture 480i 4 3 You can create your own Favorite List Use the on on the remote control when a channel is highlighted and then you can add or delete the channel to from the Favorite List FAV LiST butt Press the FAV LiST button open the favorite channel list press CH button to select the channel and press button to confirm OK KEY ADD CURRENTCHANNEL TO SKIP ...

Страница 34: ...o select the number of minutes First the OFF option appears on the screen followed by the following sleep timer options 5 MINUTE 10 MINUTE 15 MINUTE 30 MINUTE 45 MINUTE 60 MINUTE 90 MINUTE 120 MINUTE 180 MINUTE 240MINUTE OFF To confirm the sleep timer setting press SLEEP and the remaining time will be displayed for a few seconds T o cancel the sleep timer Press repeatedly until the display turns t...

Страница 35: ...icture with snow Noise Color Spot Normal volume Scramble Normal or Weak Volume No color Normal volume No Picture No sound No sound Normal Normal Disturb Noise Double or Triple Image Note 1 If the fault can not be corrected using the above guide consult with your local authorized service center 2 The TV set must only be repaired by a qualified registered service person Never attempt to remove the b...

Страница 36: ...peration 75 W 55 7 lbs 25 2 kg 22 5 inches 570 mm 18 9 inches 480mm 20 1 inches 510mm In 1 Vp p 75 ohm Out 1 Vp p 75 ohm In 8 dBm 50 K ohm Out 8 dBm 1 K ohm 20 51 mm diagonal VHF 2 13 UHF 14 69 CABLE 14 36 A W 37 59 AA WW 60 85 AAA ZZZ 86 94 86 94 95 99 A 5 A 1 100 125 100 125 01 5A VHF UHF In 75 ohm coaxial 1 13 16 46 mm x 3 7 8 99 mm 8 ohm x 2 2 0W 2 0W Remote control x 1 36 Battery x2 Owner s m...

Страница 37: ...0090508031 Ver 1 0 ...

Отзывы: