background image

17

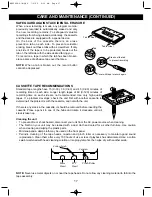
SAFEGUARD AGAINST ACCIDENTAL ERASURE

When a new recording is made, any program material
previously recorded is automatically erased and only
the new recording remains. To safeguard valuable
recordings from being erased accidentally, the cassette
and the deck are equipped with a special device.
On the back of the cassette there is an erase
prevention tab on each side. To prevent accidental
erasing, break out these tabs with a screwdriver. If only
one side of the tape is to be protected, break out the
tab on the left side with the side desired facing you.
To record on a tape in which the tab has been broken,
place a piece of adhesive tape over that area.

NOTE:

When a tab is broken out, the record button

cannot be depressed.

CASSETTE TAPE RECOMMENDATIONS

Standard tape lengths have 15 (C-30), 30 (C-60) and 45 (C-90) minutes of
recording time on each side. Longer length tapes of 60 (C-120) minutes of
recording time on each side are not recommended. Use only high quality
tapes. If a problem develops, check the unit 

fi

rst with another cassette to

determine if the problem is with the cassette, and not with the unit.

If there is any slack in the cassette, it should be removed before inserting the
cassette. Place a pencil in one of the hubs and rotate it clockwise until all
slack is taken up.

Cleaning the unit

• To prevent 

fi

re or shock hazard, disconnect your unit from the AC power source when cleaning. 

• The 

fi

nish on your unit may be cleaned with a dust cloth and cared for as other furniture. Use caution

when cleaning and wiping the plastic parts.

• Mild soap and a damp cloth may be used on the front panel.
• Periodic cleaning of the tape heads, capstan and pinch roller is necessary to maintain good sound

reproduction. Clean them after every 100 hours of use or less if playback has deteriorated. Use a cotton
swab moistened with head cleaning solution or isopropyl alcohol, then wipe dry with another swab.

NOTE:

Never use metal objects on or near the tape heads. Do not allow any cleaning material to fall into the

tape assembly.


CARE AND MAINTENANCE (CONTINUED)

MKS5620.O/M.QXD  7/2/03  9:15 AM  Page 17

Содержание MKS5620

Страница 1: ...Before operating this product please read these instructions completely User s Guide CD CD G Karaoke System with Cassette Recorder and B W Monitor MKS5620 MKS5620 O M QXD 7 2 03 9 15 AM Page 21...

Страница 2: ...s equipment may cause harmful interference unless the modifications are expressly approved in the instruction manual The user could lose the authority to operate this equipment if an unauthorized chan...

Страница 3: ...p to prevent hearing damage or loss in the future After all we want you listening for a lifetime We Want You Listening For A Lifetime Used wisely your new sound equipment will provide a lifetime of fu...

Страница 4: ...nnect the antenna or cable system This will prevent damage to the product due to lightning and power line surges 14 POWER LINES An outside antenna system should not be located in the vicinity of overh...

Страница 5: ...E STOP EJECT FAST FORWARD REWIND PLAY RECORD 14 Speaker 15 AC Cord Rear of Unit 16 Carrying Handles 17 CD Door OPEN CLOSE Area 18 CD Indicators PLAY PAUSE REPEAT PROGRAM 19 CD Display 20 PROGRAM Butto...

Страница 6: ...al Also note that On Screen lyrics are only available on special Karaoke compact discs that bear the CD G mark Many newer TV sets have a set of Video and Stereo Audio jacks on the front panel for quic...

Страница 7: ...o channel for connection to your mono TV 3 You can connect the Audio Out jacks from this portable Karaoke to the Aux In or Audio In jacks of your home stereo system to hear the sound through your home...

Страница 8: ...HE MICROPHONE This unit has two microphone jacks which will allow you to sing along with your favorite songs Before connecting make sure the MIC VOLUME controls are set to minimum HEADPHONE JACK For p...

Страница 9: ...he auto stop mechanism activates the PLAY button is released and the tape motor shuts off Press the STOP EJECT button to open the Cassette Door and remove the tape 8 TO SING ALONG If you would like to...

Страница 10: ...OLUME and TONE controls as desired Playback will continue until all of the tracks on the disc have been played 2 1 6 To stop playback before the disc ends press the Stop button The disc will stop and...

Страница 11: ...Skip Search button once to advance the player to the beginning of the next track Press the Skip Search button repeatedly to advance the player to higher numbered tracks 1 3 During playback press the S...

Страница 12: ...peat all tracks 1 2 2 REPEAT PLAYBACK Press the POWER button to turn the unit on the POWER indicator will light Rotate the Function switch to the CDG or CD position 2 1 1 Press the PROGRAM button 0 wi...

Страница 13: ...press the Play Pause button again playback will start on the first track you programmed and will continue until all the programmed tracks have been played 1 2 7 OPERATION CONTINUED It is also possibl...

Страница 14: ...rols as desired This has no affect on the recording due to the ALC circuit 2 1 5 To pause recording momentarily press the PAUSE button The tape movement stops but the tape motor is still running Press...

Страница 15: ...the BALANCE control is set to the center position so you can hear both the vocal and music tracks at an equal level MICROPHONE FEEDBACK Feedback is a howling or screeching sound that occurs when the...

Страница 16: ...OPERATION CONTINUED NOTE The Program and Repeat features on a CD G CD operate the same as with a standard CD AUTO VOCAL CONTROL Rotate the AUTO VOCAL control clockwise to suppress the vocal tracks on...

Страница 17: ...etergents or abrasive cleaners to clean the compact disc If necessary use a CD cleaning kit If a compact disc skips or gets stuck on a section of the compact disc it is probably dirty or damaged scrat...

Страница 18: ...se only high quality tapes If a problem develops check the unit first with another cassette to determine if the problem is with the cassette and not with the unit If there is any slack in the cassette...

Страница 19: ...included are to be reduced Feedback is heard Microphone is too close to unit Move microphone away from when singing or MIC volume is too high unit or decrease MIC volume Words do not appear Using non...

Страница 20: ...ptical Source Semiconductor Laser D A Conversion xx Specifications are subject to change without notice SPECIFICATIONS FOR ADDITIONAL SET UP OR OPERATING ASSISTANCE PLEASE VISIT OUR WEBSITE AT WWW MEM...

Страница 21: ...Memcorp Inc Weston FL Printed in Hong Kong Visit our website at www memorexelectronics com MKS5620 O M QXD 7 2 03 9 15 AM Page 20...

Отзывы: