Melitta Cafina XT8 Скачать руководство пользователя страница 14

5�4 

Confirming filling levels

The filling level must be confirmed at the machine each 

time a supply container is filled.

000290

Fresh water canister

Filling levels

Milk type 2

Milk type 1

Bean container 2

Bean container 1

Instant container 1

Instant container 2

1

3

2

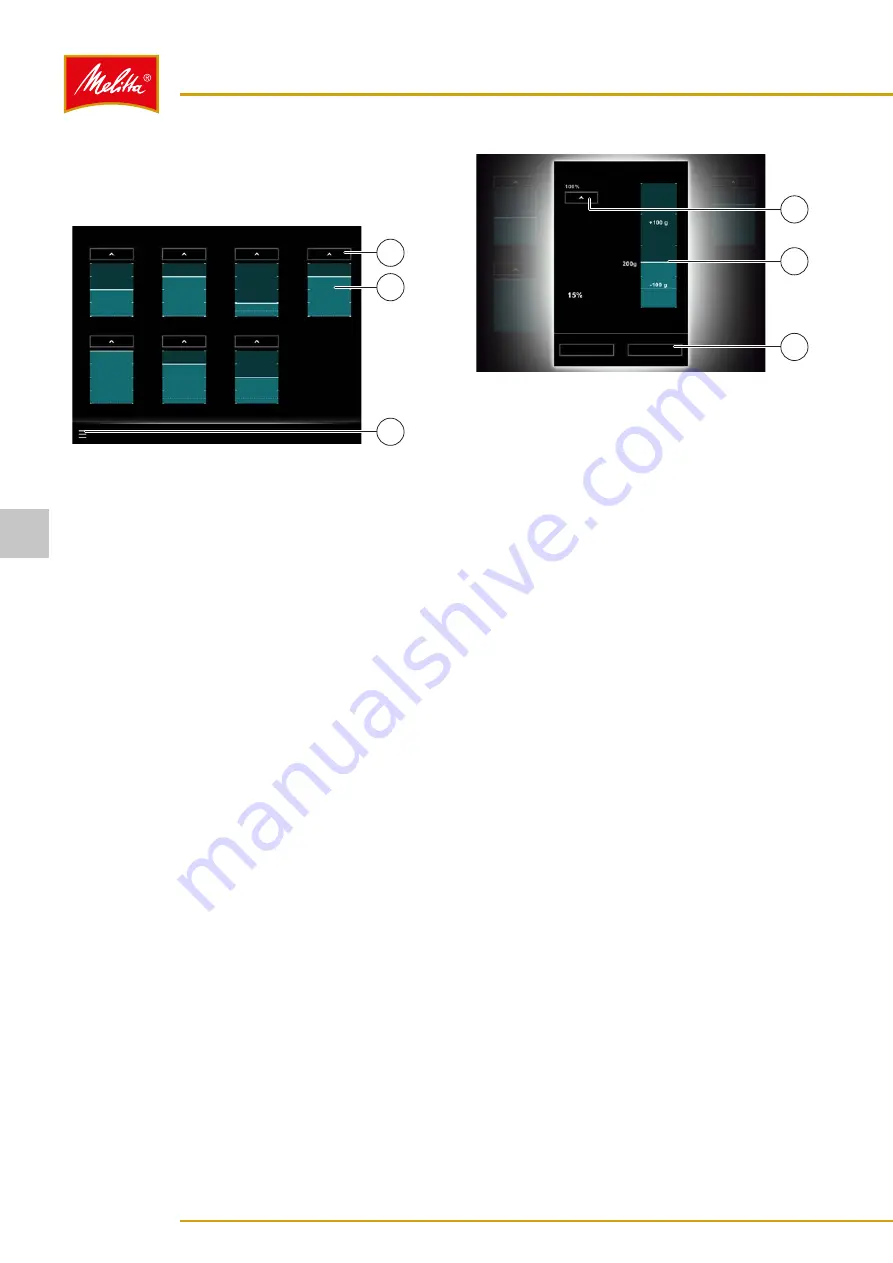
Fig. 12: Confirming filling levels

1.  On the display, press the menu symbol "

" (3) and 

then "Filling.


͵

In self-service operation, you must first log in with 

a user chip key (see chapter 5.1.4 on page 10).

2.  Press the required "

T

" button (1) above the filling 

level displays to mark the following containers as full 

(from left to right and top to bottom):


͵

Bean container 1 (front)


͵

Bean container 2 (rear)


͵

Instant container 1 (left)


͵

Instant container 2 (right)


͵

Fresh water canister


͵

Milk type 1


͵

Milk type 2


9

The filling levels have been confirmed.

To return to the start screen, proceed as follows:

• 

Self-service operation

: On the display, press the 

menu symbol "

" (3) and then "Logout".

• 

Waiter operation

: On the display, press the menu 

symbol "

" (3) and then "Selection".

You can adjust the filling levels even more accurately.

3.  Press the required filling level display, e.g., of the 

instant container 2 (2).


͵

A new window opens.

000291

Filling levels

Limit value

Designation

Apply

Cancel

Cocoa

1

3

2

Fig. 13: Adjusting filling levels more accurately

4.  Select one of the following options:

• 

Press the "

T

" button (1) to mark the container 

as full.

• 

Touch the filling level display above or below the 

bar (2) to adjust the filling level in steps.

• 

Slide the bar (2).

5.  Press the "Apply" button (3) to adopt the settings 

and return to the previous screen.


9

The filling levels have been confirmed.

If the filling level for a consumable drops below a set 

value while a product is being dispensed, a warning will 

appear on the display. If you confirm that the consum-

able has been refilled, you can then adjust the new filling 

level straight away in a similar dialog as shown in Fig. 13.

5�5 

Emptying the coffee grounds drawer

The coffee grounds drawer must be emptied if the coffee 

grounds are not disposed of via the optional container 

discharge.

When the coffee grounds drawer is full or almost full, the 

message is displayed that the grounds drawer must be 

emptied:

• 

If the coffee grounds drawer is 75 % full, only a few 

more brewing processes can be carried out.

• 

If the coffee grounds drawer is 100 % full, only 

products that do not release coffee grounds can be 

dispensed. All other products are grayed out and 

cannot be selected.

Operation

14

28514  •  20170301

5

Содержание Cafina XT8

Страница 1: ...Operating Instructions Melitta Cafina XT8 Melitta Professional Coffee Solutions...

Страница 2: ...ing a double product 19 6 8 Dispensing quick start products 19 6 9 Dispensing multiplicator products 20 6 10 Multiple dispensing of a single product 20 6 11 Batch mode 20 6 12 Preparing coffee from gr...

Страница 3: ...he original operating instructions General Safety Technical data Installation Operation Dispensing products Settings Cleaning Maintenance Recycling and disposal 3 28514 20170301 1 Chapter overview 2 3...

Страница 4: ...is not observed CAUTION Minor injuries Identifies hazards that could result in minor injuries ATTENTION Property damage Identifies the risk of possible property damage Note Identifies usage tips and...

Страница 5: ...electromagnetic compatibility the Directive on the restriction of the use of certain hazardous substances in electrical and electronic equipment and where applicable the Machinery Directive and Low V...

Страница 6: ...rk may only be carried out by Melitta customer service or by specialist personnel authorized by the manufacturer Incorrectly performed repair work can result in considerable risk to the user Theareare...

Страница 7: ...in the instructions Otherwise the safety functional reliability and durability may be impaired 3 Technical data Machine specifications Dimensions W x D x H 350 x 580 x 765 mm Weight approx 70 kg Coff...

Страница 8: ...Due to the high load a separately fused circuit is required for the machine 4 1 3 Installation location The machine is only to be installed and used in enclosed dry areas it must not be operated outdo...

Страница 9: ...ng backwards on the coupling piece Remove the plug connector from the coupling piece 2 Unscrew the lid from the canister 3 Before filling clean the fresh water canister and its lid area with standard...

Страница 10: ...ey the following options are available in waiter operation Dispensing preset products Emitting steam Switching off the machine Changing the filling levels Carrying out a full cleaning of the machine C...

Страница 11: ...achine is ready for operation Note Afterswitching on themachine thefilling levels of the supply containers must be checked If necessary the supply containers must be filled and the filling levels conf...

Страница 12: ...the bean container 2 Fill the correct beans into the corresponding bean container e g espresso beans in container 1 1 and coffee beans in container 2 2 3 Re fit the lid 9 9 The bean container has bee...

Страница 13: ...id on the instant container 6 Fill the right instant powder into the corresponding container e g cocoa Ensure that the powder is not compressed 7 Re fit the lid 8 Re fit the instant container 9 Turn t...

Страница 14: ...2 A new window opens 000291 Filling levels Limit value Designation Apply Cancel Cocoa 1 3 2 Fig 13 Adjusting filling levels more accurately 4 Select one of the following options Press the T button 1 t...

Страница 15: ...lf service operation you must first log in with a user chip key see chapter 5 1 4 on page 10 2 On the display press the Lock product choice button 9 9 Product dispensing has been locked To activate pr...

Страница 16: ...ct button with the symbol dispenses the product 3 until contact is ceased The symbol identifies a product group 2 You can select dispensing products sorted into groups by opening the specified group v...

Страница 17: ...e product is dispensed 6 5 Dispensing steam option Depending on the equipment provided the steam wand may be one of the following Basic steam wand Steam wand with Steam Control Plus CAUTION Danger of...

Страница 18: ...ete The request Blow out steam lance is shown on the display 000295 Blow out steam lance Start Close Please remove the container before starting Fig 22 Blow out steam lance 4 Position the steam wand o...

Страница 19: ...ct Press the product with the symbol 2 to dispense a single portion of the requested product Note If neither of the product buttons is pressed thenasingleportionoftheproductisdispensed automatically a...

Страница 20: ...ton on the display 3 While the product is being dispensed press multiple times in succession depending on the number of additional portions that you would like to dispense The products are prepared an...

Страница 21: ...n be added 1 Select one of the following options Once a product has been dispensed from the batch close and open the batch with the symbol in the bar 2 see Fig 27 While the product is being dispensed...

Страница 22: ...OPERATION Logout COMPONENTS Ground coffee quantity grinder 1 Usage statistics Production counter Ground coffee quantity grinder 2 Instant powder quantity 1 Instant powder quantity 2 Fig 30 Manager men...

Страница 23: ...he Create new group button 4 A new group appears on the display 2 To name the group press the button for the first or second line of the name 2 A new window opens 000162 Name selection Cancel OK Group...

Страница 24: ...the product group or product button downward 3 Sort the dispensing view Start with the last product group or product but ton at the bottom and end with the first product group or product button at the...

Страница 25: ...you want to discard the changes or whether you want to go back to save the changes 9 9 The values of the product components have been changed 7 5 2 Duplicating a product You can duplicate an existing...

Страница 26: ...a set value while a product is being dispensed a warning will appear on the display 4 The Limit value button 1 is used to set a per centage at which a warning is issued for the filling level Enter the...

Страница 27: ...ttings for the machine 7 7 1 Opening usage statistics 000253 No SELECTION PRODUCT FILTER UNIT PRODUCT OPERATION Logout COMPONENTS Ground coffee quantity grinder 1 1 Usage statistics Production counter...

Страница 28: ...selection and location Operating mode Waiter operation settings Open batch standard Allow product filter Accounting Quick start activated Off Article management Production logging 1 2 Activate weekend...

Страница 29: ...Save your changes using the Save button Otherwise you will be prompted to confirm whether you want to discard the changes or whether you want to go back to save the changes 9 9 The machine settings h...

Страница 30: ...ean damp cloth Daily 1 2 Milk and brewing system Start cleaning program Daily Instant system Clean Daily Coffee grounds drawer Clean Daily All systems parts that have been used at least once Clean wit...

Страница 31: ...water canister is filled with sufficient water and that the waste water canister is empty before you start the cleaning program 8 6 Cleaning the coffee grounds drawer The coffee grounds drawer must b...

Страница 32: ...chapter 8 8 on page 35 and then confirm that it has been fully re installed 4 First confirm Cleaning the instant system and then Instant system fully installed with the OK button 8 7 3 Cleaning the m...

Страница 33: ...agent has been added The machine starts the first automatic cleaning process The cleaning process takes a few minutes The prompt Cleaning agent milk system is then shown on the display again 000302 1...

Страница 34: ...1 see Fig 46 to confirm that the cleaning agent has been added 4 Fill a bag of AMC cleaner into the blue cleaning container 5 Insert the blue milk tube into the blue cleaning container Make sure that...

Страница 35: ...back to operational readiness mode 8 7 5 Final activities 1 Clean the dispensing area once the automatic cleaning process is complete see chapter 8 12 on page 38 2 If you want to continue using the ma...

Страница 36: ...ne of the following options Clean all parts in a dishwasher at a maximum of 60 C Clean all parts thoroughly with hot water and a cleaner suitable for milk products Rinse all parts thoroughly with clea...

Страница 37: ...y with hot water and a detergent Dishwasher cleaning is possible at max 60 C 6 Dry the parts completely 7 If you want to continue using the machine refill the beans as described in chapter 5 3 1 on pa...

Страница 38: ...ay for inputs again by touching the numbers 1 4 in the corners of the display 000304 Fig 59 Cleaning the touch screen 9 9 The touch screen has been cleaned 8 12 External cleaning Note Do not use any a...

Страница 39: ...where applicable repaired by customer service before you start using it again Incorrectly performed repair work can result in considerable risk to the user WARNING Malfunctions If there are visible si...

Страница 40: ...ofessional Coffee Solutions GmbH Co KG Zechenstr 60 32429 Minden GERMANY Phone 49 571 5049 0 Fax 49 571 5049 233 professional melitta de www melitta professional de Registered trademark of a company o...

Отзывы: