• When working metal, always wear
safety goggles!
• Do not work with damaged grinding
or cutting disks or bent shafts.
CAUTION! Always unplug before
changing bits! Before the plug is
pulled out of the socket, set the
on/off switch (1) to Off (switch
position 0) and the revolution
regulation (6) to the lowest leve
(step 08). This prevents the machine
starting up at an unintentional high
speed when the plug is plugged back
into the socket.
• To avoid hazards, damaged power
leads must be replaced by the
manufacturer or his customer service
representative.
• Hold the tool by the insulated handle
surfaces when carrying out tasks
during which is it possible that the
tool will come across hidden power
cables or its own cable. Contact with
a power-carrying cable may also put
metal parts of the unit under power
and cause an electric shock.
• The permitted revolutions of the tool
insert must be at least as high as the
highest revolutions specified on the
power tool. Accessories that rotate
faster than is permitted may break
and fly away.
7 – Installation and setting
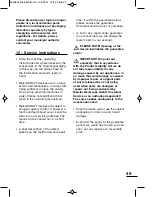
Stand (Fig. 2)
The stand consists of the bench
clamp (13) and the telescopic arm (16)
(fig. 1). Fix the bench clamp to the bench
top (max. thickness 60 mm) using the
retaining screw (14). Screw the thread of
the telescopic arm into the connecting
screw (15). For vertical attachment
positions, the connecting screw can be
placed in the hex profile (18) of the
clamp.. To loosen the parts of the
telescopic arm and the suspension
hook (17) turn them to the left. Set them
to the desired working height and fix
them in position by turning to the right.
Hang the machine on the hook (17) by
the suspension eye (7).
TIP: When working with the
flexible shaft, always hang the
machine on the stand to avoid loss of
speed through excessive flexion.
Flexible shaft (10)
CAUTION! Pull out mains plug!
Before assembling, ensure that the
machine is switched off (position O) and
the speed-control knob (6) turned to its
lowest setting (position 08).
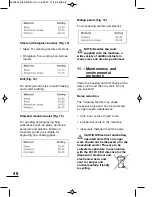
Press and hold down spindle lock (5).
Remove the grip guard (4) and the
tensioning screw of the tool holder (2)
from the machine. Select a collet
chuck (8) to fit the shaft (a) of the motor
connection (11) (fig. 3). Insert it into the
tool holder and turn the tensioning
screw loose. Insert the shaft, press and
hold the spindle lock (5) and screw the
tensioning screw tight. If necessary, use
the universal wrench. Screw the grip
guard (b) of the flexible shaft firmly onto
the machine.
Inserting tools (see Annex)
CAUTION! Switch off the
machine, turn the speed control
to the lowest setting and pull out the
power plug!
45
5450620-Kleinbohrm-man 26.02.14 12:46 Seite 45

