background image


8


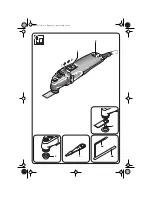
Machine Elements


 1


Switch


 2


Oscillation frequency selector


 3

Fixation element

 4

Adapter for round attachment

 5

Symbol on the cutting blade

 6

Supplied accessories
Allen key (

6a

)

Sharpening stone (

6b

)

Not all of the accessories illustrated or described are included
as standard delivery.

Intended Use

This power tool is intended for:

commercial use in industry and trade,

EMS 1.6: 

for trimming plastic beads, e. g. in the vehi-

cles sector, for cutting out elastic sealants and marble

trass joints,

EMS 2.0: 

for sawing thin sheet metal, wood and plastic

parts,  and  for  sanding  smaller  areas,  corners  and

edges, for application using the accessories given in this

instruction manual, or those recommended by Würth.
The  user  is  responsible  for  damage  caused  by  usage

other then intended.

Tool Specifications

Mounting the tool

Before any work on the machine itself, pull the
mains plug.

Always wear protective gloves.

Unscrew the fixation element

 3

.

The inner thread M 6, the drive shaft holder and the fix-

ation element must be clean.

Tighten  the  fixation  element

 3

  with  the  provided

Allen key.

For  adopting  a  comfortable  working  position  the  tool

can be fastened on the drive shaft at 30° intervals.

The sanding plate can be fastened onto the drive shaft

in any position. The adapter

 4

 is required for working

with the sanding plate.
Sharpen  the  cutting  blade  at  the  lowest  frequency

before each application with a sharpening stone. This

also applies for new cutting blades.

The cutting blades marked with a symbol

 5

 gmay

only be operated as indicated.

Starting Operation

Switching On and Off

First check that the cable and plug are not dam-

aged.

Switching on: Slide switch

 1

 forwards (

I

).

Switching off: Slide switch

 1

 backwards (

0

).

Set the oscillating frequency

Using the oscillation frequency selector

 2

, the optimum

oscillation frequency can be set according to the appli-

cation and the accessory used.

Operating Instructions

Cutting blades for the vehicles sector

The  cutting  blades  for  the  vehicles  sector  are  to  be

mounted as shown in the enclosure.
A Cutting blades, straight and curved.
B Cutting blades, bent at right angles.
C Cutting blades, U-form.
D Scraping knife.
E Scraping knife.
F Cutting blade with stop roller.
The straight, curved or cropped cutting blades must be

held at right angles to the window flange.
With  the  U-shaped  cutting  blades  make  sure  that  the

base of the cutting blade is guided parallel to the vehicle

windscreen.
The scraping knife serves for levelling out glue spots on

the window flange or windscreen. Before re-gluing the

vehicle windscreen, the remaining bead is to be levelled

to approx. 2 mm.

Maintenance and Cleaning

Before any work on the machine itself, pull the
mains plug.

Carry out the following once a week, or more often if

the power tool is used more frequently:

Clean the venting openings.

Blow out the motor space from outside with dry com-

pressed air.

EMS 1.6

EMS 2.0

Article number

0702 697 X

0702 698 X

Rated input

400 W

400 W

Output

220 W

220 W

Current type

~

~

Oscillations

11 000

18 500 /min

11 000

18 500 /min

Weight

1.25 kg

1.25 kg

Class of protection

 / II 

(Protective 

insulation)

 / II 

(Protective 

insulation)

Angle of oscillation1.6°

2.0°

EMS.book  Seite 8  Dienstag, 23. August 2005  8:38 08

Содержание EMS 1.6

Страница 1: ...eningsvejledning Bruksanvisning Käyttöohje Bruksanvisning Οδηγίε χειρισµού Kullanım kılavuzu Instrukcja obs ugi Kezelési Utasítás Návod k obsluze Návod na obsluhu Instrucøiuni de utilizare Navodila za uporabo Ръководство на потребителя Kasutusjuhend Vartojimo informacijà EkspluatÇcijas instrukcija Руководство по эксплуатации EMS book Seite 1 Dienstag 23 August 2005 8 38 08 ...

Страница 2: ... LV RUS D GB I F E P NL DK N FIN S GR TR 4 6 7 9 10 12 13 15 16 18 19 21 22 24 25 27 28 30 31 33 34 36 37 39 40 42 43 45 46 48 49 51 52 54 55 57 58 60 61 63 64 66 67 69 70 72 73 75 EMS book Seite 2 Dienstag 23 August 2005 8 38 08 ...

Страница 3: ...o h n e L a s t n o lo a d v it e s s e v id e a it t o o ls m a x P o s 3 1 2 3 4 5 6a 6b EMS book Seite 4 Dienstag 23 August 2005 8 38 08 ...

Страница 4: ...us arbeiten Sie nur mit scharfen Messern wählen Sie die Schwingfrequenz entsprechend den Würth Angaben Resonanzen vermeiden nehmen Sie an Schulungen zum Aneignen richti ger Arbeitstechniken teil Werden diese Empfehlungen nicht befolgt können bei täglichen Arbeiten mit hohen Vibrationswerten über einen längeren Zeitraum gesundheitliche Beeinträchtigungen auftreten Durchblutungsstörungen in den Händ...

Страница 5: ...ter 4 erforderlich Messer vor jedem Einsatz mit Schärfstein bei niedrigster Schwingfrequenz schärfen Gilt auch für neue Messer Die mit einem Symbol 5 gekennzeichneten Schneidmesser dürfen nur wie gekennzeichnet betrieben werden Inbetriebnahme Ein Ausschalten Zuerst Kabel und Stecker auf Beschädigungen prüfen Einschalten Schalter 1 nach vorne schieben I Ausschalten Schalter 1 nach hinten schieben 0...

Страница 6: ...ertung zugeführt werden Nur für EU Länder Werfen Sie Elektrowerkzeuge nicht in den Hausmüll Gemäß der Europäischen Richtlinie 2002 96 EG über Elektro und Elek tronik Altgeräte und ihrer Umsetzung in nationales Recht müssen nicht mehr gebrauchsfähige Elektrowerkzeuge getrennt gesammelt und einer umweltgerechten Wiederverwertung zugeführt werden Gewährleistung Für dieses Würth Gerät bieten wir eine ...

Страница 7: ...des select the oscillation frequency according to the Würth instructions avoid any resonance take part in the training programs for learning how to adopt the correct working techniques If these recommendations are not observed high vibration values that persist during daily work over a longer period of time can be detrimental to health Disturbed circulation in the hands Symptoms white finger tips ...

Страница 8: ... only be operated as indicated Starting Operation Switching On and Off First check that the cable and plug are not dam aged Switching on Slide switch 1 forwards I Switching off Slide switch 1 backwards 0 Set the oscillating frequency Using the oscillation frequency selector 2 the optimum oscillation frequency can be set according to the appli cation and the accessory used Operating Instructions Cu...

Страница 9: ...ing Only for EC countries Do not dispose of power tools into household waste According to the European Directive 2002 96 EC on waste electrical and electronic equipment and its incorpora tion into national law power tools that are no longer suitable for use must be separately col lected and sent for recovery in an environmen tal friendly manner Warranty For this Würth tool we provide a warranty in...

Страница 10: ...tto lavorare solo con lame taglienti scegliere la frequenza delle oscillazioni secondo le indicazioni Würth ed evitando risonanze partecipare a corsi di addestramento per apprendere le corrette tecniche operative In caso di mancata osservanza delle presenti indica zioni è possibile che lavorando con alti valori di vibrazione per periodi più lunghi nel corso dei lavori giornalieri si vengano a crea...

Страница 11: ... alla più bassa frequenza delle oscillazioni Vale anche per nuove lame Le lame contrassegnate con un simbolo 5 pos sono essere utilizzate esclusivamente per l impiego previsto Messa in servizio Avvio arresto Prima dell avviamento controllare l integrità del cavo e della spina Avvio Spingere l interruttore 1 in avanti I Arresto Spingere l interruttore 1 all indietro 0 Regolare la frequenza delle os...

Страница 12: ...accessori dismessi Solo per i Paesi della CE Non gettare elettroutensili dismessi tra i rifiuti domestici Conformemente alla norma della direttiva CE 2002 96 sui rifiuti di apparecchia ture elettriche ed elettroniche RAEE ed all attuazione del recepimento nel diritto nazionale gli elettroutensili diventati inservibili devono essere raccolti separatamente ed essere inviati ad una riu tilizzazione e...

Отзывы: