background image

ISLAND HOOD ASSEMBLY

Please follow below instructions.

Installation  of  ceiling  connection  plate  :

Front  sticker  (figure  3)  on  ceiling  connection 
plate and control panel of chimney hood should 
have the same direction.

1)Drill  10mm  holes  from  A,B,C,D  points.
2)Drive  10mm  wall  plugs  in  to  A,B,C,D  holes.
3)Fix ceiling connection plate to ceiling by using 
4 screws (5,5 x 45).Wall plugs,screws and celing 
connection plate are given with chimney hood. 
Picture 3

A

B

C

D

FRONT

ceiling 

connection plate

Hanging 

hole 

Front bracket connection, 
left and right up front 

Back bracket connection, 
up-front

FRONT

Assembly 
bracket

Assemblying 

front surface of 

body 

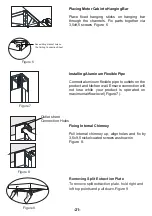
Installation of chimneys to motor cabinet:

Please put internal chimney in extarnal 
chimney.For temporary connection between 
chimneys please use a screw on motor 
cabinet.(So chimneys won't drop while you 
install motor cabinet to ceiling connection 
plate.)Mount the chimneys on this 
screw.(Screw holes of internal chimney should 
befit the side of motor cabinet.) Figure 5

Installation of cornerpieces: 

Front sticker(picture 4) shows where front side 
of chimney hood should be installed.Front 
cornerpieces should be left and right 
directions.Back cornerpieces should be 
extroverted.Screw 4 cornerpieces to motor 
block.Hanging bar should have same directions 
with ceiling connection plate.Regulating the 
legth of chimney hood with these cornerpieces. 
Figure 4

Figure 3

Figure 4

Figure 5

-20-

Содержание MEI 190 XN

Страница 1: ...Modelo MANUAL DE UTILIZADOR MEI 190 XN ...

Страница 2: ...esentação do produto 1 Chaminé Exterior 2 Chaminé Interior 3 Painel de controlo 4 Filtro de alumínio 5 Iluminação 6 Vidro temperado 1 2 3 4 5 900 660 29 5 470 475 20 80 50 280 270 Min 500 Max 955 6 MEI 190 XN ...

Страница 3: ...tipo hermético Quando a conexão da chaminé for aplicada ao seu produto use condutas de 150mm ou 120mm de diâmetro Deve ser o mais curta possível e sem curvas Este produto está destinado a uso doméstico O seu produto usa voltagem de 220 240V 50Hz O fio terra é usado na ligação eléctrica do p r o d u t o E s t e c a b o d e v e s e r definitivamente ligado a uma tomada segura Todas as ligações devem...

Страница 4: ...a caixa original Transporte o produto na caixa original cumpra com os sinais Se não houver embalagem original Não ponha material pesado na chaminé Mantenha a superfície exterior protegida Embale os seus produtos para evitar danos Instalação retire o produto da embalagem Verifique que não existe nenhuma deformação no produto Danos no transporte deves ser imediatamente reportados ao transportador Se...

Страница 5: ...a ou pelo menos 75cm se tiver placa de gás Figura 2 Instalação retire o produto da embalagem Verifique que não existe nenhuma deformação no produto Danos no transporte deves ser imediatamente reportados ao transportador Se notar algum dano reporte ao vendedor Não deixe as crianças brincarem com o material de embalar Figure 1 Electrich hobs 65 cm Gas hobs 75 cm Min 65 cm Min 75 cm Figura 2 5 ...

Страница 6: ... com os 4 parafusos 5 5x4 5 Figura 3 A B C D FRONT Chapa de conexão ao tecto Buraco apoiante braços traseiros braços dianteiros FRONT Assembly bracket Assemblying front surface of body Instalação da chaminé na cabine do motor Coloque a chaminé interna na chaminé externa Monte a chaminé nos parafusos de ligação à cabine do motor Figura 5 Instalação dos braços A parte frontal mostra onde está a fren...

Страница 7: ...xível de alumínio nas saídas de ar do produto Verifique se não se soltam em funcionamento Figura 7 Fixação da Chaminé Interna Puxe a chaminé interna para cima alinhe os buracos e fixe os parafusos de niquel 3 5x9 5 como na figura 8 Conexão de saída de ar Figura 6 Figura 7 Figura 8 Remover a Placa de Extracção Perimetral Para remover a placa de extracção perimetral segure nos pontos extremos e puxe...

Страница 8: ...co do gancho Fazer conexões Conecte a tomada de 220V Coloque os filtros de alumínio de seguida Figura 11 Conexão de tomada 220 Conexão de motor Figura 10 Figura 11 Ligação principal Após a montagem faça as conexões como mostra a imagem para activar o painel de controlo Para ligar primeiro abra as pinças Feche as no final da conexão Figura 11a Figura 11a 8 ...

Страница 9: ...o O seu exaustor é compatível com ou sem chaminé O produto deve estar ligado a uma chaminé que vai levar o ar directamente para o exterior Para uma melhor performance presta atenção à conducta de instalação que quanto mais curta melhor Atenção A saída de ar não deve estar ligada a outros canais de ar que possuam fumo também Figura 12 9 ...

Страница 10: ...motor e gire o no sentido do relógio Para remover faça o inverso Figura 13 Subsituir os Filtros de Carbono Desligue o aparelho da tomada antes Os filtros de carbono devem ser mudados de cada 3 5meses e devem ser usados em cozinhas sem ventilação Figura 13 Mudar os Filtros Para mudar os filtros puxe o na sua direcção Figura 14 Figura 14 10 ...

Страница 11: ... disponível em modelos com controlo electrónico Quando o botão é premido por mais de 2 segundos o temporizador liga se por 15 min O motor para automaticamente após 15 min Períodos de Limpeza dos Filtros deAlumínio Os filtros devem ser limpos quando o C aparecer no display de cada 2 3 semanas De forma ao C desaparecer prima o botão por mais de 3 segundos quando o aparelho está na posição off A letr...

Страница 12: ...lcool Evite o contacto de água nas partes electrónicas Use produtos de limpeza de inox disponíveis no mercado Aviso Os filtros de alumínio podem ser lavados no lava loiças Após algumas lavagens pode mudar a sua cor É normal não tem de os trocar Ventilação eficiente Para assegurar uma correcta ventilação mantenha a janela da cozinha fechada NOTAIMPORTANTE Por favor tome atenção quando o produto ope...

Страница 13: ...ão da lâmpada Deve estar posicionada em On Verifique o filtro de alumínio O filtro de alumínio deve ser lavado uma vez por mês Verifique as lâmpadas As lâmpadas devem estar firmes Verifique a saída de ar Verifique os filtros de carbono Devem ser substituídos em cada 2 3 meses O exaustor não funciona A iluminação não funciona A extracção do exaustor está fraca O exaustor não extrai o ar correctamen...

Страница 14: ...5 LAMP BLACK GREY YELLOW WHITE BLUE BROWN RED GREY GREY BROWN YELLOW GREEN BLUE WHITE WHITE ELECTRONIC CIRCUIT BUTTON BOX TRANSFORMER 12 V WHITE WHITE LAMP 12 V 220 V ESPECIFICAÇÕES TÉCNICAS Voltagem 220 240 V 50Hz Classe Isoladora do Motor Classe Isoladora F CLASS I 14 ...

Страница 15: ...MEI 190 XN INSTRUCTIONS MANUAL CHIMNEY HOOD ISLAND ...

Страница 16: ...DUCTION OF DEVICE 1 2 3 4 5 6 External Chimney Internal Chimney Control Panel Aluminum Cassette Filter Cooker Lighting Tempered Glass 1 2 3 4 5 900 660 29 5 470 475 20 80 50 280 270 Min 500 Max 955 6 4250 16 ...

Страница 17: ... is applied to your product use ducts of 150mm or 120mm diameter Duct connection should be as short as possible and should include few bends This product is designed for usage at home Your products usage voltage is 220 240 Volts 50Hz Grounded plug is used at your product s electric network cable This cable should definitely be plugged in a grounded socket All electrical networks should be set by a...

Страница 18: ...s on the product s box If there is no original package Do not put heavy material on the chimney hood Keep the external surface from bash Pack your product to avoid damages Installation taking off your product from its package Check if there is any deformation on your product Transportation damages and failures should immediately be reported to the transportation responsible If you notice any damag...

Страница 19: ... your product Transportation damages and failures should immediately be reported to the transportation responsible If you notice any damage please report to the seller Do not allow children to play with packing material Figure 1 UNPACKING THE DEVICE Check your device for any deformation Defects due to transportation must immediately be reported to the transportation agent Faults detected must also...

Страница 20: ...semblying front surface of body Installation of chimneys to motor cabinet Please put internal chimney in extarnal chimney For temporary connection between chimneys please use a screw on motor cabinet So chimneys won t drop while you install motor cabinet to ceiling connection plate Mount the chimneys on this screw Screw holes of internal chimney should befit the side of motor cabinet Figure 5 Inst...

Страница 21: ...ble pipe to outlets on the product and kitchen wall Ensure connection will not lose while your product is operated on maximum airflow level Figure 7 Fixing Internal Chimney Pull internal chimney up align holes and fix by 3 5x9 5 nickel coated screws as shown in Figure 8 Outlet sheet Connection Holes Figure 6 Figure 7 Figure 8 Removing Split Extraction Plate To remove split extraction plate hold ri...

Страница 22: ...nect 220V power supply socket with corresponding motor socket Place aluminum cassette filters when connections are done Figure 11 220 Power Cord Socket Connection Motor Socket Connection Figure 10 Figure 11 Key connection Upon mounting make conections as shown in Picture to activate use of control panel For connection first set latches outwards Latches shall be locked once connection is made Figur...

Страница 23: ... heat that will occur when the lamp is on Functions of the Product Your hood is compatible for use with our without chimney Usage with chimney The product should be connected to a chimney that will direct the air out during usage with chimney In order to achieve best performance pay attention that the duct system follows the shortest way for connection to the chimney Your product is produced as it...

Страница 24: ...3 Replacing Carbon Filters Unplug product s power cord before changing carbon filter Carbon filters should be replaced in every 3 5 months as product is operated in kitchens with no air outlet You should use oil aluminum cassette filter all the times with our without carbon filter Figure 13 ChangingAluminum Cassette Carbon Filter In order to take the carbon filter off pull it towards yourself hold...

Страница 25: ... air suction power will be affected positively We recommend you to operate your product for few minutes more after the cooking is completed to enable absorption rest of smell and steam Cleaning Periods of theAluminum Filters Filters should be cleaned when C signal appears on Display or according to usage each 2 3 weeks In order to remove C signal after the filters are cleaned and replaced to their...

Страница 26: ... Inox cleaning and maintenance products available in the market will help your product to perform longer Warning Aluminum filters may be washed in the dishwasher Color of aluminum filters may change after several washings This is normal and it is not necessary to change the filters Efficient Ventilation In order to ensure correct ventilation keep your kitchen windows closed IMPORTANT NOTE Please p...

Страница 27: ...filter Aluminum Cassette Filter should be washed once a month at normal conditions Check lamps Lamps should be firm Check outlet Outlet should be open Check Carbon Filter Carbon filter should be replaced with a new one each 2 3 months at the models with Carbon Filter at normal conditions Cooker hood does not work Illumination Lamp does not work Cooker hoods air suction is weak Cooker hood does not...

Страница 28: ...MP BLACK GREY YELLOW WHITE BLUE BROWN RED GREY GREY BROWN YELLOW GREEN BLUE WHITE WHITE ELECTRONIC CIRCUIT BUTTON BOX TRANSFORMER 12 V WHITE WHITE LAMP 12 V 220 V TECHNICAL SPECIFICATIONS Feeding Voltage 220 240 V 50Hz Motor Isolation Class Isolation Class F CLASS I 28 ...

Отзывы: