background image

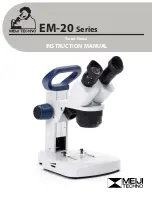
EM-20 

Series

Turret Stereo

INSTRUCTION MANUAL

Construction of the Microscope

The names of the several parts are listed below and 

are indicated in the picture on the next page:

A) Eyeshade 

B)  Diopter adjustment 

C)  Revolver (objective changer)

D)  Illumination adjustment 

E)  Object clip 

F)  Stage plate   

G)  Stand foot with built-in illumination 

H) Pillar

I)  On/off switch

J)  Incident illumination

K)  Focusing knob

L) Handle

M)  Prism housing

N)  Widefield eyepiece

Содержание EM-20 Series

Страница 1: ...EM 20 Series Turret Stereo INSTRUCTION MANUAL...

Страница 2: ...ereo INSTRUCTION MANUAL Table of Contents 1 Introduction 2 3 Construction of the microscope 4 5 Functions of the microscope 6 Preparing the microscope for use 7 9 Working with the microscope 10 11 Mai...

Страница 3: ...focus them simultaneously on the object Each tube has prisms achromatic objectives and a widefield eyepiece in order to obtain a large flat field of view Both eyes are looking at the object under a di...

Страница 4: ...elow and are indicated in the picture on the next page A Eyeshade B Diopter adjustment C Revolver objective changer D Illumination adjustment E Object clip F Stage plate G Stand foot with built in ill...

Страница 5: ...EM 20 Series Turret Stereo INSTRUCTION MANUAL A B C D E F G H I K L N M I...

Страница 6: ...a small screw Object stage The EM 20 stereo microscopes are equipped with an transparent object stage and 2 object clips All models have a transmitted and a incident LED illumination Focusing With the...

Страница 7: ...lluminators can be adjusted in intensity and both illuminations can be used simultaneously With the switch I the illuminations can be switch IN and OUT Tension adjustment When the system lowers itself...

Страница 8: ...s packing and put it on a firm stable table Insert the plug of the power supply adapter into the mains supply and switch on the illumination with the On off switch I and place the eyeshades onto the e...

Страница 9: ...ther until one round image is seen with both eyes Focus the specimen by means of the focusing knobs K on both sides of the holder For normal observation both tubes should have the same length but to a...

Страница 10: ...n this does not help put a drop of xylol or alcohol on the lens paper Never put xylol or alcohol directly on the lens When dirt is clearly visible in the field of view it resides on the lowest lens of...

Страница 11: ...ger to the mains supply The first charging will take about 20 hours to reach full capacity Exchanging the batteries Caution Always remove the power adapter from the mains supply before changing the bu...

Отзывы: