background image

5

Record

System

Return

Display

Mute

Pause

Rotate

Power

OK

CR-39

Source

Quality

Edit

Zoom

1

5

4

8

11
14

16

18

21
19

2
3
6
7
9

12

10

13
15

17

20

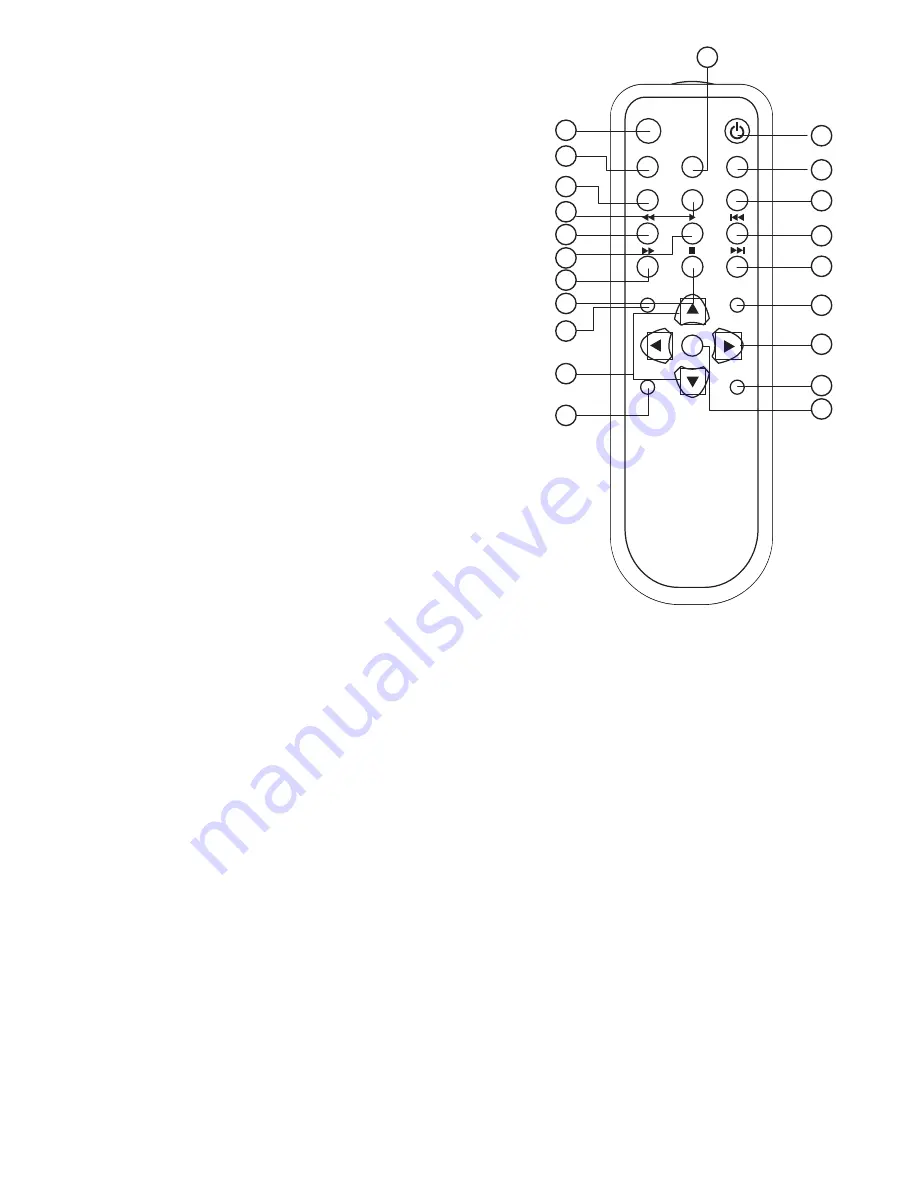
4. Overview of the Remote Control

1. Power: 

    Switch CSC-M4 on or off.

2. Source: 

    Choose AV/YUV/SV/USB mode.

3. Quality: 

    Choose the recording quality HQ/SP/LP.

4. Edit: 

    Edit the file name, delete the file or Play mode.

5. Zoom:

    Simultaneous press to increase/ decrease the 

    picture/ movie size or switch off the zoom size.

6. Record: 

    Record the AV signal to USB device.

7. Pause : 

    Pause current process at the first press; go on 

    step by step at the subsequent process.

8. Rotate: 

      Photo rotate 90°/180°/270°/360°.

9.  ▲ ▲  : 

    Fast Backward, Simultaneous press it to 

    increase the fast-backward speed: x2, x4, x8, x20.

10. 

      Play the selected multimedia file.

11. 

▲ ▲  : 

      Return to the previous page.

12. 

▲ ▲

    Simultaneous press it to increase the fast-forward speed: x2, x4, x8, x20.

13. 

 : 

      Stop playing the file and return to the previous page.

14. 

▲ ▲

      Jump to next selection.

15. System: 

      Enter into the system menu.

16. Mute: 

      Press to mute the audio.

17. ▲/▼: 

      Move the highlight rectangle up or down. 

18.  ▲/

      Move the highlight rectangle left or right.

19. OK: 

      Confirm the selection.

20. Return: 

      Return to the previous state.

21. Display: 

      Display media information.

Содержание CSD-M4

Страница 1: ...1 Personal Video Recorder Operation Manual CSD M4...

Страница 2: ...guarantee is given to the correctness of the contents The information in this document is subject to change without notice Safety information Do not disassemble the SD Video Recorder Touching the pro...

Страница 3: ...D Utility 7 2 1 Format 7 3 Setup 7 3 1 System 7 3 1 1 TV System 7 3 1 2 Screen Saver 7 3 1 3 System Language 7 3 1 4 Time Format 7 3 1 5 Set Date 7 3 1 6 Set Time 7 3 1 7 Reset Setting 7 3 2 A V Set 7...

Страница 4: ...res Supports OSD On Screen Display menu operation Supports USB HDD or USB Flash drive FAT32 file system is supported but excepted NTFS High speed USB devices USB1 1 are recommended for a good record q...

Страница 5: ...Pause current process at the first press go on step by step at the subsequent process 8 Rotate Photo rotate 90 180 270 360 9 Fast Backward Simultaneous press it to increase the fast backward speed x2...

Страница 6: ...ch for a USB Flash HDD device If there is no connected USB device the screen remains to display NO USB Device Please Insert You can press the SOURCE key to select another source in On the other hand i...

Страница 7: ...guage Press to select language Press OK to confirm the selection 7 1 1 1 TV Type Press to select display type There is PS 4 3 LB 4 3 and 16 9 PS 4 3 means 4 3 Pan Scan LB 4 3 means 4 3 Letter Box Pres...

Страница 8: ...to confirm the selection after confirm the Format selection the CSD M4 will erase all data on USB HDD device and re create a FAT file system Select No to return to the format selection Select Yes to f...

Страница 9: ...isplay type Press OK to confirm the selection 7 3 1 System Press to select the system setup Press OK to confirm the selection 7 3 1 1 TV System Press to select the system setup NTSC or PAL system Pres...

Страница 10: ...e screen saver Press OK to confirm the selection 7 3 1 3 System Language Press to select the language format or return Press OK to confirm the selection 7 3 1 4 Time Format Press to select the display...

Страница 11: ...tem date Press OK to confirm the selection 7 3 1 7 Reset Setting Press OK to rest the system back to the factory setting 7 3 2 A V Set Press to select A V setup 7 3 1 6 Set Time Press to set system ti...

Страница 12: ...ress OK to confirm the selection 7 3 2 2 TV Type Press to select display type There are PS 4 3 LB 4 3 and 16 9 PS 4 3 means 4 3 Pan Scan LB 4 3 means 4 3 Letter Box Press OK to confirm the selection 7...

Страница 13: ...ace to rename the selected file Delete Delete the selected file Press OK to confirm 7 5 Instant Rec Press to select record type Source Input AV YUV S Video Target Save USB Quality HQ SP LP Mode Save M...

Страница 14: ...making this connection ensure you connect the video audio cables to the corresponding video audio input terminals on the CSD M4 Connect to the S video and audio output terminals from other video equi...

Страница 15: ...S Video x 1 Video x1 Audio R L x 1 Power Supply 5V 2 6A DC US EU standards CE FCC UL certi Remote Control Discrete IR remote Chassis Material Metal with Plastic Silk Skin Color White with Black Opera...

Страница 16: ...place the remote control batteries No Picture A V connection may be loose Check that the A V cables are connected securely Incorrect TV source is selected Make sure that the correct input source is se...

Отзывы: