background image

Camera Mode and Instructions


27

English

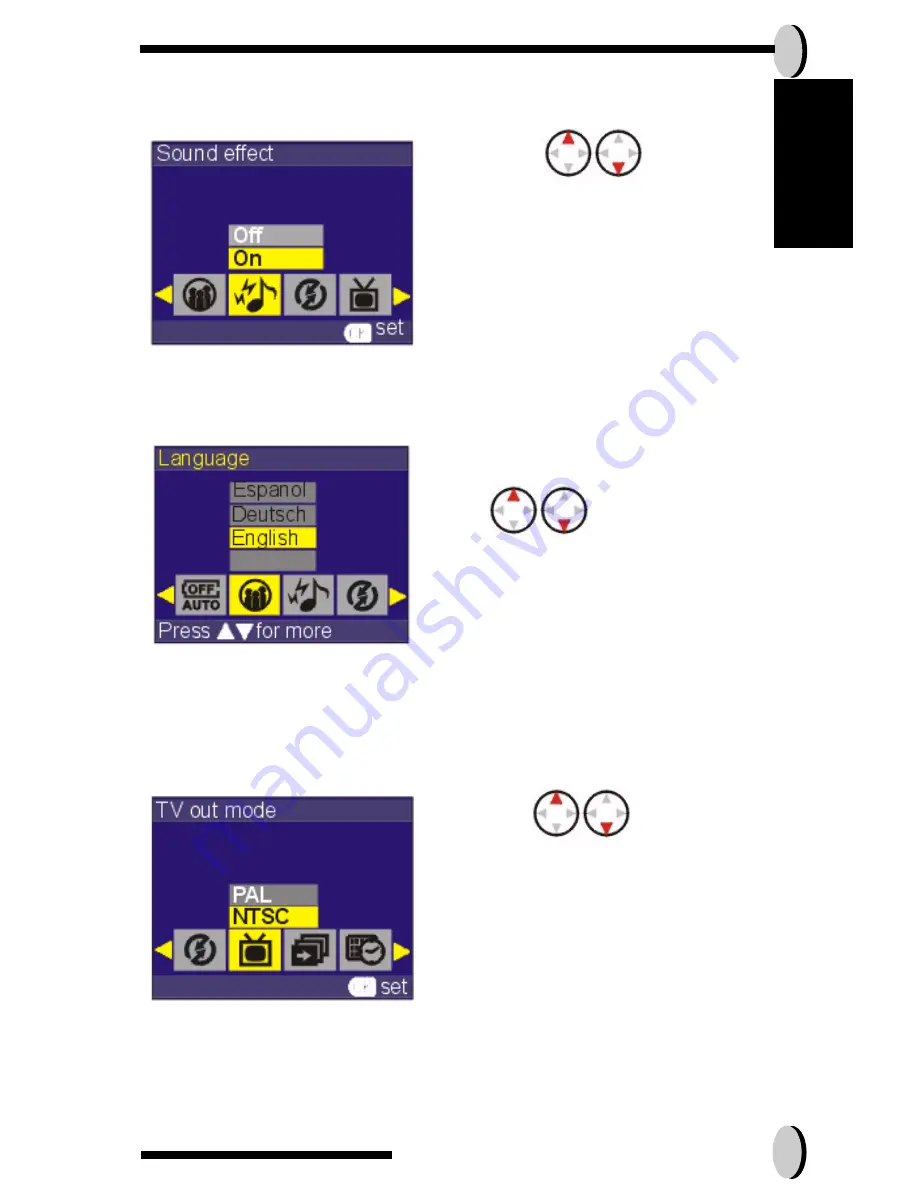
To set the SOUND EFFECT:

This setting will allow users to set the sound effect for the camera. .

To set LANGUAGES:

There are a total of nine languages you can choose to navigate this camera.

To set the TV OUT: (Optional)

Depending on where your location, different region requires different system 

for TV-out function.Please use your docking station to set the TV-out. Fix your 

camera on the docking station, and set the appropriate setting. .

1. Press the                     button to  

turn the sound ON or OFF.

2. Press OK to access the setting.

1.To select your desired language, 

press

2.Push the OK button when you are done

1. Press the                   button to select

either PAL or NTSC.

2. Press OK when you are done.

Содержание TX410

Страница 1: ...digital camera but it can also be used in record ing short movies PC connection and TV out output functions which will allow pictures and movie viewing on either your PC or TV With a fixed focus the...

Страница 2: ...atting the SD Card 12 Connecting to your Docking station optional 13 Changing the Optional Face Plate 14 Turning the Camera ON OFF 14 Camera Mode and Instructions 13 CAPTURE MODE 14 Shooting images 15...

Страница 3: ...e show order 26 To set the SOUND EFFECT 27 To set LANGUAGES 27 To set the TV OUT Optional 27 To set the PC MODE PC cam 28 To set the frequency 28 Restoring 28 Making Connections 31 Installing software...

Страница 4: ...a From this section you will learn how to turn the camera ON and OFF shoot pictures Zooming In and Out set your Flash and Playback your pictures BASIC SHOOTING 1 Turn the mode dial 3 When you are set...

Страница 5: ...e the zoom in or out button is pressed NOTE 4 x digital zoom are all supported In PLAYBACK Mode 1 Slide the rim of the lens to the direction of the macro icon 2 Proceed as you would when SHOOTING IMAG...

Страница 6: ...Quick Start 7 English Flash Setting Please Refer to CAPTURE MODE page 14 Playback Please Refer back to Playback Mode page 20 Resolution Digital Zoom 4 0 M 2 x 3 1 M 2 x 2 0 M 2 x 1 3 M 2 x VGA 4 x...

Страница 7: ...se steps and you ll be on your way to infinite boundaries Unpacking the camera 1 Clear all items from the box It is highly recommended that the box and wrappings are kept for future usage 2 Double che...

Страница 8: ...Viewfinder Power Flash LED Zoom Button Five way Switch Docking Connector TFT LCD Display Button USB Connector Shutter Mode Dial Interchangeable Face Plate Power Switch Flash Lens Viewfinder Two steps...

Страница 9: ...ce all installed batteries at the same time and keep batter way from heat 4 To abandon batteries please refer to index of battery manufacturer 6 Do not mix battery types or it may cause a fire or expl...

Страница 10: ...the SD Card from the camera To format pro ceed with the following steps 1 Turn the Mode Dial to Playback Mode 2 Press the OK button to enter Playback Function Mode 3 Press the five way switch button t...

Страница 11: ...hen you dock the camera into the docking station the camera will automat ically turn OFF The docking station will detect the battery status If the battery is in its low state docking will start chargi...

Страница 12: ...ON OFF 1 Slide and remove the face plate 2 Affix the new face plate and slide it back until you hear a click 1 Locate the power slide switch on top of the camera 2 To turn the camera ON or OFF slide t...

Страница 13: ...Page Capture Mode 1 Color effect setting 2 White Balance setting 3 Resolution setting 4 Image quality setting 5 EV adjust setting Page 14 Playback Mode 1 File protection setting 2 File erase setting 3...

Страница 14: ...ings accordingly NOTE 1 To turn on the LCD Display simply press the Display Button To save your batteries it is best to not leave your display ON for a long period of time Resolution Picture Quality E...

Страница 15: ...this function If not press the display button to exit 6 Self timer can be combined with Capture mode simply set it before you press the shutter button FLASH Setting 1 To use or set the Flash press th...

Страница 16: ...ture Mode 2 To enter Capture Mode Setup press the OK button To exit Capture Mode Setup press the display button 3 Once you are in the Capture Mode Setup you will be able to adjust the fol lowing setti...

Страница 17: ...3 M 2 0 M 3 1 M or 4 0 M Image Quality The quality of the picture Users can select from Best Default Better and Basic EV Adjust The exposure is the actual exposure of the digital cameras sensor to li...

Страница 18: ...ures 3 1 M S About 14 pictures 2 0 M About 20 pictures 1 3 M About 30 pictures VGA About 140 pictures 1 Press the up or button to select your desired light source 2 Press the right button to exit Whit...

Страница 19: ...age Quality To set EV Adjust 1 Press the up or down button to select your desired image quality 2 Press the right button to exit Image Quality 1 Press the up or down button to select your desired brig...

Страница 20: ...right button to select the following settings 4 Press display button to exit the setting menu File Erase Erasing options for your pictures File Protection Protection setting for your pictures against...

Страница 21: ...rinters compatible with the SD card 1 Press the up or down button to select the following File Protection Setting 2 Once you are set press the OK button and a confirmation icon will appear on the LCD...

Страница 22: ...down button to select the following options within DPOF Copy Date and File No 2 Once you ve selected Copy press OK to enter the Copy setting 3 Press the up and down button to select the number of cop...

Страница 23: ...y images to standard size 5 Press the left or right button to view other images DIGITAL ZOOM DISPLAY The camera has 4x digital zoom Press the display button to quit Digital Zoom Display selected image...

Страница 24: ...mory is sufficient to record a movie If the memory is full a warning sign will display on the LCD and will automatically exit the movie recording state 3 If the camera does not show any message about...

Страница 25: ...play 3 Select the type of setup you want to perform by pushing the left or right but ton on the joystick switch To set the DATE and TIME You can set the date and time in three different format NOTE Pr...

Страница 26: ...ing its first 3 minutes and so forth To set slide show order Under this setting you will be able to adjust the play time for each image The options are 1 3 or 5 seconds 1 Press to change the time form...

Страница 27: ...Depending on where your location different region requires different system for TV out function Please use your docking station to set the TV out Fix your camera on the docking station and set the app...

Страница 28: ...camera Users have the option of choosing from 50 HZ and 60 HZ Restoring 1 Press the button to select the DSC or PC CAM 2 Press OK when you are done With DSC Mode images can only be copied from your ca...

Страница 29: ...camera to your PC to down load edit photo use camera as PC cam This softare is compatible with any MAC OS 9 1 or higher Installing software in autorun CD Driver Direct X Arcsoft photo impression For...

Страница 30: ...informs you the completion Viewing images on your TV optional Before you proceed please determine your corresponding TV Out mode 1 Turn the camera off 2 Connect the video cable into the docking stati...

Страница 31: ...refer to DSC Setup Mode page xxx 1 Turn the computer ON 2 Connect the camera and the computer with the USB port cable 3 Turn the camera ON 4 Launch Image Impression the inclusive software which you h...

Страница 32: ...era allows users to move the images or movies from camera to PC by MSDC support 3 When the camera is connected to your PC there will be an external storage under My computer named 200_CAMERA 4 Simply...

Страница 33: ...ory 16MB NAND Flash Memory EstimatedNumber of storable pictures Compression ratio 1 8 16MB SD card 4 0M S 10 pictures 3 0M S 14 pictures 2 1M 20 pictures 1 3M 30 pictures VGA 140 pictures Movie mode d...

Страница 34: ...apter optional 5 V 2A Docking interface Optional Mini USB TV Out through docking DC In through docking Dimension WxHxD 105x52x36 mm Weight 120 g without batteries System requirements Windows Win98 Win...

Страница 35: ...sh Battery Power Status Summary of Warning Messages 1 Memory Full 2 Battery Low 3 Protect one all 4 Unprotect one all 5 Delete 6 Format SD Card 7 Format Internal Memory 8 Restore Factory Setting Full...

Отзывы: