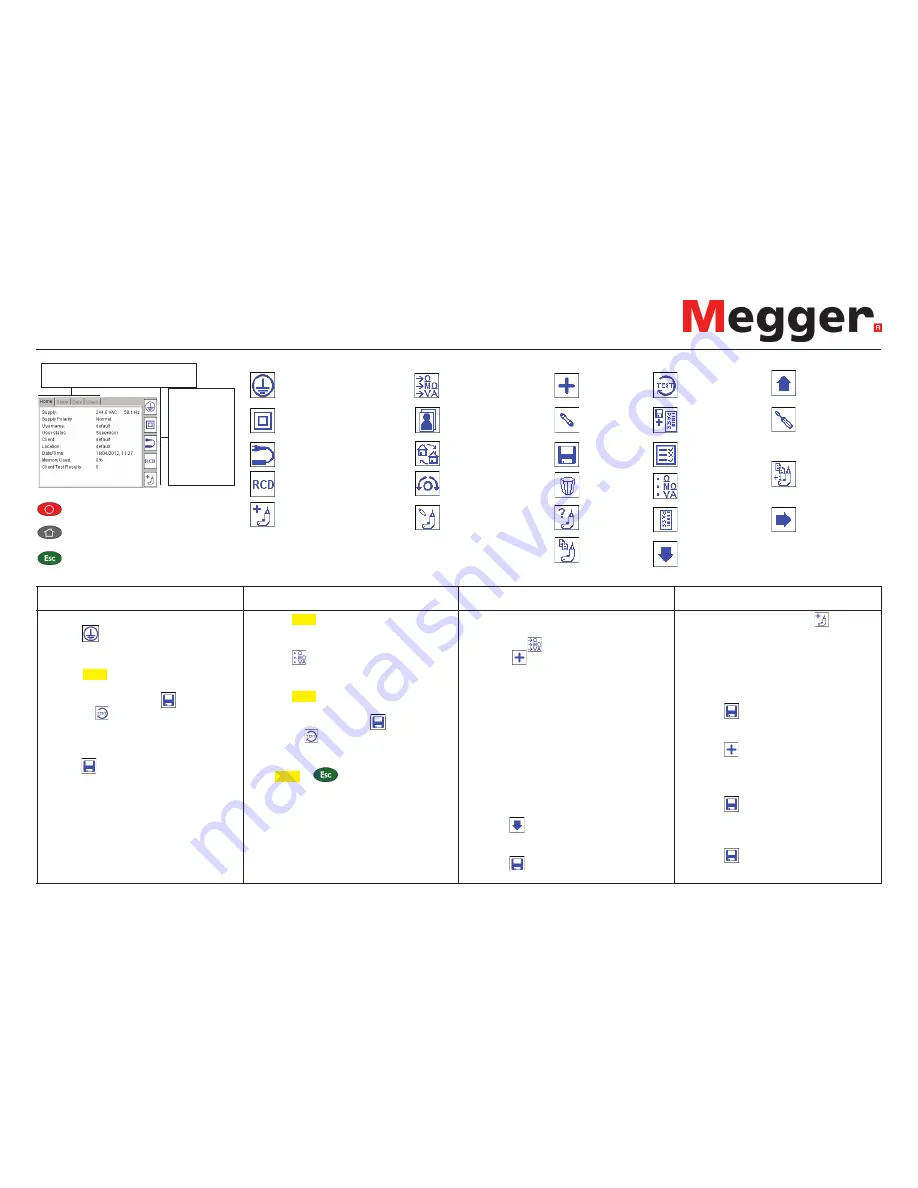
Testing using HOTKEYS to start test
1) From
HOME
screen.
2) Press
for Class I test group options
3) Press 1,2,3 etc to select from available
test groups.
4) Press
TEST
button to start test.
5) Follow screen instructions.
6) At end of testing press
to
SAVE
or press
to repeat test.
7) Display changes to
ADD ASSET
screen
8) Add a new
ASSET ID
.
9) Add additional data if required (optional)
10) Press
to store result.
11) If the
ASSET ID
was added before
testing, the result will automatically be
saved and screen will return to test
groups for next test.
PAT400
Quick start guide
Class I test groups
Home screen
Class II test groups
Menu bar - Provides navigation
paths and menu options
Hot keys -
Quick access
to frequently
used test
groups, and
adding
assets
Test group
manager
Add
Power/extension leads
Portable RCD
Add asset
Change client
Change location
Bond lead null
Edit asset
Edit
Save
Delete
Find asset
Battery save power OFF
HOME screen
Escape
Copy last
asset
Re-run test
Save and print
label
View test
results
List test
groups
Print barcode
SETUP screen
Other icons
Adding TEST GROUPS
1) From
HOME
screen use right arrow to
select
SETUP
.
2) Press the
.
TEST GROUP
key.
3) Press
to
ADD
a
TEST GROUP
.
4) NAME:
enter
TEST GROUP
name and press
DOWN
arrow (max. 10 characters).
5) Description:
Enter a useful description to help
remember
TEST GROUP
type. Press
DOWN
arrow.
6) Select 230 V or 110 V depending on
asset supply voltage.
7) Select Class I, II or
EXT
(lead).
8) Check boxes:
Press
OK
to select each test required.
9) Press
to enter config’ limits page.
10) Change
PASS
limits, test type and
number of test cycles as required.
11) Press
to store new test group.
Pressing TEST button to start test
1) Press
TEST
button.
2) Add
ASSET ID
(this can be left until
after testing).
3) Press
to list the test groups available
4) Use
DOWN
arrow and
OK
to select
the group required.
5) Press
TEST
to initiate testing.
6) Follow screen instructions.
7) At end of testing press
to
SAVE
or press
to repeat test.
ABORTING A TEST
To abort a test during the test sequence
press
TEST
or
buttons.
Test will be displayed as an aborted test.
Adding ASSETS
1) From
HOME
screen press
to add a
new asset to database.
2) Enter
ASSET ID
and press
DOWN
arrow.
3) Press
OK
to select
TEST GROUP
from
drop down options and press
OK
.
4) Add additional data if required.
5) Press
to
ADD
asset to database.
Adding Clients/Locations
1) Select
CLIENT
from
SETUP
menu.
2) Press
to add new client.
3) Add client Name. Other fields are
optional.
Press
OK
to accept.
4) Press
to save client detail. Display
will jump to
ADD
locations.
5) Add location name. Other fields are
optional.
6) Press
to
SAVE
asset to database.
Current client/location automatically updates.
Note: Asset ID and optional additional data can be added before testing or after testing, as required.
Next page
Previous page
Repair code
pop-up box
activation
Copy last asset
(& increment
asset ID)
Login


