background image


28 

Properties 
Button


16.3  Downloading test results 


Preparing your MIT430 or MIT485 for “Bluetooth” Communications. 


“Megger Download Manager” software and a computer with “Bluetooth” capabilities are 
required to communicate with MIT430 and MIT485 instrument. Notes on installing these 
options are explained in the document “Additional Bluetooth Information” which can be 
found on the User CD. Run “Megger Download Manager” from the Windows start menu. 
Enable the Bluetooth function on your PC. Refer to your PC manual if necessary.  
 
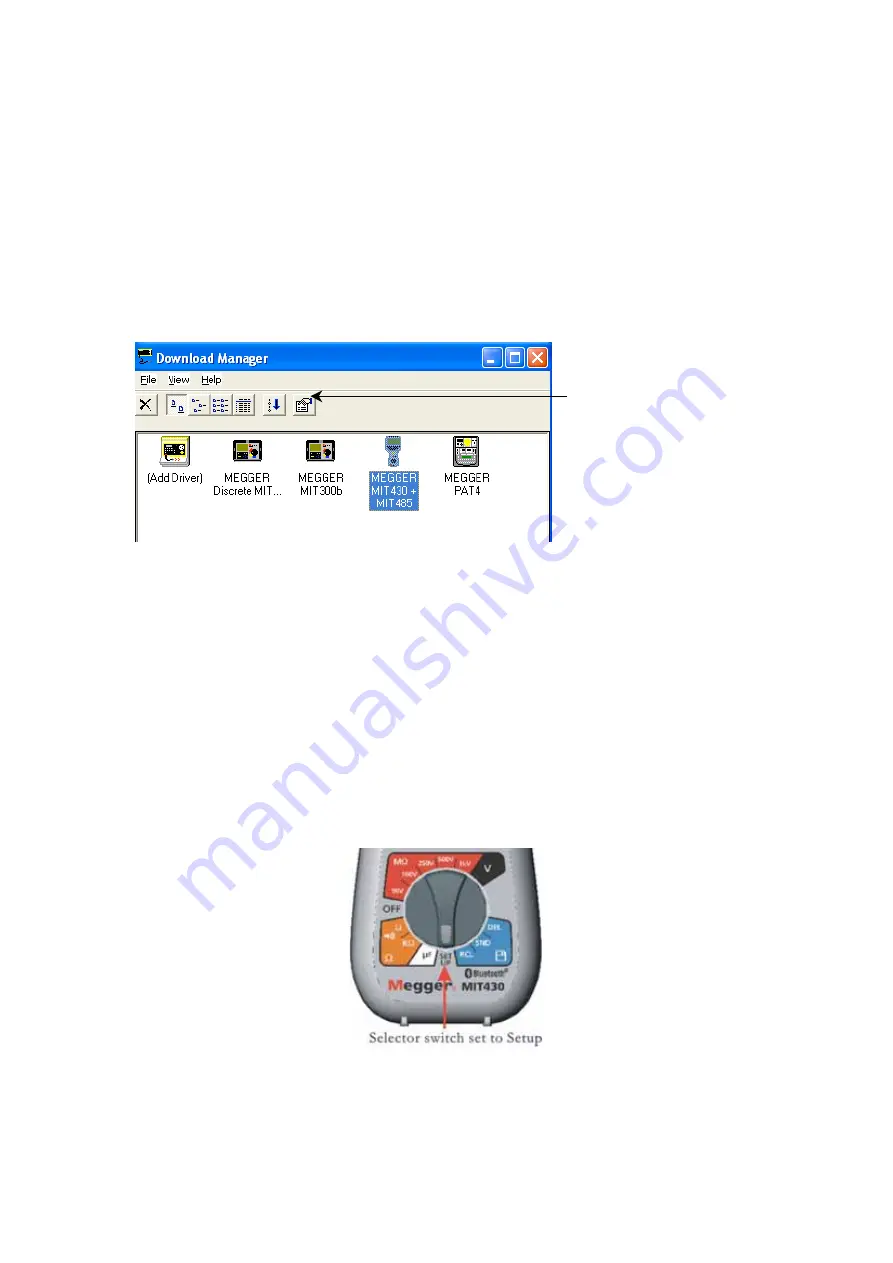
Select Megger “ MIT485” product by clicking the icon as shown. Load the 
properties screen by clicking the “Properties Button”.  


Click on the Bluetooth tab to display the current Bluetooth configuration. 
 
The preferred method is to Pair F

From  the MIT430 / MIT485 T

To  the PC.  As described in in 

detail below. Users familiar with “Bluetooth” devices may wish to “Pair “F

From the PC. In this 

case “Open” your “Bluetooth Manager”  usually located in the “Status Bar”. Switch your 
MIT430 / MIT485 to “SETUP” and follow the procedure for “Scan for new devices”. Once the 
MIT430 / MIT485 has been located Pair up using the Pin 1234. On IBM laptops use “Fn” with 
“F5” to access “Bluetooth Services”. 


Procedure for Pairing your MIT430 or MIT485 to your PC. 


1.


Switch the MIT430 / MIT485 Range Switch to the “Setup” position. 


2.


Scan for local “Bluetooth” computers. Press the yellow test button 5 times until the 
MIT430 / MIT485 displays ““b t ”  with three dashes or a 3 digit number.  

(The three dashes indicate that the instrument has not yet been paired with a p.c., 
otherwise the current paired Bluetooth device ID will be displayed). 

Содержание ME1000351

Страница 1: ...M MIT400 Series Insulation and continuity testers USER GUIDE...

Страница 2: ...ontinuity testing and buzzer 18 12 Resistance measurements k Range 19 13 Capacitance measurements 20 Capacitance measurement procedure 20 Distance measurement by capacitance 20 14 Setup options 21 15...

Страница 3: ...ty warnings and instructions before attempting to use the instruments This user guide describes the operation and functions of the MIT400 series of insulation and continuity test instruments These ins...

Страница 4: ...if any part of it is damaged 7 All test leads probes and crocodile clips must be in good order clean and with no broken or cracked insulation 8 Ensure that hands remain behind guards of probes clips...

Страница 5: ...e test lead probes also observe voltage discharges to a safe level On battery cover see section 2 0 notes 10 and 11 At terminals do not exceed rated input voltage Equipment protected throughout by Dou...

Страница 6: ...ce any delays in supporting you should the need arise 4 2 Case contents all instruments 1 x MIT400 series instrument 1 x Hard carry case 1 x Red black test lead set with clips 5 x AA LR6 batteries fit...

Страница 7: ...t the test leads prods and crocodile clips to confirm that their condition is good with no damaged or broken insulation 2 Check continuity of the test leads by firmly shorting the leads together and r...

Страница 8: ...test protecting your instrument from damage Note This limit is increased on MIT480 MIT481 and MIT485 to 75 V but a warning buzzer will indicate voltages above 50 V Use extreme care when using or measu...

Страница 9: ...ad null Insulation lock button Function buttons Battery internal fuse access panel at rear Result recall and transfer Insulation test ranges OFF positon Resistance ranges Capacitance F Insulation PI t...

Страница 10: ...e if a voltage greater than 25 V exists testing will be automatically inhibited and voltage measurement will be displayed 6 4 Backlight operation All instrument displays are backlit The backlight func...

Страница 11: ...te hands free testing and increases user safety 1 Connect the SP5 probe to the instrument using the special 3 pole ve socket in place of the RED test lead 2 Select a suitable insulation resistance ran...

Страница 12: ...ed 4 The measured voltage will be displayed on the main digital scale in units of V or mV as appropriate In TRMS mode the measured frequency Hz will be simultaneously displayed on the MIT410 MIT420 MI...

Страница 13: ...e instrument ON by rotating the selector switch to the desired test voltage 50 V 100 V 250 V 500 V or 1 kV 3 Press and hold the TEST button to start the test 4 The insulation resistance value in both...

Страница 14: ...igned t2 i e after 1 minute and 10 minutes PI 10 minute value 1 minute value c Dielectric Absorption Ratio DAR DAR is the ratio between the insulation resistance values at 30seconds assigned t1 and at...

Страница 15: ...ther 50 V 100 V 250 V 500 V or 1 kV 3 Select the timed test t by pressing PI DAR t function button repetitively until the desired function is displayed Note the test type defaults to insulation resist...

Страница 16: ...ne minute a test result is stored t1 After 10 minutes a second test result is stored t2 The resultant ratio is then displayed on the screen The same procedure applies for the D DAR timed tests however...

Страница 17: ...selected the actual voltage at the probe tip will be within the stated tolerance of 1 V The MIT40X is supplied with a default setting of 10 V This can be adjusted in the setup procedure between 10 V...

Страница 18: ...able disable the audible buzzer function When enabled the sounder symbol will be shown on the screen display The pass threshold is set to 2 by default but is adjustable as defined in Setup see section...

Страница 19: ...ements k Range Except MIT40X and MIT480 Test procedure refer to Figure 10 Figure 10 Resistance k range 1 Turn the instrument ON by rotating the selector switch to the desired k position 2 Connect the...

Страница 20: ...ds to the isolated conductors under test 3 Observe the test result displayed automatically 13 2 Distance measurement by capacitance 4 For the MIT481 and MIT485 instrument only cable length is also be...

Страница 21: ...m continuity short circuit current 200 mA 20 mA 200 mA default 200 mA All InS Sets low threshold for insulation test buzzer in Mohms Buzzer sounds is result is more than set value 0 5 M 0 5 1 2 5 10 2...

Страница 22: ...tion to be changed is displayed press and hold the TEST button to change the value Each subsequent press increments the limit Holding down the TEST button will automatically increment 4 Changing a val...

Страница 23: ...n of a particular measurement ensure the test result is displayed on the instrument display refer to Figure 13 Screen A The test result will remain displayed for one minute during which time the resul...

Страница 24: ...ss OK to select 4 The test result will be displayed Additional information stored with the test result may be viewed using the relevant button For example on insulation test A can be recalled using th...

Страница 25: ...ed 2 Locate the particular test result identification number by using the and buttons then press OK to select 3 The test result will be displayed To scroll through the different measurements used in c...

Страница 26: ...g the selector switch to the delete DEL position 2 The latest test result will be displayed Where no results have previously been stored the display will indicate this by three dashes 3 Press OK to de...

Страница 27: ...lay will indicate this by three dashes 2 Press next button Note that the display now indicates ALL 3 Press OK to delete all the test results Note the progress bar decays as the contents of memory are...

Страница 28: ...Bluetooth configuration The preferred method is to Pair F From the MIT430 MIT485 T To the PC As described in in detail below Users familiar with Bluetooth devices may wish to Pair F From the PC In thi...

Страница 29: ...ay The partial address of the last detected device will be shown on the auxiliary display 4 Use the keys to scroll round and locate the address that matches the required one shown on Download manager...

Страница 30: ...ay also need to accept other message prompts that may be displayed as part of this setup sequence If you get a message bubble or prompt asking you to accept a serial port connection then click and acc...

Страница 31: ...he Megger MIT430 MIT485 icon c Click on the download button d Switch the instrument to the SND position to initiate the communications port and start the download The download may take a few seconds t...

Страница 32: ...f the test leads are connected 2 Switch off the instrument and disconnect the instrument from any electrical circuits 3 To avoid the possibility of electric shock do not press the test button or touch...

Страница 33: ...t not be opened if test leads are connected Follow the same procedure as for battery replacement A replacement fuse m must be of the correct type and rating i e 500 mA FF H B C 50 kA min 1000 V 32mm x...

Страница 34: ...current 2 mA 0 50 Terminal voltage 0 20 1 V Ii 1 mA Test current on load 1 mA at min pass value of insulation specified in BS7671 HD384 and IEC364 EN61152 2 2 mA max EN61557 operating range 0 10 M to...

Страница 35: ...1 digit 100Hz to 400Hz Capacitance measurement MIT420 MIT430 MIT481 and MIT485 Measurement range 100 pF to 10 F Accuracy 5 0 2 digits Distance by capacitance MIT420 MIT430 MIT481 MIT485 Arithmetic con...

Страница 36: ...cts Temperature coefficient 0 1 per C up to 1 G 0 1 per C per G above 1 G Environmental Operating range 20 C to 55 C Operating humidity 95 RH at 0 C to 35 C 70 RH 35 C to 55 C Storage temperature rang...

Страница 37: ...02 Instrument case 5410 420 Additional in MIT430 and MIT485 Download Manager CD 6111 442 Optional accessories and replacements Fused 2 wire test lead set and crocodile clips 6220 789 Bluetooth Module...

Отзывы: