Mega 105WR Скачать руководство пользователя страница 23


Mega 105WR ADSL2+  Router - Easy Start Guide 


22

Chapter 6 – Router Setup Utility – MAC OS  

(For Mac® OS 10.2 & above only) 


6.1  Running the setup utility  


Power on your computer to start Mac OS X (V10.2 & above).   


Place the 

Installation CD 

into your CD-ROM Drive. 


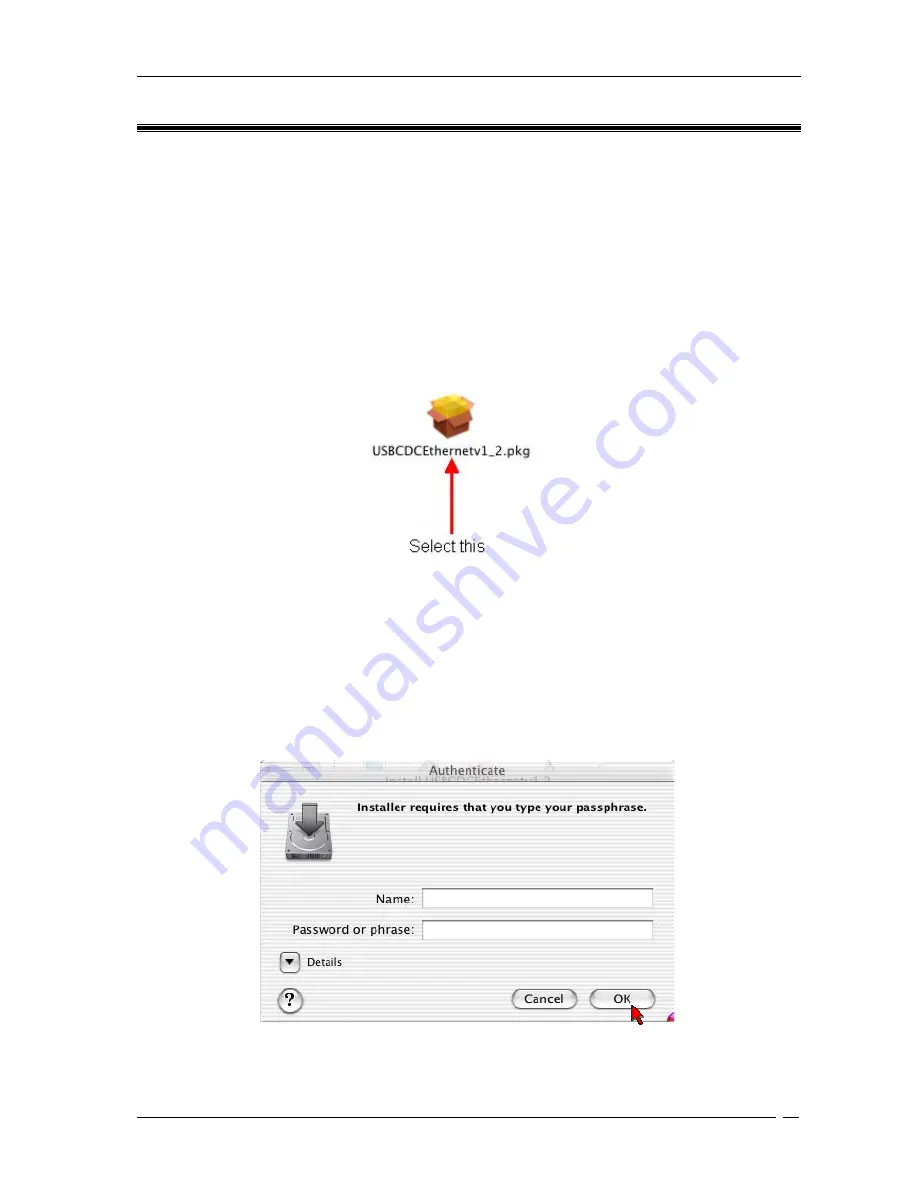
Access to the CD-ROM drive and double-click on 

Mac

 folder. Select 

USBCDCEthernetv1_2.pkg 

file and open, as shown in 

Fig 6-1

Figure 6-1 : Installation from Location 


 A  Macintosh® Administrator authentication window (Figure 6-2) will be shown. Enter 
your administrator login Name and Password or phrase. Click on OK to proceed.  


Figure 6-2 : Authentication 


Содержание 105WR

Страница 1: ...Mega 105WR ADSL 2 Router Easy Start...

Страница 2: ...USB port or IEEE 802 11b g Wireless adapter The Ethernet ports have the Auto MDI MDIX feature which allows both cross and straight UTP cable to be utilized The Mega 105WR has an in built IEEE802 11g W...

Страница 3: ...in the items shown in Figure 1 1 For any missing items please contact the sales outlet from which you purchased this router immediately Wireless Router Quick Start guide Utility CD Cat 5 Ethernet Stra...

Страница 4: ...L is transmitting receiving data 3 Wireless Flickers when the Wireless LAN is operational 4 USB Lights up when the USB cable is properly connected from your Router to the USB port Light is Off when th...

Страница 5: ...SB port if required 3 RESET To reset the ADSL Router simply press the reset button for at least 10 seconds all customised settings that you have saved will be lost 4 ETHERNET E1 E4 10 100 Base T Auto...

Страница 6: ...ou may however connect any of the Ethernet ports to an Ethernet hub or switch Many more computers and other Ethernet devices may then be connected to the router Figure 1 4 Typical device conectivity N...

Страница 7: ...s configured if necessary Web browser is configured for connection if necessary Mega 105WR is configured for internet connection Your Telkom internet account is verified The easiest way to configure y...

Страница 8: ...es the same telephone line please connect it as shown in Figure 3 2 Together with a telephone Please connect as per Figure 3 3 if you have a single telephone outlet or Figure 3 4 if you have a twin te...

Страница 9: ...uter Easy Start Guide 8 Figure 3 2 Connecting a telephone to the same telephone line Figure3 3 Connecting the router together with a telephone to a single telephone outlet using splitter line doubler...

Страница 10: ...ptor This is connected to the Router as shown in Figure 3 5 The 3 pin mains plug on the other end of the power adapter is to be plugged into the mains outlet Figure 3 5 Connecting the power adapter to...

Страница 11: ...cessary NOTE Do EITHER section 4 1 OR section 4 2 as needed not both 4 1 Connecting the computer using a Ethernet connection You can connect up to four Ethernet devices to your Mega 105WR These device...

Страница 12: ...omputer s USB port This is the same type of port that printers webcams and other accessories are often connected to Please connect your router to your computer using a USB cable as shown in Figure 4 3...

Страница 13: ...ter Easy Start Guide 12 Figure 4 4 Installation utility installing drivers 4 3 Powering ON Make sure that the power outlet that your router s power adaptor is connected to is turned ON Turn your Route...

Страница 14: ...Utility Insert the Setup Utility CD into the CD ROM drive The utility will auto run and the screen as shown below will appear Note If it does not auto run access the CD ROM drive and execute Setup exe...

Страница 15: ...ou should now return to chapter 4 and do sections 4 1 and 4 3 only You can then click on Continue OR If you are using a USB connection click on Continue without plugging in any cables Figure 5 2 Impor...

Страница 16: ...ce it detects that the cable is correctly plugged in and the router has been switched on The Installation utility will now begin to check your router and DSL connection You will see the screen shown i...

Страница 17: ...ot proceed with this verification your ADSL connection will not work until you do so You only need to do this verification once so if you have done a factory default reset and are running the setup ut...

Страница 18: ...Mega 105WR ADSL2 Router Easy Start Guide 17 Figure 5 5 Verify ADSL account...

Страница 19: ...eed You will now be able to set up your Mega 105WR s wireless access point using the screen shown in Figure 5 7 The Wi Fi encryption is set to WPA with a unique key and is enabled by default Your uniq...

Страница 20: ...o the internet using your account details While it is doing this the screen in Figure 5 8 will be shown If the router is unable to connect the most likely cause will be that your username or password...

Страница 21: ...of Settings NOTE Keep the Setup Utility CD safely for future use A final confirmation that the installation utility has successfully run Figure 5 10 will be displayed Should you wish to browse the in...

Страница 22: ...21 Figure 5 10 Successful Connection If you have trouble connecting your router to the Internet at any time click Diagnostics on the Welcome screen Fig 5 1 to troubleshoot For more information click V...

Страница 23: ...Place the Installation CD into your CD ROM Drive Access to the CD ROM drive and double click on Mac folder Select USBCDCEthernetv1_2 pkg file and open as shown in Fig 6 1 Figure 6 1 Installation from...

Страница 24: ...the screen shown in Figure 6 3 click Continue to proceed with the installation Figure 6 3 Installation program On the screen shown in Figure 6 4 select a destination disk to install the software Clic...

Страница 25: ...n shown in Figure 6 5 to perform the installation Figure 6 5 Easy Install The system will prompt you to restart your computer when installation is completed On the screen shown in Figure 6 6 click Con...

Страница 26: ...Restart to finish installing the software Figure 6 7 Software installed successfully The system will reboot Select System Preferences from the dock Select Network as shown in Figure 6 8 to choose the...

Страница 27: ...Easy Start Guide 26 Select Ethernet Adaptor enXX as your adaptor under Show option Your IP Address subnet mask router IP should appear as shown in Figure 6 9 Figure 6 9 Network settings You should no...

Страница 28: ...y for Windows Xp X64 It may also be followed when setting up the USB drivers on a windows XP x64 computer without using the installation utility Figure 7 1 Found New Hardware Wizard Upon plugging in y...

Страница 29: ...ck Next Figure 7 3 Installation in progress Figure 7 3 shows the USB driver is being installed Please wait for this to finish You may be prompted with a Hardware Installation dialog box Figure 7 4 Thi...

Страница 30: ...nstallation of USB driver is complete click Finish Figure 7 5 Installation Complete If you were directed to follow this chapter by chapter 4 you will now need to return to chapter 4 to continue with t...

Страница 31: ...Browser 2 From the Menu click Tools and select Internet Options 3 Select the Connections tab Click the field Never dial a connection This option will be grayed off if you have not installed an analog...

Страница 32: ...Enter See Fig 9 1 Figure 9 1 Logging In Once connected the router will request you to enter your username and password Figure 9 2 The default username is admin and the default password is admin Click...

Страница 33: ...the Username and Password that your ISP provided Please do not change VPI VCI or PPPoE setings unless your ISP has requested this Click on Next to continue Figure 9 4 shows the screen that is provide...

Страница 34: ...he SSID This will provide additional security to your Wi Fi port Click on Next to continue Figure 9 5 Wireless LAN Configuration The next screen Figure 9 6 will require you to change your router login...

Страница 35: ...the setup Figure 9 7 Summary Your information will be saved and the progress bar shown in Figure 9 8 will be displayed to indicate connecting process to the Internet Figure 9 8 Connecting To ISP Upon...

Страница 36: ...d is enabled by default with WPA encryption see router s base for default key Should you wish to disable Wi Fi or change the key you will need to do this manualy by selecting the wireless tab on Figur...

Отзывы: