background image

12

carE anD clEanInG

ALWAYS unplug the coffee maker and let it cool down before cleaning.

1.  Use  a  clean,  damp  cloth  to  clean  all 

outside surfaces of the coffee maker. 

Do not use harsh abrasives to clean.

2.  Use a clean, damp cloth to clean the 

K-cup® Holder

,  being  very  careful 

not to come into contact with the sharp 

stainless steel Piercing Tip as this can 

cause bodily injury.

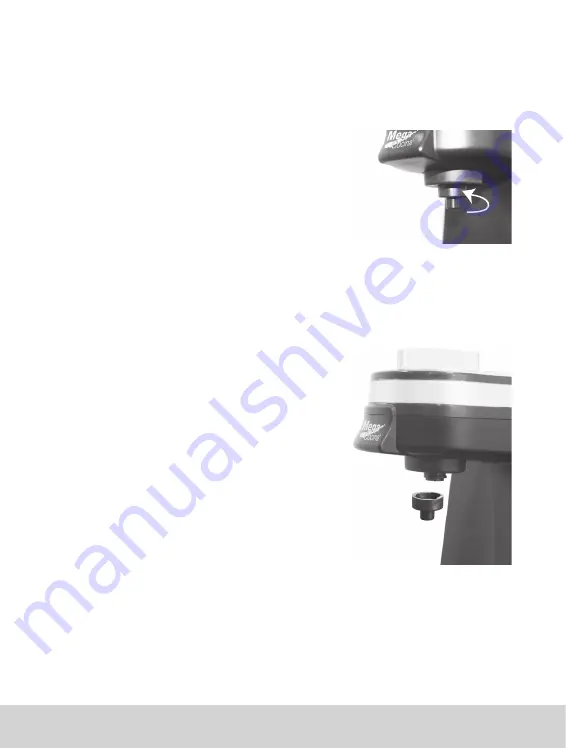
3.  Clean the 

coffee outlet

 by pulling it off. Rinse it periodically (see 

Pic. 2 & 3). Pay attention to the sealing ring around the 

coffee 

outlet

, and do not forget to clean it, also.

4.  Lift the stainless steel 

Drip tray cover


off the 

Drip tray

. Remove the plastic 

Drip tray

  from  the  coffee  maker  by 

pulling  it  until  it  comes  loose.  Wash 

both the 

Drip tray

 and the 

Drip tray 

cover

 with mild soap and water.

5.  Mineral  content  in  water  varies  from 

place  to  place.  Depending  on  the


mineral content of the water in your area, 

calcium deposits or scale may build up 

in your coffee maker. Scale is non-toxic, 

but it can hinder the performance of your 

coffee  maker.  De-scaling  your  coffee 

maker helps maintain in good condition 

the parts of the coffee maker that come in contact with water. To 

clean/remove scaling from the inside of the coffee maker:

a.  Fill  the 

Water tank

  with  360ml/12oz  of  a  cleaning  solution 

composed  of  water  and  household  scale  remover  (4  parts


water to 1 part scale remover). Then close the 

lid assembly

Pic. 2

Pic. 3

Содержание K-CUP MCHKEKCB

Страница 1: ...f it still fails to fit contact a qualified electrician Do NOT attempt to defeat this safety feature ESTE APARATO ES PARA USO DOM STICO UNICAMENTE PARA TOMACORRIENTES DE 120V Para reducir el riesgo de...

Страница 2: ......

Страница 3: ...SAFEGUARDS 5 Special Cord Instructions 7 PRODUCT SPECIFICATIONS FEATURES AND DESCRIPTION OF COFFEE MAKER 8 9 INTRODUCTION 10 OPERATING INSTRUCTIONS 10 11 CARE AND CLEANING 12 13 STORAGE 13 TROUBLESHOO...

Страница 4: ......

Страница 5: ...liance with a damaged cord or plug or if the appliance malfunctions or has been damaged in any way 6 The use of accessory attachments not recommended by the manufacturer may cause hazards or injuries...

Страница 6: ...een used for a long period of time clean the water tank prior to use by brewing water only CAUTION There is a sharp Plastic Piercing Tip that punctures the K Cup on the underneath side of the Lid Asse...

Страница 7: ...n extension cord may be purchased and used if care is exercised in its use 3 If an extension cord is used the marked electrical rating of the extension cord must be the same as that of the appliance T...

Страница 8: ...ight 7 5 Depth 110mm Width 251mm Height 191mm Depth Net Weight 2 2 LB 1 0Kg Safety Compliance UL FEATURES A Locking Mechanism B Lid Assembly C Coffee Outlet D Power On Off Button E Drip Tray Cover F D...

Страница 9: ...9 C A B K D G H J I F E E F...

Страница 10: ...the Lid Assembly to open 2 Measure the amount of water you want to use to brew your coffee The water amount should not exceed the maximum of 360ml 12oz and should be no less than 150ml 5oz Pour water...

Страница 11: ...or light on the Power Button flashes during the heating process and continues until brewing is finished 7 The coffee maker shuts off automatically after brewing is finished 8 Tostopbrewingatanytime pr...

Страница 12: ...the Drip Tray Remove the plastic Drip Tray from the coffee maker by pulling it until it comes loose Wash both the Drip Tray and the Drip Tray Cover with mild soap and water 5 Mineral content in water...

Страница 13: ...he Water Tank and then press the Power Button to start the rinsing process c Repeat Step B to remove any remaining unpleasant taste if necessary 6 Take care in cleaning the Plastic and Stainless Steel...

Страница 14: ...y result Pour at least 150ml 5oz of water in the Water Tank and cool the coffee maker up to 2 minutes before pressing the Power Button again to resume brewing c The indicator light will keep flashing...

Страница 15: ...OES NOT cover the following a Improper use such as improper installation or not using the coffee maker according to the instructions b Appliance has been disassembled c Damage by natural causes d Wear...

Страница 16: ......

Страница 17: ...UCCIONES ESPECIALES DEL CORD N EL CTRICO 21 ESPECIFICACIONES DEL PRODUCTO Y DESCRIPCI N DE LA CAFETERA 22 23 INTRODUCCI N 24 INSTRUCCIONES DE USO 24 25 LIMPIEZA Y MANTENIMIENTO 26 ALMACENAMIENTO 27 SO...

Страница 18: ......

Страница 19: ...n un cord n o enchufe da ado despu s de que el aparato haya fallado o si se cae al suelo o se da a de cualquier otra manera 6 El uso de accesorios no recomendados o vendidos por el fabricante del apar...

Страница 20: ...usada por un per odo largo de tiempo limpie el tanque de agua antes de usar colando agua solamente PRECAUCI N Hay una punta afilada de pl stico que perfora el K Cup en la parte inferior del Ensamblaj...

Страница 21: ...CON UN CABLE M S LARGO 2 Puede utilizar cables de extensi n si se observan las precauciones adecuadas 3 Si se usa un cable de extensi n la capacidad nominal el ctrica del cable de extensi n debe ser...

Страница 22: ...o Peso Neto 2 2LB 1 0Kg Cumplimiento de Seguridad UL CARACTER STICAS A Mecanismo de Abrir Cerrar B Ensamblaje de la Tapa C Salida de Caf D Bot n de Encender Apagar E Cubierta de Bandeja de Goteo F Ban...

Страница 23: ...23 C A B K D G H J I F E E F...

Страница 24: ...laje de la Tapa se abrir 2 Mida la cantidad de agua que desee usar para colar sucaf Lacantidaddeagua no debe sobrepasar el m ximode360ml 12ozyno debe ser menos de 150ml 5oz Deposite el agua en el Tanq...

Страница 25: ...necer parpadeando durante el proceso de calentamiento y continuar hasta que la colada haya terminado 7 La cafetera se apagar autom ticamente luego de que la colada haya terminado 8 Para detener la fun...

Страница 26: ...e olvide de limpiar el anillo sellador de goma alrededor de la Salida de Caf 4 Levante la Cubierta de la Bandeja de Goteo de acero inoxidable de la Bandeja de Goteo Remueva la Bandeja de Goteo de pl s...

Страница 27: ...ar para descalcificar la cafetera b Cuando el ciclo de colar termine vac e y enjuague la taza Luego de terminar el Paso A deposite alrededor de 360ml 12oz de agua solamente en el Tanque de Agua y pres...

Страница 28: ...la temperatura alta Deposite por lo menos 150ml 5oz de agua en el Tanque de agua y deje que la cafetera se enfr e hasta 2 minutos antes de oprimir el Bot n de Encender Apagar para comenzar de nuevo l...

Страница 29: ...ses La garant a no cubre lo siguiente a Uso inapropiado tal como instalaci n inapropiada o no usando la cafetera de acuerdo a las instrucciones b La cafetera ha sido desarmada c Da os por causas natur...

Страница 30: ......

Страница 31: ...gistered trademark of Rowland Coffee Roasters Incorporated Caf Bustelo es una marca registrada de Rowland Coffee Roasters Incorporated Mega and MegaCocina are registered tradmarks of Megatrade Interna...

Отзывы: