22
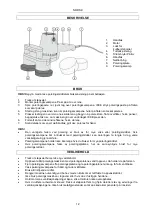
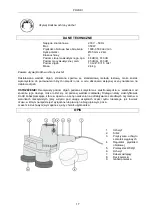
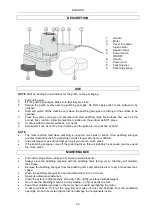
DESCRIPTION
1.
Handle
2.
Motor
3.
Cover for carbon
brush holder
4.
Speed control
5.
Power switch
ON/OFF
6.
Handle
7.
Power cord
8.
Polishing disc
9.
Polishing sponge
USE
NOTE:
Start by reading the instructions for the polish on the packaging.
1.
Pull out the plug.
2.
Fit the polishing sponges. Make sure that they are clean.
3.
Spread the polish evenly over the polishing sponges. Do NOT apply polish to the surface to be
polished.
4.
Start and switch off the machine only when the polishing sponges are resting on the surface to be
polished.
5.
Place the power cord over one shoulder and start polishing large flat surfaces first, such as the
bonnet, boot, roof etc. Allow the machine to glide over the surface, do NOT press.
6.
Continue with the smaller surfaces, e.g. doors.
7.
Small parts, such as mirrors, door handles and the grille etc. are polished by hand.
NOTE:
The most common fault when polishing is using too much wax or polish. If the polishing sponges
are drenched with polish, the polishing can take longer and be more difficult.
The polishing sponges will not last as long if you use too much polish.
If the polishing sponges come off the polishing discs, this will probably be because you have used
too much polish.
MAINTENANCE
Pull out the plug before carrying out service and maintenance.
Always store the polishing machine with the polishing discs facing up, so that they will maintain
their shape.
Remove the polishing sponges from the polishing discs and allow the discs to dry and resume their
shape.
Wash the polishing sponges by hand and allow them to dry in the air.
Never use abrasive substances.
Clean the exterior of the machine with a dry cloth, lightly moistened with detergent.
Do not use the polishing machine in rainy weather, or if your hands are wet.
Keep the ventilation openings on the motor open to avoid overheating the motor.
In dusty conditions: Pull out the plug first and poke off dust and deposits from the ventilation
openings. Do not use metal objects that can damage the components inside.
Содержание 010-005
Страница 24: ......


